How to Prepare Soil for Planting: A Complete Guide
Learn how to prepare soil for planting with our step-by-step guide. We cover soil testing, amending, tilling vs. no-dig, and creating the perfect garden bed.
You've got the plants picked out. The bed is marked. Maybe you even have a garden plan sitting on your phone or scribbled on a notepad. Then you push a shovel into the ground and hit the actual project: compacted dirt, roots, clods, maybe a slick patch of clay or a tired strip of lifeless soil that's grown weeds better than flowers.
That's where most gardens succeed or stall.
Good planting starts below the surface. Seedlings can't outrun bad drainage. Shrubs won't thrive in hardpan. Vegetables can't make use of nutrients if the root zone is dense, waterlogged, or chemically out of balance. If you want to know how to prepare soil for planting, the answer isn't just “add compost” or “till it up.” It's matching the prep to the soil you have.
Why Great Gardens Start with Great Soil
A new gardener usually blames the plant. An experienced gardener blames the bed first.
I've seen beautiful garden plans go into the ground and fail for one simple reason: the soil never gave roots a fair shot. The layout was fine. The plant choices were fine. The ground underneath was the problem. It held too much water, shed too much water, or stayed so tight that roots barely moved.
That's why soil preparation isn't the boring part before gardening starts. It is gardening itself.
If you're staring at a patch of rough ground and wondering whether it needs digging, compost, fertilizer, or just time, you're asking the right question. In places with tough native ground, local advice can help sharpen your approach. This guide on Peoria AZ soil improvement for gardens is a good example of how regional conditions change what works.
A smart garden also starts with a smart layout. If you're still deciding where beds, paths, and planting zones should go, this guide on planning a garden layout helps you avoid building the right soil in the wrong place.
Great gardens don't come from feeding plants harder. They come from building a root zone that works.
The good news is that soil can be improved. Bad soil isn't a permanent sentence. But different problems need different fixes. Some beds need testing before anything else. Some need deep loosening. Others need less disturbance, not more. And some should never be worked on the day you feel most motivated, because the ground is still too wet and you'll do more harm than good.
Become a Soil Detective with Testing and Analysis
A bed can look hungry when the problem is pH. It can look dry when compaction is slowing root growth. It can even look “fertilizer deficient” when nutrients are already present but tied up in the soil. That is why I test before I buy anything.
New Mexico State University Extension explains that soil analysis is used to guide fertilizer recommendations and check fertility status, and notes that many garden crops perform best in a pH range of 5.8 to 6.8 in their soil testing guidance. That's the practical reason testing matters: it replaces guessing with a plan.
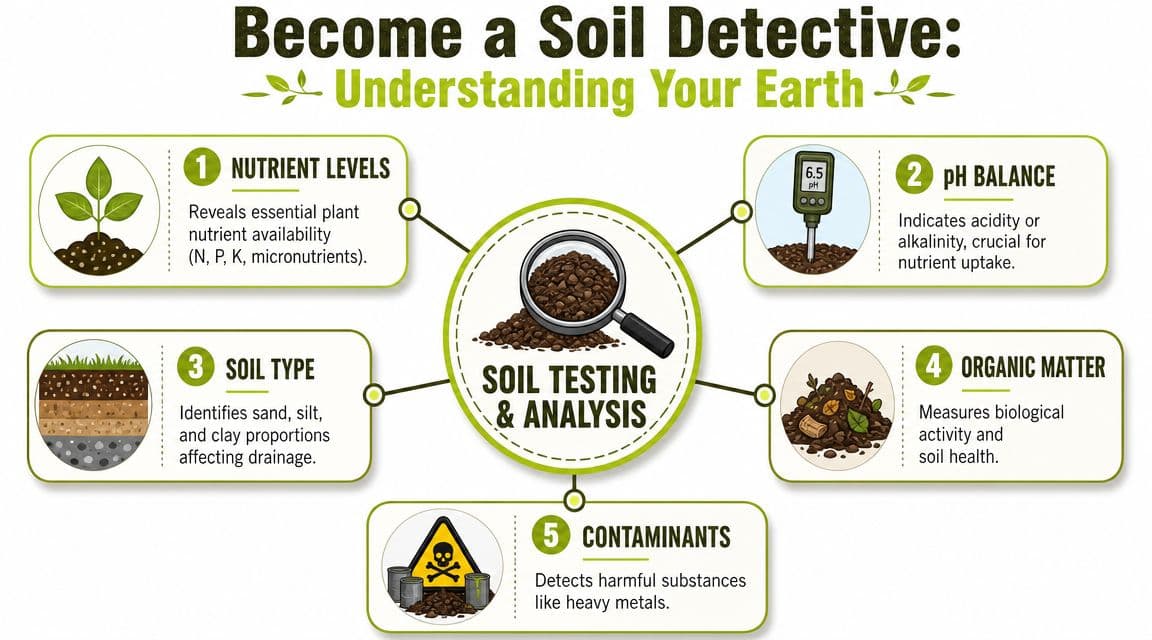
What a soil test actually gives you
A good test answers the questions that shape every later choice, including whether tilling will help or whether a no-dig approach makes more sense.
- pH: If pH is off, plants struggle to use nutrients already in the ground.
- Nutrient levels: You can see what is low, what is adequate, and what should be left alone.
- Amendment priorities: The report points you toward fertilizer, compost, lime, sulfur, or no correction at all.
- A cleaner starting point for planning: If you are mapping beds and deciding where vegetables, flowers, or lawn will go, a free online garden planner works better when you already know what each area needs.
That last point saves money. It also saves labor. There is no sense tilling in fertilizer or pH products blindly, then finding out the bed mainly needed organic matter and better drainage.
How to take a sample that is worth testing
Bad samples give bad recommendations.
Take small samples from several spots in the bed, mix them in a clean bucket, and send in the combined sample. Skip unusual patches, such as the place where a burn pile sat, where pets regularly go, or where one shrub has been heavily fertilized for years. Sample the root zone, not just the dry crust on top, especially if you are preparing a new garden bed from scratch.
For home gardeners, that simple extra effort is the difference between a report you can use and one that sends you chasing the wrong fix.
Practical rule: Spend money on a test before you spend money on products.
How to read the report like someone who has to work the soil
Start with pH, because it affects everything else. Then look at nutrient levels. Then look at organic matter, if your lab includes it.
Here is the trade-off many DIY gardeners miss. If the test shows a nutrient shortage, fertilizer can address that fast, but fertilizer will not improve a tight clay bed or a sandy bed that dries out too quickly. If organic matter is low, compost usually gives broader benefits over time, especially if you are deciding between digging everything in now or building the soil gradually with a no-dig system.
This is also where project type matters. A lawn renovation has different priorities than a tomato bed or a shrub border. For turf areas, Richmond Tree Experts' guide to lawn soil is a useful comparison because lawn soil preparation often puts more weight on surface grading, drainage, and consistent rooting depth than a mixed planting bed does.
The old habit was to read the leaves, guess the problem, and throw something at it. Testing is slower for a week and faster for the next five years.
The Gardener's Toolkit for Amending Soil
Once the test tells you what's missing, you can stop buying random bags and start fixing the actual problem.

What each amendment is for
Compost is the workhorse. It improves texture, helps with moisture management, and adds slow-building fertility. If I could choose only one amendment for most home beds, it would be compost.
Fertilizer is different. It's for supplying nutrients, not fixing structure. That's why fertilizer alone rarely solves a bed that stays hard, sticky, or droughty. It can feed a plant, but it can't create crumbly soil by itself.
Lime and sulfur belong in the “only when needed” category. If the test says pH correction is needed, use the product that addresses that issue. If there's no pH problem, don't apply either one casually.
A measured approach for ornamental beds
For grouped ornamentals, the University of Georgia Extension recommends deep tilling to 12 to 15 inches and incorporating about 1 pound of an 8-8-8 or 10-10-10 fertilizer per 100 square feet, but only if the soil test shows a need, according to their planting procedures document. The same guidance recommends 40 pounds of bagged organic amendments per 100 square feet mixed into the top 6 to 8 inches.
That's a useful example because it shows two important realities. First, deeper preparation makes sense for some beds. Second, even specific fertilizer rates still depend on the test.
If you're also trying to improve turf areas, this Richmond Tree Experts' guide to lawn soil is a helpful companion because lawn soil prep follows a different logic than a flower or vegetable bed.
How to apply amendments so roots can use them
Topdressing has its place, but when you're building a new bed, roots need those materials in the root zone. That means incorporation, not a decorative layer sitting on top.
A simple planning sketch helps here, especially if you're balancing ornamentals, edibles, and lawn transitions. This online garden planner can help you map where intensive soil work is worth the effort and where lighter prep makes more sense.
Here's the mistake I see most often. People add good material, then leave it too shallow or too patchy. A bed with one rich pocket and one dense pocket won't grow evenly.
This walkthrough is a useful visual reference before you start mixing materials into the soil:
Apply fertilizer and pH amendments as if they're medicine, not mulch. The right amount helps. The wrong amount creates a new problem.
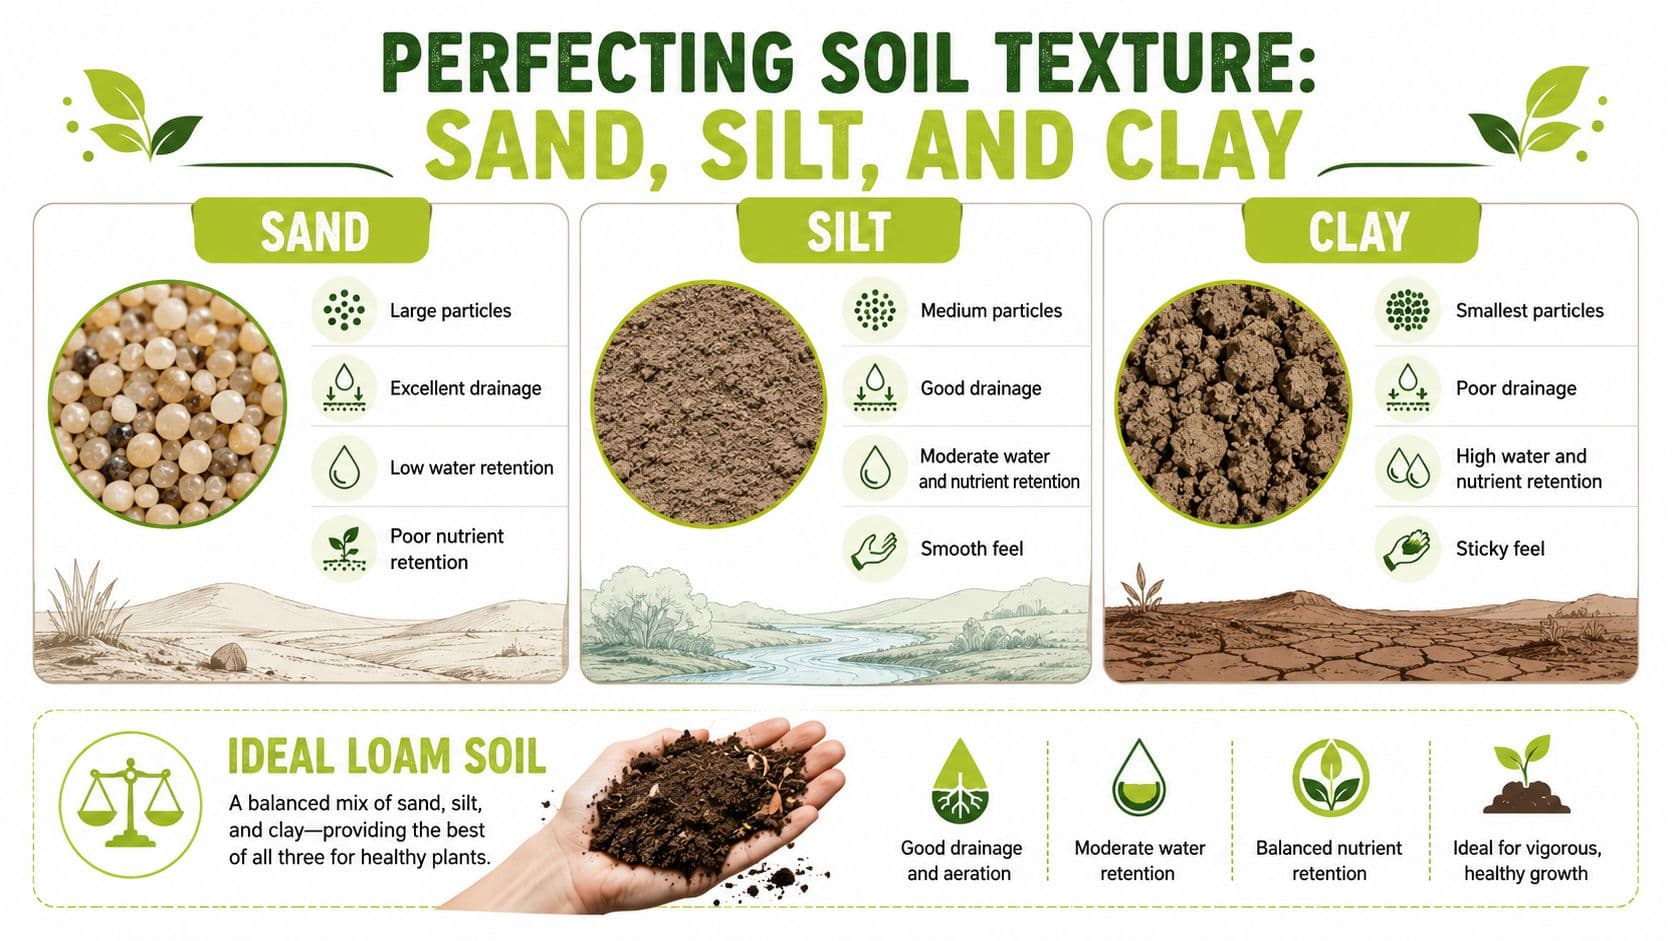
From Concrete to Crumbly by Perfecting Soil Texture
You can plant into a bed that looks dark and finished on top, then wonder why seedlings stall, roots curl, and water either vanishes or sits there. The problem is usually texture in the root zone, not the surface.
Soil texture is the balance of sand, silt, and clay. Sand has large particles and wide spaces between them, so water drains fast and nutrients wash through. Clay has tiny particles that pack tight, so roots face resistance and oxygen runs short after rain. Silt lands in the middle and can be workable, but it still needs structure to stay open.
Why organic matter fixes more than one problem
Organic matter improves texture because it changes how soil behaves, not just how it looks.
In sandy soil, compost slows water loss and gives nutrients more places to cling. In clay, it creates more pore space so water can move and roots can push farther. Those are different problems, but the same amendment helps both. That is why compost shows up in almost every good soil recipe.
There is a trade-off, though. Compost improves structure over time. It does not turn bad soil into perfect loam in one weekend. Clay still needs patience, and sand still needs repeated additions if you want steady moisture.
Texture fixes that actually help
Match the fix to the failure.
- Heavy clay: Loosen it while conditions are slightly moist, not wet. Wet clay smears and dries into clods. Add compost regularly, and mix it through the root zone if you are building a new bed. If the clay is extreme, a first-round blend that includes coarse mineral material and organic matter can help open it up, as noted earlier.
- Light sandy soil: Skip the urge to compact it into submission. That only trades fast drainage for hard ground. Add compost, mulch the surface, and expect to build moisture-holding capacity in layers over more than one season.
- Mixed or decent garden soil: Improve it gently. Good structure is easy to damage by overworking, especially if you keep chopping it finer every time you plant.
One practical rule has saved me a lot of trouble. If a squeezed handful forms a slick ribbon, treat it like clay. If it falls apart before you can close your hand, treat it like sand. That quick test is not scientific, but it tells you which mistake to avoid.
Depth matters more than surface fluff
Roots do not live in the top inch alone. A bed can look soft on top and still be dense underneath, which leads to weak growth and uneven watering.
Work on the depth your plants will require. Shallow-rooted greens forgive more. Tomatoes, peppers, shrubs, and many perennials do not. This is also where the tilling versus no-dig choice starts to matter in real life. If you are opening compacted ground for the first time, deeper correction often makes sense. If the bed already has good structure, piling on organic matter and protecting the surface usually preserves that crumbly texture better.
Crumbly soil is not a cosmetic goal. It is what lets water enter, air stay available, and roots keep growing instead of stopping at a hard layer.
Tilling vs No-Dig Which Preparation Method Is Right for You
You clear a patch, spread compost, and stand there with a fork in one hand and a tiller rental page open on your phone. That choice affects more than today's labor. It shapes drainage, weed pressure, and how much work this bed will demand next season.
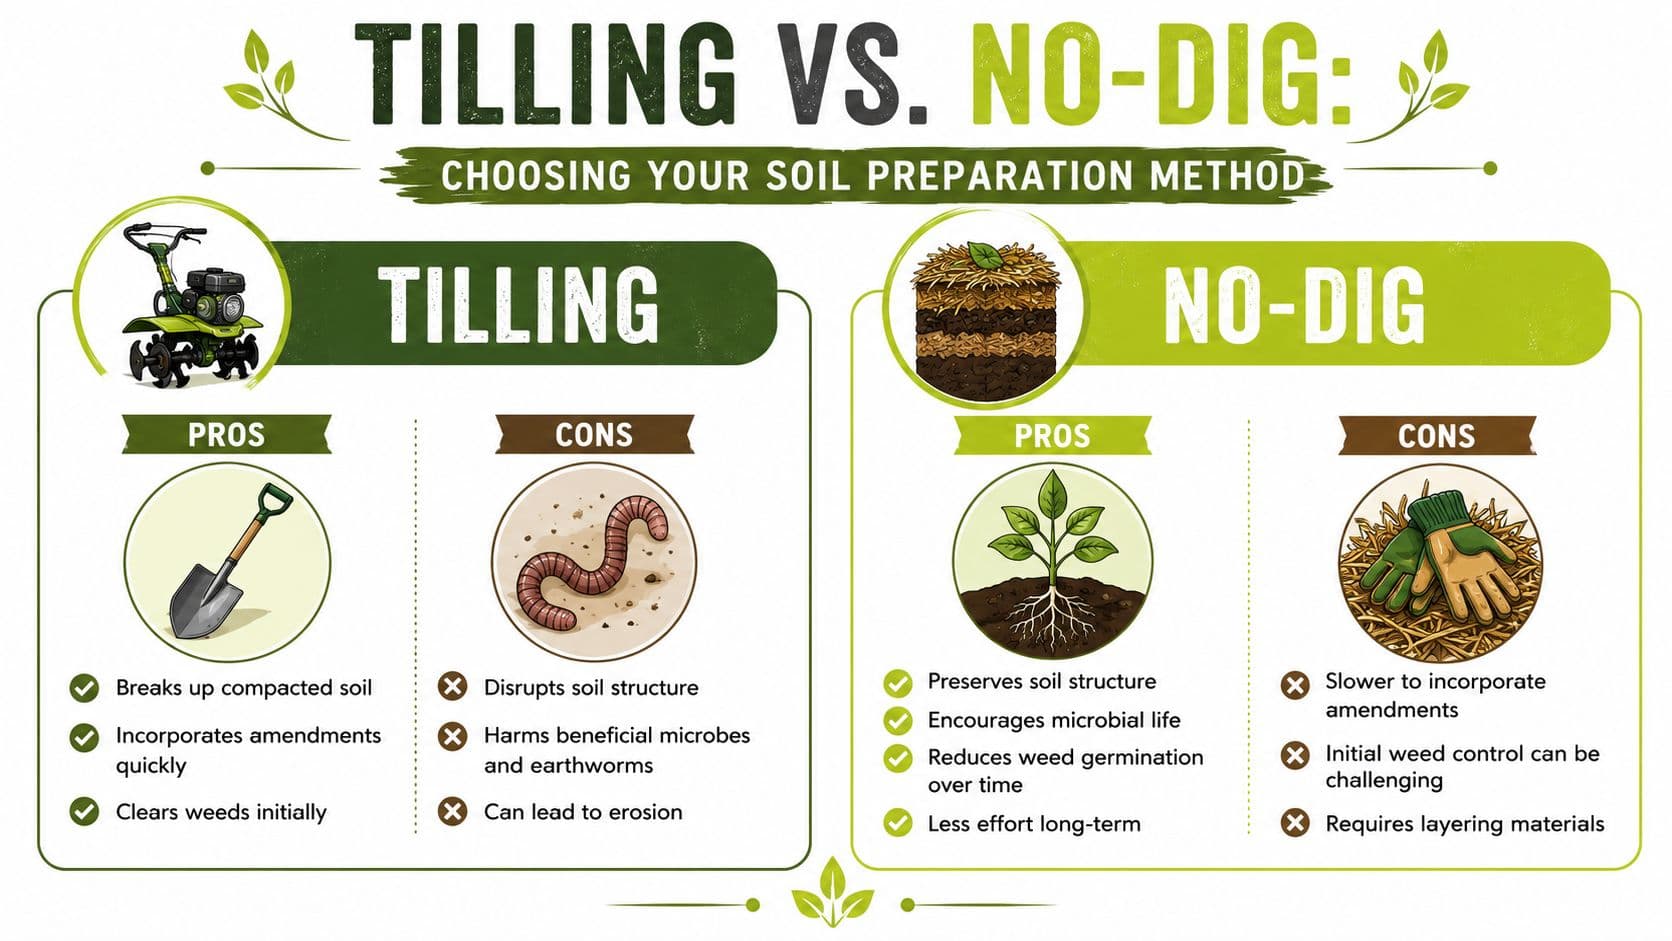
When tilling earns its keep
Tilling is a tool, not a belief system. I use it for first-time bed creation, stubborn compaction, and sites where amendments need to be worked through the root zone instead of sitting on the surface.
On raw ground, tilling can save a season. It opens hard soil, breaks up old turf, and gives roots a usable starting depth faster than surface mulching alone. That matters for hungry crops like tomatoes, squash, and corn, which struggle in shallow, tight soil.
The trade-off is real. Tilling done at the wrong time can smear clay, chop up soil structure you wanted to keep, and bring buried weed seeds into the light. One aggressive pass can help. Repeated passes usually create fluff on top and trouble underneath.
When no-dig is the smarter move
No-dig works best once a bed already functions reasonably well. Instead of turning the whole area again, add compost on top, keep the soil covered, and let roots, worms, and moisture carry that organic matter downward over time.
I prefer no-dig in established beds, raised beds, and small spaces where preserving structure matters more than getting instant mixing. It also makes sense where you want fewer weed flushes and less disruption to soil life. If your garden is near a path, lawn edge, or low-water planting, this lighter approach often fits better than remaking the whole area. In those transition zones, choosing the right planting style matters just as much as soil prep, especially if you are considering ground cover alternatives to grass for hard-to-mow spaces.
No-dig is slower at correcting deep problems. If the soil is badly compacted several inches down, topdressing alone will not fix it by planting day.
A practical way to choose
Choose tilling when the site is new, compacted, full of roots or sod, or needs amendments mixed into the rooting depth before you plant.
Choose no-dig when the bed already drains reasonably well, has decent crumb structure, and mainly needs steady improvement rather than rescue.
If you are on the fence, ask one question. Are you building a bed, or maintaining one? Building usually calls for one round of deeper disturbance. Maintaining usually rewards restraint.
That is the part generic advice misses. Good gardeners often use both methods, just at different stages. I till to solve a clear problem. I stop tilling as soon as that problem is gone.
Wet soil does not improve under force. If it smears or sticks to the tool, wait for better conditions.
Your Soil Recipe Book and Common Mistakes to Avoid
A lot of soil prep advice falls apart at planting time because it never answers the core question. What should you do with the patch of ground in front of you today?
Use a simple recipe. Adjust it based on whether you are building a bed from scratch or improving one that already works. That is also where the tilling versus no-dig choice becomes practical instead of theoretical.
Quick Soil Recipes for Common Garden Projects
| Garden Type | Goal | Quick Recipe |
|---|---|---|
| New vegetable bed | Open the root zone and add organic matter | Check soil moisture first. If the ground is workable and the site is new, compacted, or full of old roots, loosen to your intended rooting depth and mix in a modest layer of finished compost. In the first year, restraint usually beats overloading the bed with amendments. |
| Existing flower border | Improve soil without wrecking structure | Skip full-scale digging if the border already drains decently and plants are growing well. Loosen only the tight spots, add compost where roots can actually use it, and protect the surface with mulch after planting. |
| Compacted small bed | Restore drainage and root access | Break up the compacted zone before planting. If the problem is shallow, hand loosening is usually enough. If compaction runs deeper, one round of heavier prep may save a season of frustration. |
| Ornamental planting area | Prepare for shrubs, perennials, or mixed groupings | Match the prep to the plants, not just the square footage. Trees and shrubs need wide, well-prepared planting areas, but they do not benefit from a rich pocket surrounded by hard soil. Improve the broader bed if you can. |
| Lawn edge or low-water transition zone | Avoid building the wrong soil in the wrong place | Do not amend first and choose plants later. Decide what belongs there, then prep for that use. If turf keeps struggling in that strip, these ground cover alternatives to grass may fit the site better. |
Mistakes that cause more harm than bad soil
The first mistake is rushing wet soil. Grab a handful from below the dry surface and squeeze it. If it smears, stays sticky, or forms a hard lump that will not break apart easily, wait. A day or two of patience does more good than any bagged product.
The next set of mistakes is less obvious, and I see them all the time:
- Adding compost without a job for it: Compost can feed biology, improve texture, or act as mulch, but those are not the same use. Put it where it matches the goal.
- Burying every bed with the same method: New ground often needs deeper correction. Established beds usually respond better to lighter handling.
- Feeding plants before reading the soil: Fertilizer can help, but blind applications often create lush top growth and weak roots, or salt buildup in stressed beds.
- Tilling year after year out of habit: One corrective pass can make sense. Repeated disturbance can break apart improving structure and wake up buried weed seed.
- Fixing the planting hole instead of the whole area: Roots do not stay inside a perfect pocket of amended soil. If the surrounding ground is hard, growth slows when roots hit that wall.
The short version that saves trouble
Use this order:
- Check moisture before you touch the bed.
- Let the soil test decide what to add.
- Choose tilling for rescue work, no-dig for steady improvement.
- Place organic matter where roots will grow into it.
- Back off once the soil starts holding structure on its own.
Good soil prep is not about doing more. It is about doing the right amount, in the right place, at the right time.
If you want to visualize bed shapes, planting zones, and layout ideas before you start digging, OutdoorBrite makes it easy to turn photos of your yard into realistic garden design concepts so you can plan smarter and avoid costly mistakes.
See your yard reimagined
Start creating