Garden Plans for Full Sun That Actually Work
Practical garden plans for full sun that boost yield, save water, and look great. Step-by-step layouts, plant palettes, and real-world design tips.
Start with a quick sunlight check this weekend to find your true full-sun pockets. A reliable full-sun zone gets consistent direct light for at least six hours a day, and knowing that upfront saves you a ton of work and ruined crops down the line.
Table of Contents
- Mapping Sunlight Before You Plant a Thing
- Designing the Layout So Nothing Gets Shaded Out
- Building Soil and Water Systems That Handle the Heat
- Plant Palettes That Earn Their Place in the Sun
- Hardscape Paths and Visualizing the Plan Before You Build
- Seasonal Schedule and Maintenance Rhythm
- Frequently Asked Questions About Garden Plans for Full Sun
Mapping Sunlight Before You Plant a Thing
Begin with a one-day light audit to learn how sunlight actually moves across your yard and which areas genuinely qualify as full sun.
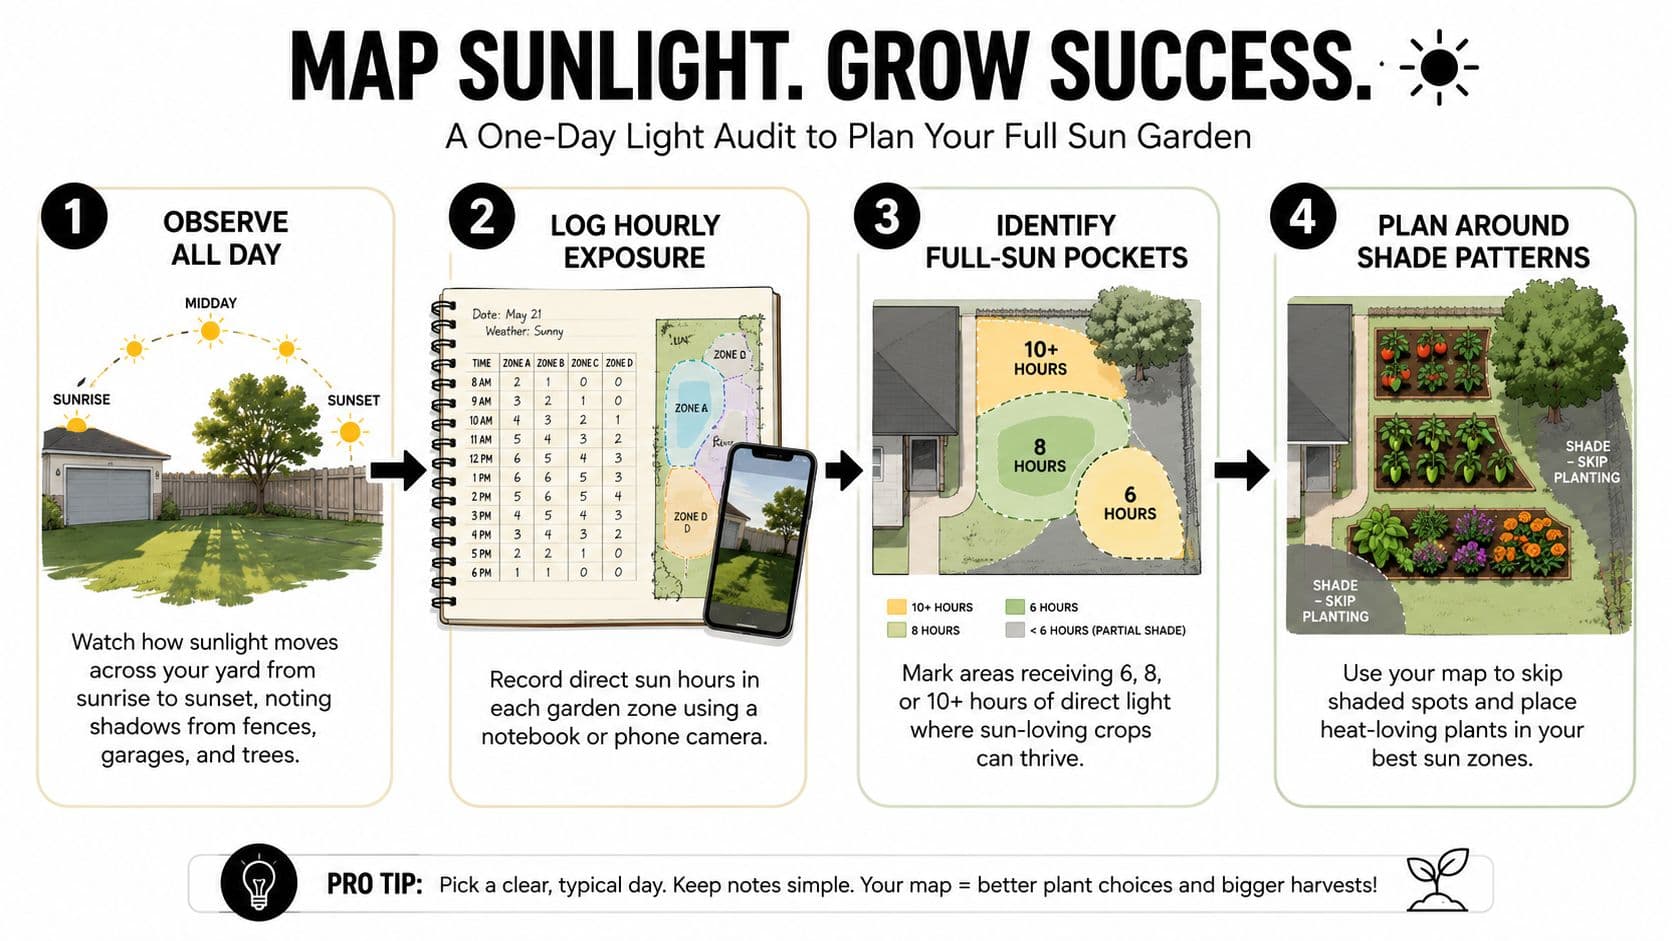
This infographic walks you through a simple four-step sunlight audit workflow: observation, hourly logging, identifying six/8/10+ hour pockets, and planning around shade patterns.
Once you start interpreting the graphic, you'll see how short morning exposure differs from long, afternoon-dominant sun, and exactly where fences or garages cut into your usable hours.
Quick One-Day Audit Actions
- Watch the yard from sunrise to sunset and note where persistent shadows linger.
- Photograph the same spot hourly, or just jot the times in a notebook.
- Sketch rough zones on graph paper, or take a single photo and mark the sun hours directly on it.
A south-facing wall can add 30–60 extra growing-degree days in cool climates, effectively lengthening your season.
What Six, Eight, And Ten Hours Mean
Here's a quick reference for how different daily sun totals affect your plant choices, water needs, and typical yields.
| Daily Direct Sun | Best For | Watch Out For |
|---|---|---|
| 6 hours | Leafy greens, many herbs | Midday heat stress in summer |
| 8 hours | Tomatoes, peppers, most annuals | Increased water needs; mulch heavily |
| 10+ hours | Heat-lovers, full-sun ornamentals | Risk of sunscald and quicker soil drying |
In short, six hours is your baseline for most edibles, eight hours opens up the heavy producers, and ten-plus hours demands heat-tolerant varieties and vigilant watering.
Practical Notes And Examples
A west-side strip behind a garage might hit 10+ hours in July but drop to six by October — that's not a spot for long-season tomatoes. A single maple can cast afternoon shade that ruins peppers, so map that shadow before you plant anything.
Use your audit results to place raised beds, trellises, and water lines where they'll actually get the sun they need. For help turning that sunlight map into a workable layout, check out this guide on how to plan a garden for step-by-step guidance on converting observations into a plant-ready plan.
Designing the Layout So Nothing Gets Shaded Out
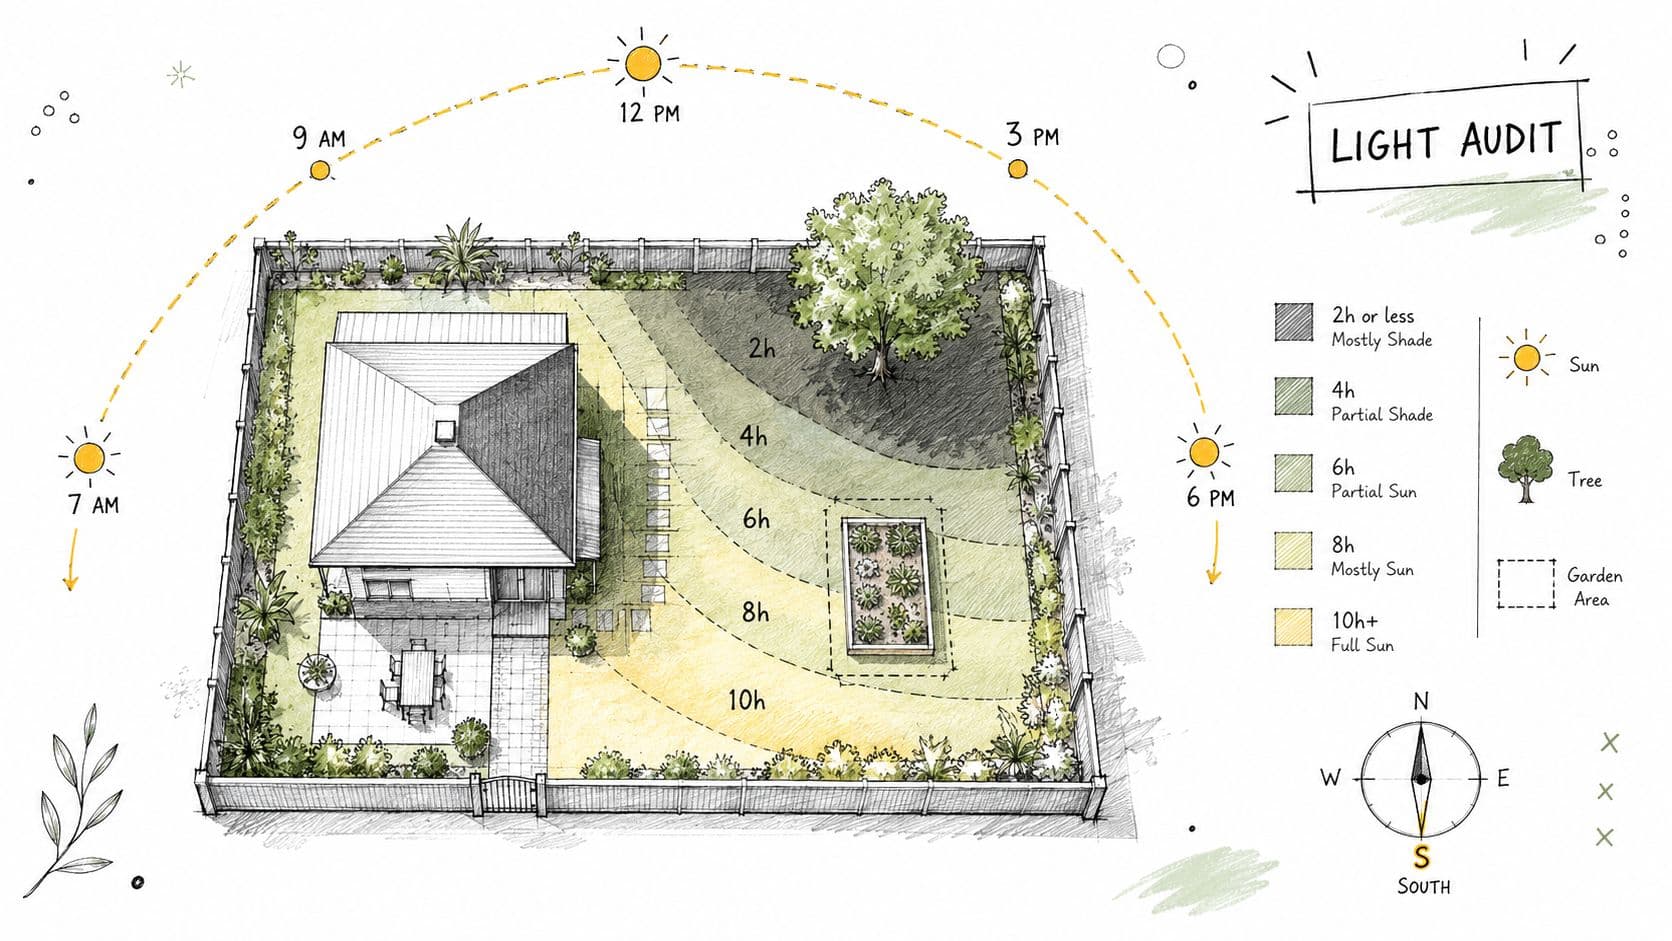
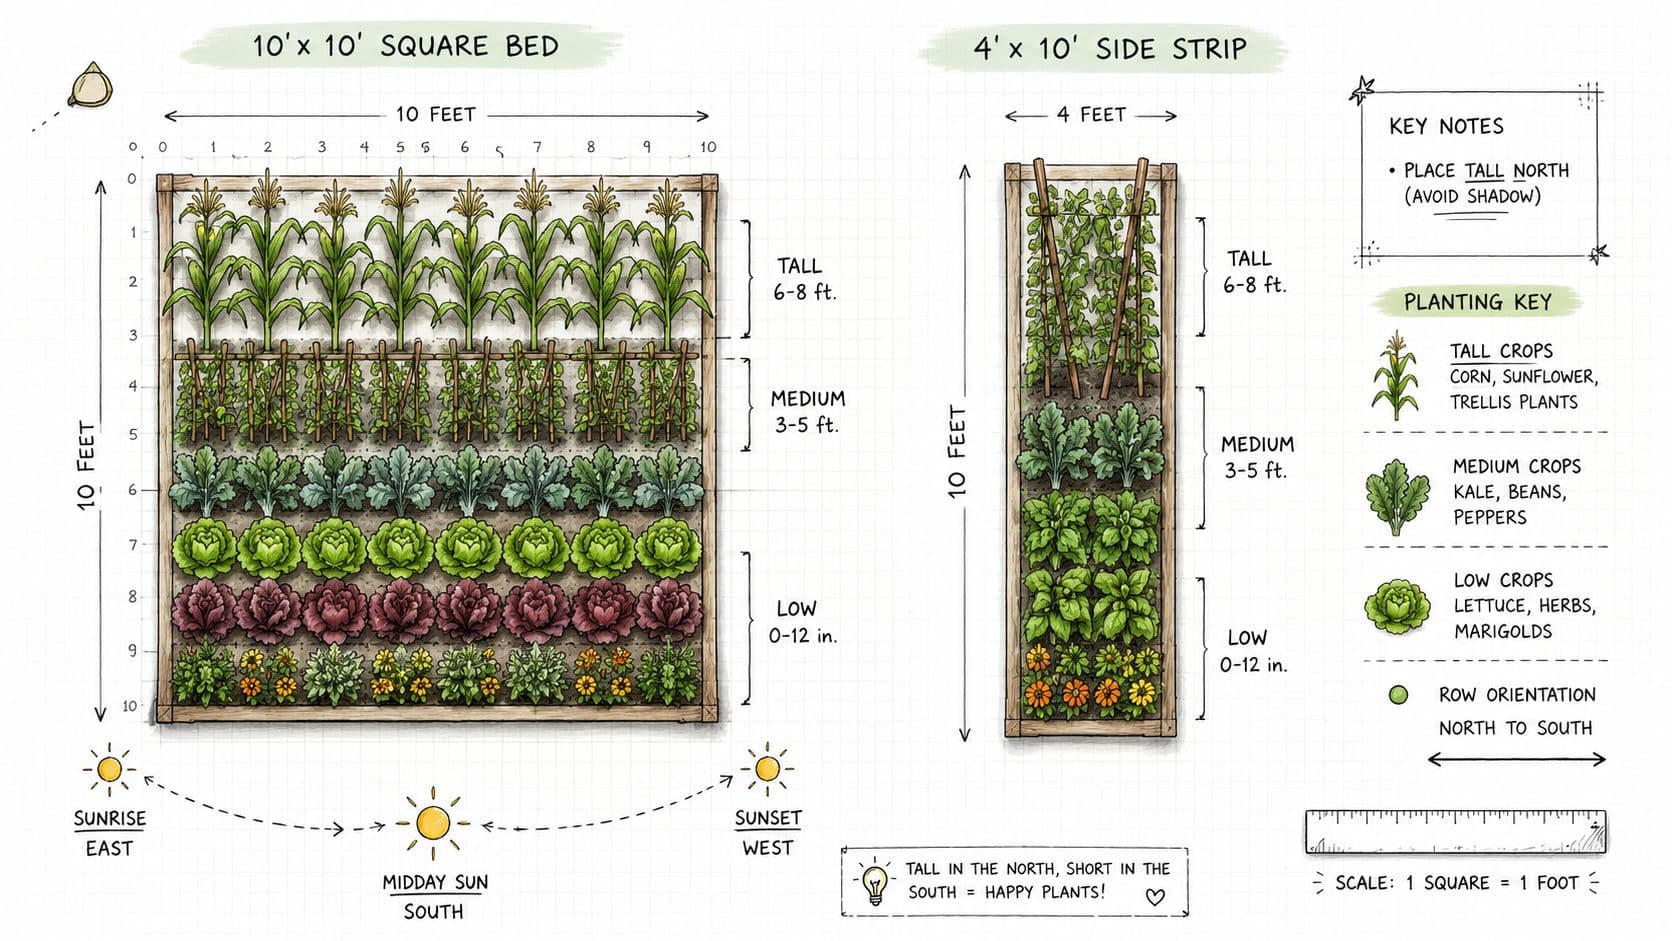
Getting the layout right means keeping short plants out of the tall ones' shadow. Tuck your taller crops along the north side of the beds so they don't block the sun from lower growers. This is exactly why experienced growers favor north-south rows, which keep sun-loving herbs and greens bathed in light all day.
It helps to think in vertical layers rather than just flat horizontal lines. For instance, trellised beans or corn belong at the very back of a bed, not the middle. That way, a row of cabbage or basil up front still gets direct light without competing for it.
Grab some graph paper and spend 30 minutes sketching before you dig. Draw the bed to scale, mark any existing shade sources, and sketch out the mature heights. That small investment saves you from the classic beginner headache of having to replant in the middle of the season.
Workable Example One Small Backyard 10x10
- North edge: A 2-foot trellis for pole beans, interplanted with early spring peas for a quick nitrogen fix.
- Center: Staggered 12–18 inch spacing for tomatoes and peppers on sturdy supports.
- South edge: Low herbs and lettuce in succession plantings to keep spring and fall harvests coming.
A to-scale sketch cuts layout changes by over 50% in my projects because it exposes shade conflicts early.
Workable Example Two Narrow Side Yard Strip
- Alternate short perennials and annuals so the perennials don't slowly take over the space.
- Plant drought-tolerant lavender and yarrow against the fence, leave a 2-foot path, and put a row of seasonal veggies in front.
- Lean on espaliered fruit or narrow trellises to save room and keep the sunlight flowing evenly.
When planning seasonal blocks, keep these layouts in mind:
- Spring crops: Place them where perennials are still dormant, so they get first dibs on the light.
- Summer heavy-feeders: Reserve the absolute sunniest quarter of the space for tomatoes and peppers.
- Fall block: Dedicate a section that catches late afternoon sun for kale and other brassicas.
Mixing bed functions is the best defense against shade creep. Keeping perennials in defined islands stops them from slowly invading your annual plots. Plus, sketching it all out ahead of time makes planning irrigation runs and path widths a breeze. You can easily fit a wheelbarrow and lay drip lines without any surprise reroutes.
Quick tips
- Stick temporary stakes in the ground to simulate mature plant heights before you commit.
- Leave an 18–24 inch buffer between tall and short zones.
- Revisit your sketch after the first month and tweak spacing based on how things are actually growing.
Building Soil and Water Systems That Handle the Heat
Full-sun beds dry out fast. That's just the reality of gardening in direct exposure. The trick is designing your irrigation to match what the plants actually need, not just running a sprinkler and hoping for the best.
Drip irrigation puts water right at the root zone. You cut surface evaporation dramatically, and you avoid the fungal problems that come with wet foliage. Healthier roots, less wasted water—it's a straightforward upgrade that pays off quickly.
Group plants by how much they drink. I've seen too many gardeners drown drought-tolerant herbs because they're on the same line as thirsty vegetables. Lavender and rosemary do fine in a well-draining border with minimal water. Tomatoes and basil, on the other hand, want consistent moisture—give them their own drip zone with emitters spaced 12–18 inches apart. That separation prevents soggy soil and keeps disease pressure down.
Switching one homeowner's beds to drip and adding mulch cut summer watering time by roughly 40% while improving yields.
Practical Weekly Schedule for a Hot-Summer Full-Sun Vegetable Bed
Early season (May) — Run 2 deep drip sessions per week, 30–45 minutes each. This encourages roots to chase moisture downward, which builds resilience for the hotter months ahead.
Peak summer (July–Aug) — Bump up to 3 sessions per week. If you're working with sandy soil, you might need daily short cycles instead. Sandy ground drains fast and doesn't hold moisture the way loam does.
Late season (Sept) — Scale back to 1–2 sessions as nights cool and plants slow their growth. Overwatering in fall invites rot and delays dormancy.
Key Soil and Mulch Actions
- Apply a 3–4 inch layer of organic mulch. It stabilizes soil temperature and cuts evaporation by almost half—one of the simplest things you can do for a full-sun bed.
- Work compost into the soil at planting time. It improves both water retention and nutrient supply, giving plants a buffer during dry spells.
- Check moisture with a soil probe before you water. Push it 3–6 inches down. If it's still damp, skip the irrigation cycle.
Hose Reach and Bed Siting Checklist
- Keep beds within 25–35 feet of a spigot when you can. Longer runs mean pressure loss and more fittings to maintain.
- Install a shutoff valve and pressure regulator for your drip lines. They're inexpensive and save you from blowouts and uneven watering.
- Plan paths that let you reach every bed easily. You'll be adjusting emitters and checking lines regularly—make that access effortless.
A key element of building for full sun is choosing materials that can handle direct heat without degrading. If you're working on patios or hardscape, it helps to compare porcelain vs stone tile for options that won't crack or fade under constant exposure.
For longer-term resilience, think about rain capture and storage. These practical rainwater garden setup steps walk you through adding rain-fed storage to your irrigation plan—worth considering if you're in a region with seasonal dry spells.
Plant Palettes That Earn Their Place in the Sun
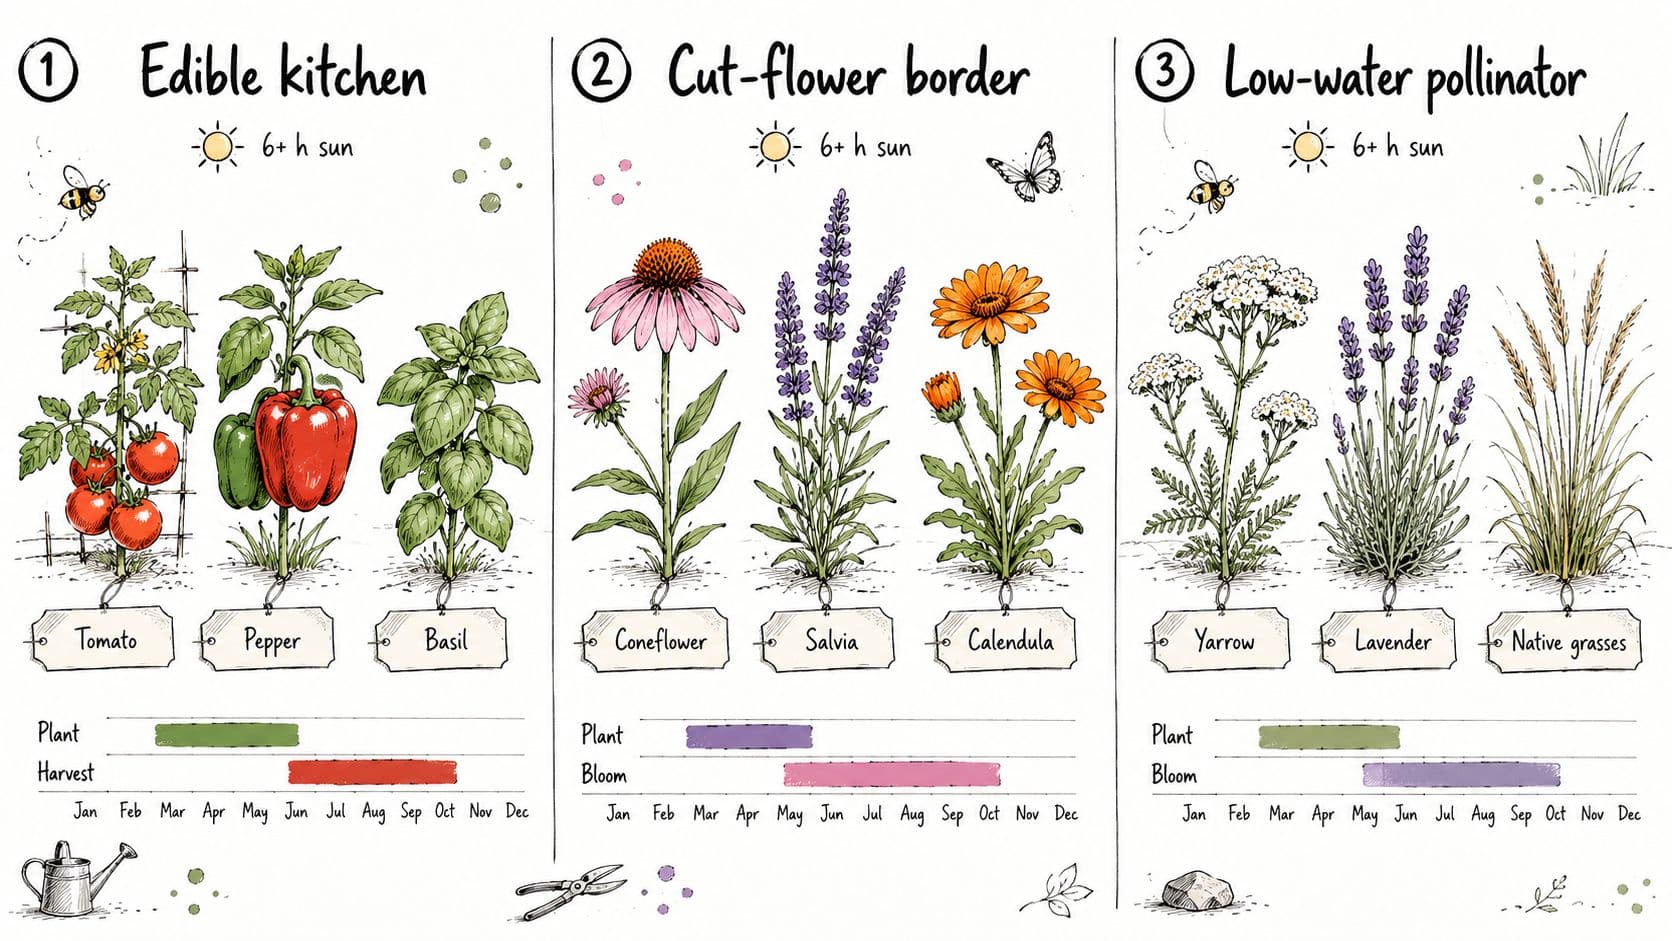
Pick plants that actually match what you want from your garden and how much water you're willing to provide. That way everything sitting in six-plus hours of direct sun has a real job to do.
Edible Kitchen Garden Palette
Tomatoes and peppers are the backbone of any full-sun kitchen garden—they genuinely need 8+ hours of direct light to set fruit properly. Bush beans fill in the midseason gap with quick yields, and trellised cucumbers make the most of limited ground space.
Leafy greens like spinach and lettuce appreciate a break from intense afternoon sun. Tuck them along the south edge or throw some shade cloth over them during the worst of July heat.
Herbs are where succession planting really pays off. Stagger basil, parsley, and dill every few weeks and you'll harvest from May straight through October.
- Indeterminate tomatoes keep producing all season long
- Mix sweet and hot peppers for a longer ripening window
- Plant basil and parsley in blocks—makes pruning and harvesting far easier
Stagger your plantings every 3–4 weeks and you'll get steady harvests instead of one overwhelming glut.
Cut-Flower Border Palette
The trick here is planning for predictable bloom times and varying heights. Cosmos and zinnias carry the summer show, while snapdragons and bachelor's buttons give you structure early in the season. Dahlias come in strong when everything else is winding down.
- Coneflower and salvia pull double duty—pollinator magnets that also rebloom reliably
- Build in 3–4 distinct height layers so you can cut stems without trampling the shorter plants
Low-Water Pollinator Bed Palette
Once established, drought-tolerant perennials like yarrow, lavender, and Russian sage barely need supplemental water. They'll keep pumping out nectar from June well into September.
- Yarrow and coneflower handle the summer nectar flow
- Salvia and native asters pick up the slack in late summer and fall
Three Full-Sun Plant Palettes by Purpose
| Palette | Top Plants | Peak Season |
|---|---|---|
| Kitchen Garden | Tomato, Pepper, Basil | May–Oct |
| Cut-Flower Border | Zinnia, Dahlia, Salvia | June–Sept |
| Pollinator Bed | Lavender, Yarrow, Coneflower | June–Oct |
When you're mapping out your plant selections, think about working in native species. They naturally support garden health and help keep pest problems in check—check out these native plant pest solutions by FullScope for more on that approach.
Hardscape Paths and Visualizing the Plan Before You Build
Hardscape changes how a full-sun garden functions on a hot afternoon, so think routes and rests before picking plants.
Start by mapping functional widths for movement and maintenance. A 3-foot path handles foot traffic just fine, but bump it to 4 feet if you're hauling a wheelbarrow through regularly — you'll thank yourself during heavy summer work.
Place shade-giving features where they earn their keep. A small pergola over a bench on the west edge gives filtered afternoon relief without stealing morning sun from your vegetables.
Plan paths to match use and access frequency for best long-term performance
Practical Layout Examples That Actually Work
10x10 Backyard Vegetable Plot
- Central 3-foot access path with beds 2.5 feet wide for two-row hand harvesting
- Pergola at the northwest corner for shaded seating and late-afternoon cool-down
4-Foot Driveway Border
- Narrow gravel service strip with an 18-inch planting band, stepped pavers every 4 feet for maintenance access
- Drought-tolerant perennials to keep irrigation needs low
Front-Yard Pollinator Strip
- Curving 2.5-foot bed with an 18-inch mulch path for pruning and curb appeal
- Low edging to keep mulch contained and show structure from the street
Quick Material Estimating Tips
- Measure path length and multiply by width for square footage
- For gravel, order 0.5 cubic yards per 100 sq ft at 2-inch depth
- For pavers, count pieces per square foot and add 5–10% waste
Before you commit to materials, test balance and sightlines with a quick mockup. A fast AI tool can convert your photos into easy mockups and catch scale issues early. Try the best free garden design software to visualize the whole thing before you dig.
Seasonal Schedule and Maintenance Rhythm
Getting your soil ready in spring does more than just kick off the growing season—it genuinely saves you time when summer heats up. Loosen the top 6–8 inches and mix in a 1–2 inch layer of compost. This improves water retention and gets microbial activity humming, which gives transplants and seedlings a much better foundation.
Build your planting calendar around your last frost date and what you learned from that sunlight audit. For a typical full-sun setup in the 2000 USDA zone, you might direct-sow peas and lettuce three weeks before the last frost, then wait until two weeks after to set out tomatoes and peppers. Staggering plantings every 3–4 weeks keeps harvests coming steadily instead of all at once.
A realistic time budget is 2 to 4 hours a week in peak summer for a typical full-sun bed.
Summer Watering and Mulch Rhythm
Drip irrigation works best with deep cycles of 30–45 minutes twice a week early on, bumping up to three times during the hottest stretches. Keeping mulch at 3–4 inches cuts evaporation almost in half and keeps soil temperatures more stable.
- Check emitters monthly and flush lines around mid-June.
- Group plants into separate drip zones based on water needs—this prevents overwatering drought-tolerant herbs.
- Quick troubleshooting: blossom-end rot usually points to calcium issues or inconsistent watering, while sunscald appears as pale, papery patches on fruit.
Fall Cutbacks and Cover Cropping
Once summer crops finish, pull them out, compost any diseased material, and sow a fast winter cover like winter rye or clover. Cover crops protect bare soil, cut erosion, and add organic matter when you turn them under in spring.
- Cut back perennials lightly and leave seedheads standing for pollinators through October.
- Scale back irrigation to 1–2 sessions as growth slows down.
Final Checklist for the Shed Door
- Soil test every 2–3 years
- Refresh mulch in May and July
- Check drip pressure monthly
- Rotate crop blocks annually
Signs Your Plan Is Working
- Even canopy growth and consistent harvests
- Deep root profiles when you probe beds
- Fewer pest problems and steady soil moisture levels
If growth looks patchy, go back and revisit your sun mapping and irrigation zoning before swapping out plant choices.
Frequently Asked Questions About Garden Plans for Full Sun
What should I do if my yard only gets about five hours of direct sunlight?
You'll want to shift your focus toward plants that handle partial sun well. Leafy greens, herbs like cilantro and parsley, and certain flowering perennials can thrive on less light than you'd think. Place your heat-lovers — tomatoes, peppers, squash — in that spot where the sun lingers longest through the day. Even an hour of extra direct light makes a noticeable difference for those crops.
It also helps to track how the light actually moves across your yard throughout the day. That way you're not guessing — you're putting each plant where it genuinely performs best.
How do raised beds help with poor soil in sunny locations?
Raised beds basically let you start fresh. Instead of fighting with compacted clay or sandy dirt, you fill them with a mix that actually works. A blend of 60% topsoil, 30% compost, and 10% grit (like perlite or coarse sand) gives you fast drainage while still holding enough moisture for roots to access.
This matters even more in full sun because the soil heats up and dries out faster. Good drainage prevents waterlogging after heavy rain, and the compost feeds your plants steadily through the growing season. I've seen struggling in-ground plots turn around completely just by switching to this approach.
Aim for at least 12 inches of depth in your raised beds — deeper if you're growing root vegetables or larger perennials.
What's the best watering strategy during heat waves?
Run your drip irrigation early in the morning and again in the late evening. Morning watering gives plants what they need before the day gets brutal, and that second round in the evening tops off soil moisture without leaving foliage wet overnight (which invites fungal problems).
Then add 3–4 inches of mulch around your plants. This single step can cut evaporation roughly in half, which means less watering and less stress on everything in the bed. Straw, shredded bark, or even dried grass clippings work well — just keep the mulch a couple inches away from plant stems to prevent rot.
Can I create a full-sun garden on a patio?
Absolutely. Large containers with a well-draining potting mix can handle full sun just fine, as long as you're smart about setup. Bigger pots hold moisture better than small ones, so go with containers that are at least 14–16 inches in diameter for most vegetables and perennials.
Here's a trick that saves a lot of headaches: group pots by water needs. Put your thirsty plants together and your drought-tolerant ones in a separate cluster. That way you're not overwatering the rosemary while trying to keep the lettuce happy. A simple drip system on a timer works great for container setups too.
Try OutdoorBrite Money to visualize these layouts fast and confidently.
See your yard reimagined
Start creating