Rainwater Harvesting Garden: A DIY Guide for 2026
Start your rainwater harvesting garden with our step-by-step guide. Learn site assessment, storage, planting, and maintenance for a sustainable yard.
You're probably looking at a downspout right now and thinking one of two things. Either it's dumping good water onto a patch that turns muddy every storm, or it's sending runoff away while you're still dragging a hose across the yard a few days later.
That gap is where a good rainwater harvesting garden starts. Not with a barrel purchase, and not with a Pinterest sketch, but with a simple shift in thinking. Your roof is a catchment surface, your garden is storage, and your soil can do far more work than most homeowners ask of it.
A practical setup can be small. One barrel feeding a bed of herbs. It can also be more integrated, with roof runoff split between a tank for hand watering and a swale that slowly recharges the root zone around trees and shrubs. That second approach matters because many beginner guides focus only on containers, even though passive infiltration often gives better long-term drought resilience in outdoor areas.
Modern planning tools help here too. Before you cut a downspout or dig a basin, it's useful to see the layout in context, especially when you're trying to fit barrels, overflow routes, planting zones, and foot traffic into a yard that already has fences, patios, and beds.
Table of Contents
- Planning Your System and Assessing Your Site
- Choosing Your Catchment and Storage Methods
- Building Your System From Collection To Overflow
- Designing and Planting Your Rain Garden
- Maintenance Troubleshooting and Seasonal Care
- Answering Your Top Rainwater Harvesting Questions
Planning Your System and Assessing Your Site
The best rainwater harvesting garden plans begin with a walk, not a shopping cart. Stand outside during or right after a storm if you can. Watch where water drops hard from the roof, where it runs fast, and where it lingers. That tells you more than a product listing ever will.
A workable design has to balance how much water you can catch with how much water your garden needs. The sizing method from the U.S. Department of Energy is straightforward: Monthly Rainfall Collected (gal) = Catchment Area (sq ft) × Monthly Rainfall (inches) × 0.62 × Collection Factor (0.75–0.90). That same review notes that reaching 60–79% replacement of potable water demand depends on matching monthly rainfall to demand, and in places with uneven rainfall, a larger tank helps bridge wet and dry periods (U.S. Department of Energy rainwater harvesting sizing guidance).
Start with the roof and the garden demand
Say you've got one roof plane feeding a single downspout over a side yard. Measure the roof section that drains to that downspout. Then look at what you want the system to do.
Use questions like these:
- Watering goal: Are you trying to keep patio pots alive, support fruit trees, or reduce hose use in a vegetable bed?
- Use pattern: Will you use water by hand with a watering can, by gravity hose, or by directing overflow into the garden area?
- Dry season reality: Does your area get steady summer rain, or do you need storage that can hold wet-season surplus for later?
A beginner mistake is planning only from the roof side. The garden side matters just as much. A thirsty annual bed in peak summer behaves differently from a mulched shrub border or a young orchard with deep-rooted companions.
Practical rule: Size for your most important use, not every possible use. It's better to keep one food bed reliably supplied than to build a system that looks big on paper but doesn't meet any real need well.
Map the flow before you buy parts
Visualization helps. Uploading a yard photo into one of the Best landscape design apps makes it easier to test barrel placement, screen a cistern behind planting, or sketch where a swale could intercept overflow before you start cutting pipe.

When I plan a yard like this, I look for four things first:
-
Stable placement near a downspout
Tanks and barrels need a level base close enough to collect cleanly without awkward bends. -
Safe overflow direction
Overflow should move away from foundations, paving seams, and crawlspace vents. -
Access for maintenance
If you can't reach the lid, screen, or spigot comfortably, you won't clean it often enough. -
Useful gravity path
Even a simple setup works better when water can move downhill into a bed, basin, or swale.
There's also a visual side. A barrel that blocks a gate will annoy you every week. A swale that cuts through the natural walking line across the yard will get compacted. Seeing those conflicts early saves rework.
Choosing Your Catchment and Storage Methods
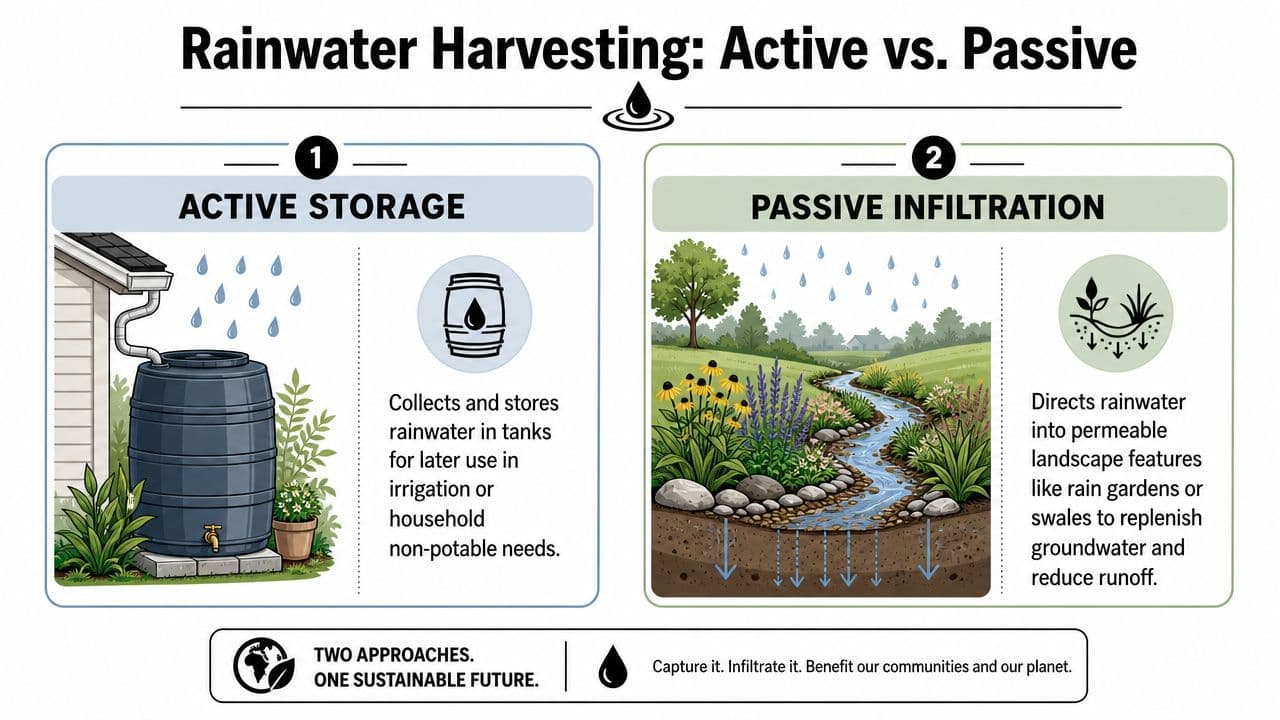
Most homeowners think the choice is barrel size. It isn't. The actual choice is active storage versus passive infiltration, or a hybrid of both.
Active systems hold water for later. Passive systems slow it down and sink it into the soil now. For a strong rainwater harvesting garden, both have a place. One gives control. The other builds resilience.
Active storage works best when you need control
Barrels and cisterns make sense when you want water on demand. Filling a can, attaching a short hose, or holding water for a dry week is much easier with stored supply than with a purely passive garden.
The global market data reflects how common this route is. Above-ground collection systems hold 69.3% of the market share in 2025, and on a 100m² flat terrace with 600mm annual rainfall, up to 60,000 liters can be accumulated annually. The same source notes practical examples where a 4m³ tank can satisfy 70.6% of a residence's water demand, a 10m³ tank can meet 75% in an office setting, and a 12m³ tank in a Nigerian hospital can fulfill 78% of water demand (IMARC rainwater harvesting market and application examples).
That doesn't mean bigger is always better. Large tanks take up space, need a proper base, and often call for better screening and overflow management.
If your gutters clog often, add protection upstream. Good gutter covers reduce the amount of leaf litter reaching your diverter and tank, and resources like HIBCO ROOF LLC leaf guard options help homeowners understand what styles fit different roof and debris conditions.
Passive infiltration works best when you want resilience
Passive systems send roof runoff into swales, basins, rain gardens, and other permeable zones. This approach is often ignored in standard tutorials, but it's one of the most useful strategies for trees, shrubs, and deep-rooted perennials. As noted in the background material, integrating swales can create deep soil water depots and help the garden need less irrigation over time.
A passive system does something barrels can't. It hydrates the profile below the mulch layer, where roots can follow moisture downward instead of waiting for the next surface watering. That changes plant behavior. Trees establish better. Perennials stretch deeper. The yard becomes less flashy but more forgiving.
A barrel stores water in plastic. A swale stores water in soil. In many gardens, the second storage bank matters more over the long haul.
Rainwater Storage Options Compared
| Method | Typical Capacity | Estimated Cost | Best For |
|---|---|---|---|
| Rain barrel | Small to moderate | Lower upfront cost | Patio beds, hand watering, first-time projects |
| Slim wall tank | Moderate | Moderate | Narrow side yards, screening beside sheds or fences |
| Large cistern | High | Higher upfront cost and more site prep | Whole-yard irrigation planning, long dry spells |
| Swale and berm | Soil-based, no container storage | Cost depends on digging, shaping, and mulch | Trees, hedges, perennials, overflow management |
| Hybrid system | Stored water plus infiltrated overflow | Moderate to higher | Homeowners who want flexibility and soil recharge |
If you're deciding between them, use a simple filter. Choose active storage when you need portable water. Choose passive infiltration when you want lower day-to-day effort and stronger root-zone hydration. Choose both when you want the barrel for convenience and the ground to absorb the excess.
Building Your System From Collection To Overflow
A clean build starts at the gutter and ends at a safe overflow point. If either end is sloppy, the system becomes annoying fast. Barrels tip, inlets clog, and overflow scours the exact area you meant to improve.
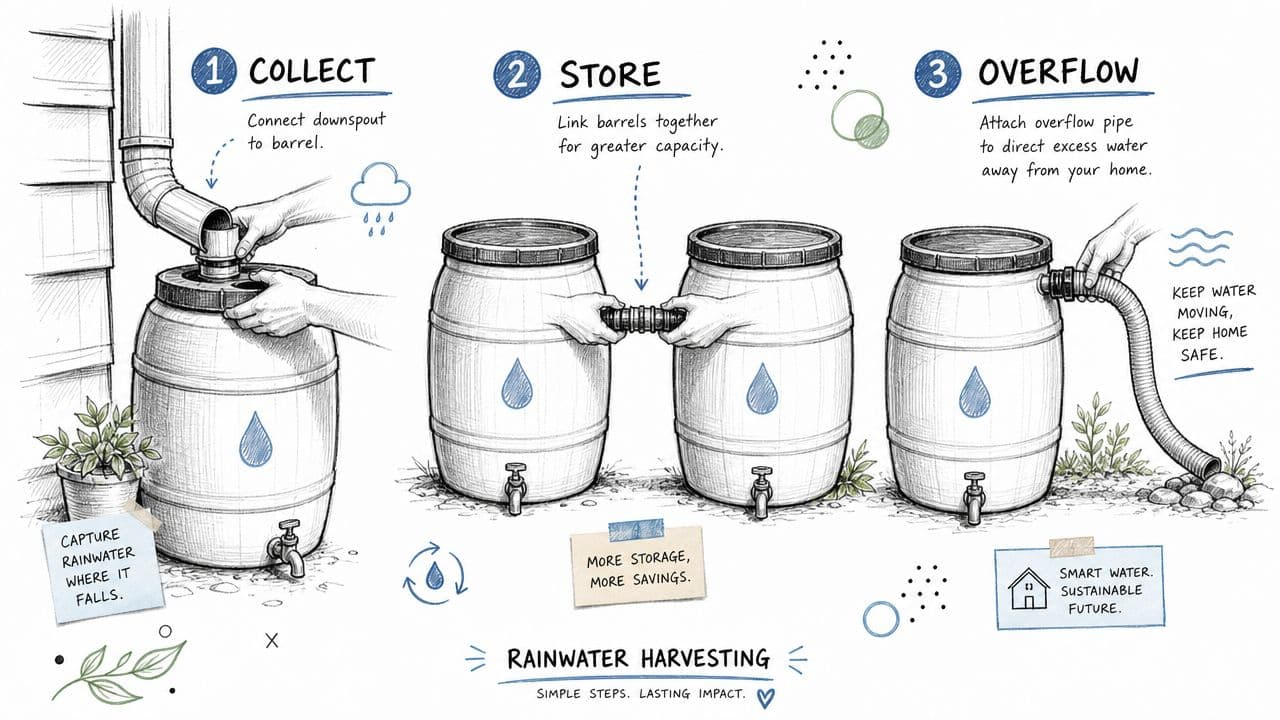
The first build I trust for a homeowner is simple. One downspout. One opaque barrel or tank. One screened inlet. One first-flush path or diverter. One overflow line going somewhere intentional.
Build the collection side correctly
Start with the base. It needs to be level, firm, and able to handle the full weight of a filled tank. That usually means compacted gravel, concrete pavers, or a poured pad, not loose soil or mulch. If the container settles unevenly, fittings strain and the barrel can lean.
Then deal with water quality before it enters storage. The Texas Water Development Board notes that system efficiency can be reduced by 10-25% when homeowners use transparent tanks that encourage algae growth or skip a first-flush diverter. The same guidance recommends opaque, UV-resistant materials and diverting the initial runoff from every 100 sq ft of catchment area to protect water quality (Texas rainwater harvesting manual).
Here's the build order I recommend:
-
Cut and fit the downspout carefully
Dry-fit first so you don't end up with a crooked inlet or splashing at the top. -
Screen the inlet
A leaf screen catches the obvious debris. It's cheap insurance. -
Use an opaque container
Skip clear or translucent storage if it sits in sunlight. -
Install a usable outlet height
If the spigot is too low to fit a watering can under, daily use becomes clumsy.
For a visual walkthrough, this video is a solid companion to the build process:
Plan overflow before the first storm
Overflow is where many DIY systems fail. A full tank during a hard rain doesn't politely stop collecting. It dumps somewhere. If you haven't chosen that somewhere, water chooses for you.
Good overflow routes include a mulched basin, a planted rain garden, or a swale that carries water gently across contour. If the ground near your house drains poorly, it may be worth looking at professional guidance on subsurface dispersal and expert soakaway installations so runoff doesn't sit against the structure.
Field note: Test overflow with a hose before the rainy season. A five-minute mock storm will show you whether water reaches the exact place you intended or slips toward the foundation, walkway, or neighbor's fence.
Keep the pipe path simple. Fewer bends mean fewer clogs. Secure the outlet where erosion could start, and give water a broad landing zone with stone, mulch, or dense planting so it slows down instead of trenching.
Designing and Planting Your Rain Garden
A rain garden works when it looks intentional in dry weather and behaves well in wet weather. That means shaping it as a filter, not just digging a low spot and stuffing it with moisture-loving plants.
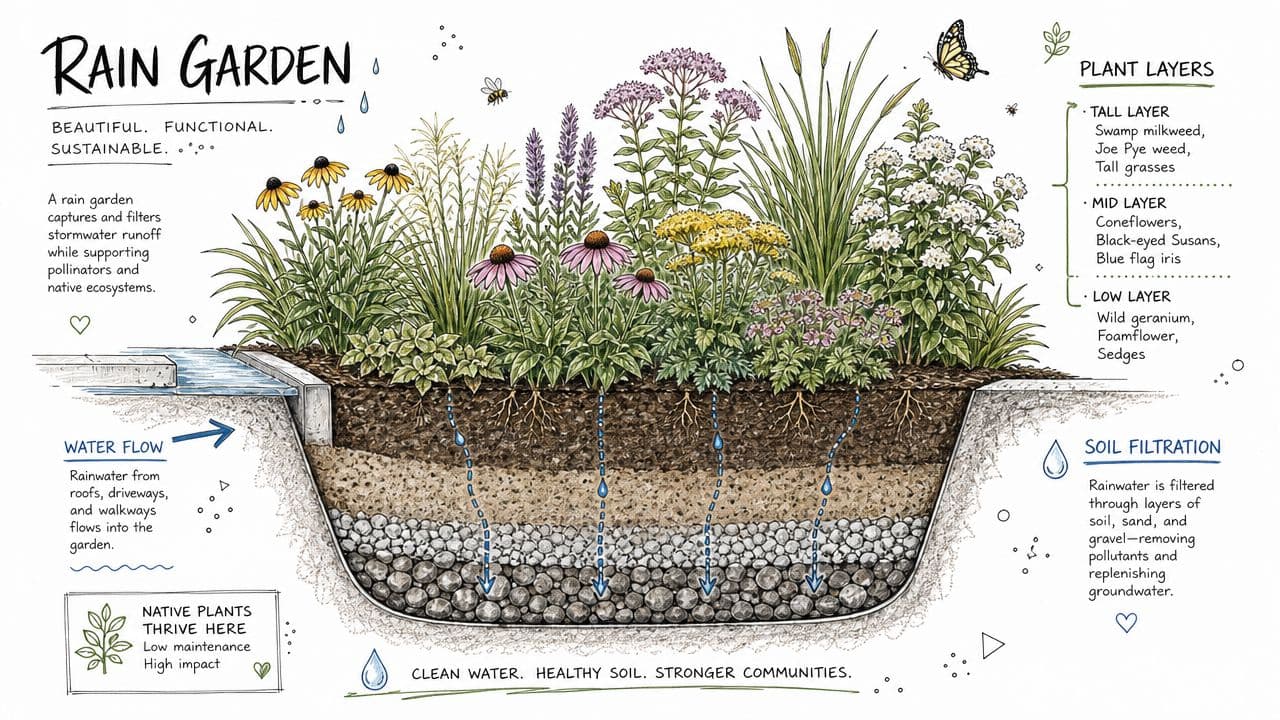
I like to think of a rain garden as a staged landing area for overflow. Water enters, spreads, pauses, sinks, and leaves behind moisture where roots can use it. The basin does the hydraulic work. The plants do the long-term soil work.
Shape the basin like a living filter
Start with the water entry point. It should slow incoming flow before it reaches the planted area. A small stone apron helps. Then shape a shallow basin with a flat or gently curved bottom rather than a narrow pit. Water spreads better across area than depth.
Soil matters as much as shape. Heavy clay often benefits from compost and coarse mineral material to improve structure, while very sandy soil may need organic matter to hold moisture a little longer. The sweet spot is a mix that infiltrates without staying sour and compacted.
When homeowners want help picturing the finished planting structure, a garden ai design tool can be useful for testing the basin outline, path edges, screening plants, and the visual transition between a rain garden and the rest of the yard.
Plant by moisture zone, not by appearance alone
The strongest planting plans use zones. The center handles the most frequent saturation. The middle accepts periodic wet feet. The edge ties into the rest of the garden and should still look good during dry spells.
A practical zoning pattern looks like this:
-
Bottom zone
Use plants that can handle periodic standing water and runoff pulses. Sedges, rushes, and moisture-tolerant irises are classic candidates depending on your region. -
Middle zone Many native perennials shine in this zone. They can take wet periods but don't need to sit in water all week.
-
Outer rim
Treat this like a dry border with tougher grasses, flowering perennials, and low shrubs that can handle occasional runoff without relying on it.
One client yard I think about often had a barrel overflowing onto turf that always turned slick. We converted that strip into a basin planted in layers. The bottom stayed functional in storms, the middle filled with durable flowering perennials, and the rim blended into the front edge of an edible garden. After one season, the area stopped looking like a drainage fix and started reading as a real garden.
There's also a larger context here. Rainwater harvesting isn't niche. It's a long-standing global practice, and the UNEP CCC summary notes that some urban systems in Australia provide 177 billion liters annually. The same source says optimization of these systems could expand safe drinking water coverage by 0.45–2.08 billion people globally through better seasonal storage and transition management (UNEP CCC rainwater harvesting overview). A home rain garden doesn't solve water scarcity alone, but it does move your property in the same direction. Less waste, less runoff, more useful storage in the ground.
Maintenance Troubleshooting and Seasonal Care
A rainwater harvesting garden should get easier after setup, not fussier. The systems that last are the ones built for routine care with a short checklist and a few seasonal habits.
A simple care rhythm that keeps systems working
Check the system after major storms at first. You're looking for drift in the barrel base, clogged screens, splash marks around the overflow, and signs that water is bypassing the path you planned.
A simple maintenance rhythm works well:
-
After leaf drop
Clean gutters, clear inlet screens, and remove sludge from the top of the diverter if your model collects debris there. -
During warm weather
Check for algae, odors, mosquito access points, and sediment at the bottom of the tank. -
Before freezing weather
Drain lines that can crack, disconnect fragile fittings, and decide whether the barrel stays in service or gets winterized. -
Around planted areas
Refresh mulch and keep infiltration zones open. If you're also selecting the right garden mulching options, choose materials that protect soil without sealing the surface into a crust.
If maintenance feels complicated, the design is usually the problem. A lid you can't reach, a filter you can't see, or an overflow you can't inspect will always be neglected.
Common problems and practical fixes
| Problem | Likely cause | Practical fix |
|---|---|---|
| Barrel isn't filling | Screen or diverter clogged, downspout misaligned | Clean the screen, recheck the cut line, test with a hose |
| Water smells stale | Organic debris entered storage, tank sits too long | Clean the tank, improve screening, use water more regularly |
| Spigot flow is weak | Gravity head is low | Raise the tank on a stronger stand or use shorter hose runs |
| Overflow causes erosion | Outlet is too concentrated | Add stone splash control and widen the receiving basin |
| Basin stays soggy too long | Soil drains slowly or basin is too deep | Loosen and amend soil, reshape the basin, reduce inflow concentration |
Most troubleshooting comes down to observing the system in real weather. Dry-weather assumptions are often wrong.
Answering Your Top Rainwater Harvesting Questions
Is harvested rainwater safe for edible plants
Usually, yes, but the safest use depends on what you're growing and where the water touches the crop. The evidence in your provided source is more nuanced than the blanket warnings people often repeat. A 2024 study found low occurrence of E. coli in harvested rainwater, and the University of Minnesota Extension guidance advises avoiding direct application on leafy vegetables because roofs can collect contamination from birds and squirrels. The safer targets are fruit trees, shrubs, perennials, and vegetables where the edible portion doesn't contact the water directly, or crops harvested weeks after watering (evidence summary on harvested rainwater and edible crop use).
That means drip or soil-directed watering is the better habit for edible beds. It also means roof water is a strong fit for orchards, berries, herbs that aren't splash-prone, and support plantings around food gardens.
Do I need a barrel, a swale, or both
If you want convenience, start with a barrel. If you want long-term garden resilience, add a swale or rain garden. If you want the most useful setup for a mixed yard, combine them.
A stored supply gives you flexible watering during dry spells. A passive infiltration feature takes care of overflow and hydrates roots below the surface. Together, they turn one storm into both immediate use and slower soil recharge.
What makes a system feel easy instead of fussy
Three things. First, a clean inlet. Second, an overflow route you trust. Third, a realistic use pattern.
A lot of bad experiences come from systems that technically work but are awkward in daily life. The barrel is too far from the plants. The spigot is too low. The lid is hard to remove. The overflow creates a mess. Fix those friction points and the whole system starts feeling natural.
For most homeowners, the best rainwater harvesting garden isn't the most elaborate one. It's the one you'll keep clean, use, and still appreciate after a full season of storms and dry spells.
Outdoor planning gets much easier when you can test ideas before you buy materials or start digging. OutdoorBrite Money helps you visualize rain barrels, swales, rain gardens, and full yard layouts from a simple photo so you can compare options, avoid awkward placements, and move into your project with a clearer plan.
See your yard reimagined
Start creating