
Outdoor Kitchen Layout Ideas: Design Your Dream Space
Explore 10 stunning outdoor kitchen layout ideas for any backyard. Design your perfect L-shape, island, or linear entertaining space.
You're standing on the patio, looking at the back door, the grill location, and the spot where guests always drift with a drink in hand. That is the right place to start. A good outdoor kitchen hub is less about the appliance list and more about how people move, stop, cook, serve, and clean up without crossing each other every two minutes.
Start with the layout before you choose finishes. Stone, tile, and cabinet colors can change. A poor footprint keeps causing the same problems every time you host. I tell homeowners to solve circulation first, then build the style around it.
The clearest way to plan it is by zones. Set a hot zone for the grill, smoker, or pizza oven. Place the wet zone where the sink, ice maker, or cleanup station will be useful. Reserve the dry zone for prep, plating, drinks, and serving. Once those three zones are in the right relationship, the rest of the design gets easier.
Distance matters. Put the hot zone close enough to the house that carrying trays and supplies feels easy, but far enough from doors and seating that smoke and heat do not become a constant annoyance. Keep the wet zone near prep, not stranded at one end where nobody uses it. Give the dry zone enough counter length to do real work. In practice, that usually means homeowners need more landing space than they first expect.
If the kitchen connects to custom outdoor living spaces, it often becomes the organizing point for the yard's layout. That can work well, but only if the kitchen supports the way you entertain. A family that grills twice a week needs a different hub than a household that hosts ten people every Saturday.
This guide approaches each layout as a mini blueprint. You'll see the ideal dimensions, where the hot, wet, and dry zones fit best, and the trade-offs each plan brings in real use and real budgets. Before you commit to masonry, utilities, or cabinet runs, use OutdoorBrite to test the layout virtually. It is one of the easiest ways to check spacing, sightlines, and traffic flow before the expensive part starts.
Table of Contents
- 1. The Efficient L-Shape
- 2. The Space-Saving Linear Layout
- 3. The Social Island Hub
- 4. The Ultimate U-Shape
- 5. The Versatile Peninsula
- 6. The Flexible Modular Kitchen
- 7. The Integrated Entertainer
- 8. The Outdoor Living Room
- 9. The Dynamic Multi-Level Design
- 10. The Dedicated Grill & Bar Zone
- 10 Outdoor Kitchen Layouts Compared
- From Idea to Reality Visualize Your Dream Kitchen
1. The Efficient L-Shape
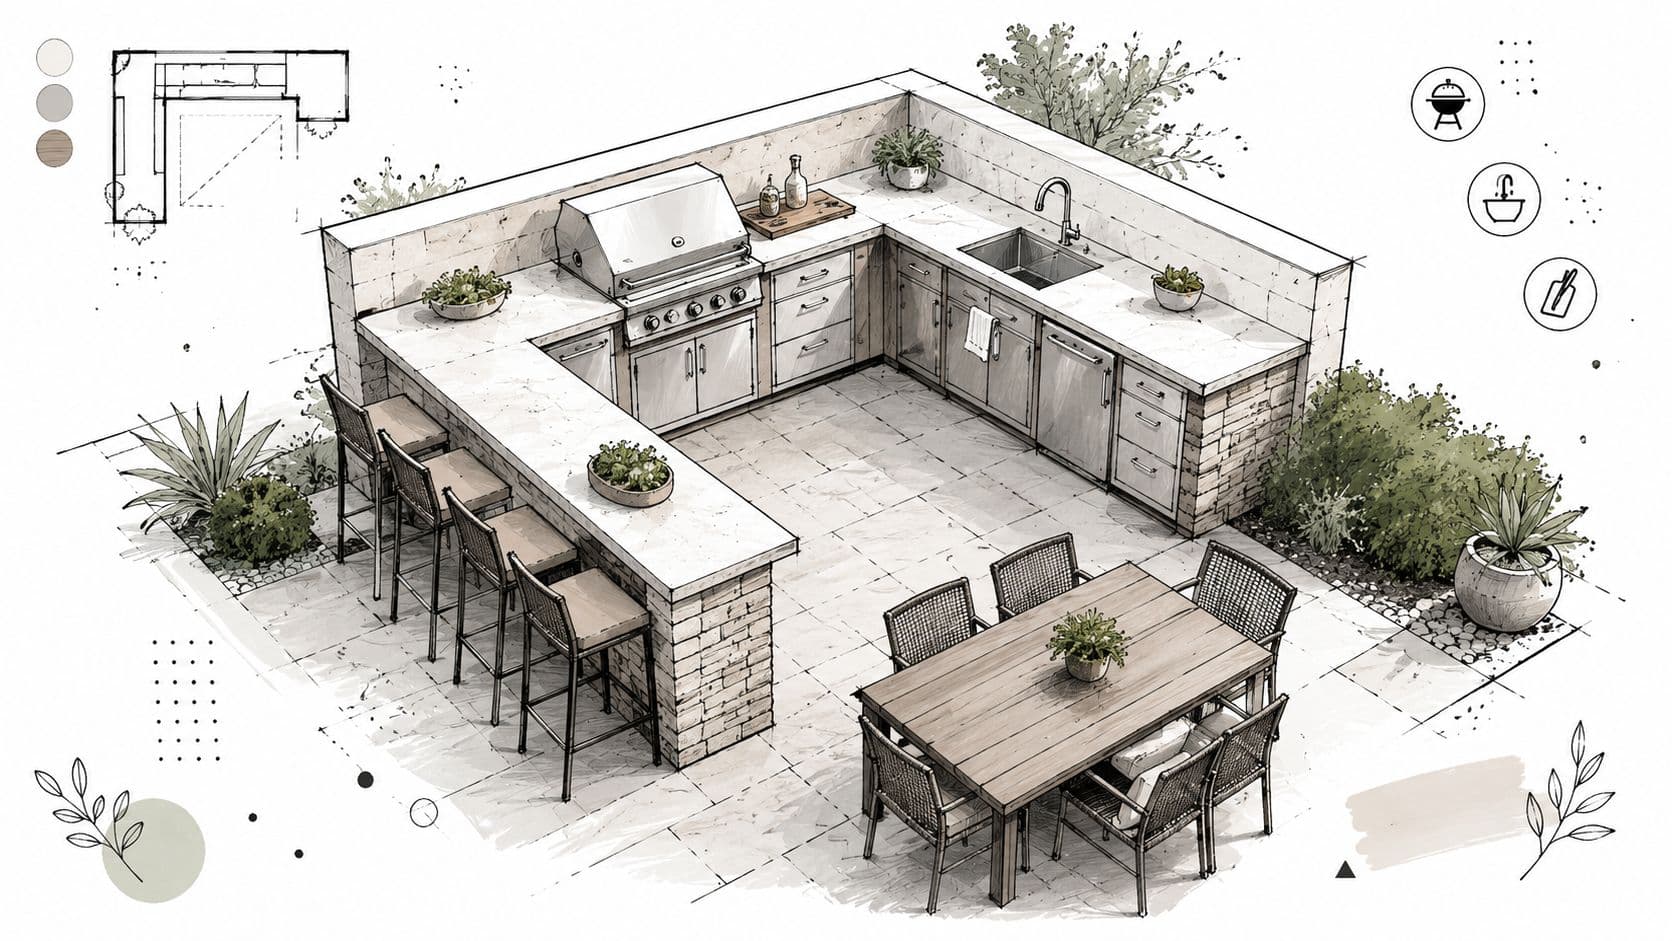
An L-shape is often the first layout I recommend when a homeowner wants a kitchen that feels complete without taking over the whole patio. It uses two connected runs to separate tasks naturally, so the cook isn't piling prep, grilling, and serving onto one crowded counter.
Blueprint
In practical terms, an L-shape works best when one leg carries the hot zone and the other handles wet and dry tasks. Put the grill on the longer run, then use the return leg for a sink, beverage fridge, or landing space. Corner placement usually makes the footprint feel calmer because the open side faces the yard or dining area.
A good mini-blueprint looks like this:
- Hot zone: Put the grill near the outer end of one leg so heat and smoke stay away from seating.
- Wet zone: Tuck the sink into the inside corner or on the shorter leg where cleanup won't interrupt cooking.
- Dry zone: Keep uninterrupted prep and plating space between the grill and sink if you can.
For a medium patio, this layout fits especially well because the average outdoor kitchen now tends to land in the 200 to 300 square foot range. That gives an L-shape enough room to breathe without making the yard feel all kitchen and no gathering space.
What works and what fails
What works is conversation. A small dining table set off one arm or a few stools on the outside edge lets the cook stay part of the group. I like this layout for suburban backyards with a roughly rectangular patio because it creates an easy social edge without demanding a large construction budget.
What fails is a badly handled corner. If the inside angle becomes dead storage, the whole layout loses efficiency.
Practical rule: If you can't reach the corner cabinet easily, use that corner for sink placement, trash pullout, or uninterrupted counter, not deep storage.
Use OutdoorBrite to test appliance placement before buying anything permanent. An L-shape can feel roomy in plan and cramped in real life, especially once grill lid swing, stools, and traffic from the house are layered in.
2. The Space-Saving Linear Layout
A straight run is the honest solution for small spaces. It doesn't pretend to be a full resort kitchen. It gives you a clear cooking wall, keeps utilities simple, and works where other layouts won't.
Blueprint
For narrow patios, side yards, townhouse courtyards, and compact decks, place everything along one line and treat every inch of counter as valuable. Keep the hot zone centered or slightly off-center, then put dry landing space on at least one side. If you're adding a sink, place the wet zone at one end so water tasks don't cut through the middle of prep.
This layout benefits from restraint:
- Hot zone: Centered grill or grill near one end with safe landing space.
- Wet zone: Sink on the far end if plumbing is worthwhile.
- Dry zone: Continuous prep strip between appliances, plus vertical storage above or below.
A rolling cart can do more work here than a built-in add-on. It gives you flexible prep room on busy days and disappears when you want floor space back.
Best use cases
Linear kitchens shine when the patio edge already tells you where the kitchen belongs. Think apartment terraces, slim decks, or modern minimalist gardens where a long cabinet run looks intentional instead of squeezed in. Seating usually works better opposite the run than attached to it, because guests can face the cook without blocking the workspace.
The biggest weakness is emotional, not technical. A linear layout can feel like a utility wall if you don't pair it with a real destination across from it, such as a bistro set, lounge pair, or planting bed. That's why I often tell homeowners to preview this one virtually first. OutdoorBrite's staging tools make it easier to check if the kitchen reads as purposeful or just pushed against the perimeter.
If you're pairing a kitchen with a compact entertaining area, this small deck guide for Manitoba homeowners is a useful companion for thinking through scale.
3. The Social Island Hub
Some homeowners want the cook in the middle of everything. An island does that better than any perimeter layout. It turns the kitchen into the gathering point rather than a service station off to the side.
Blueprint
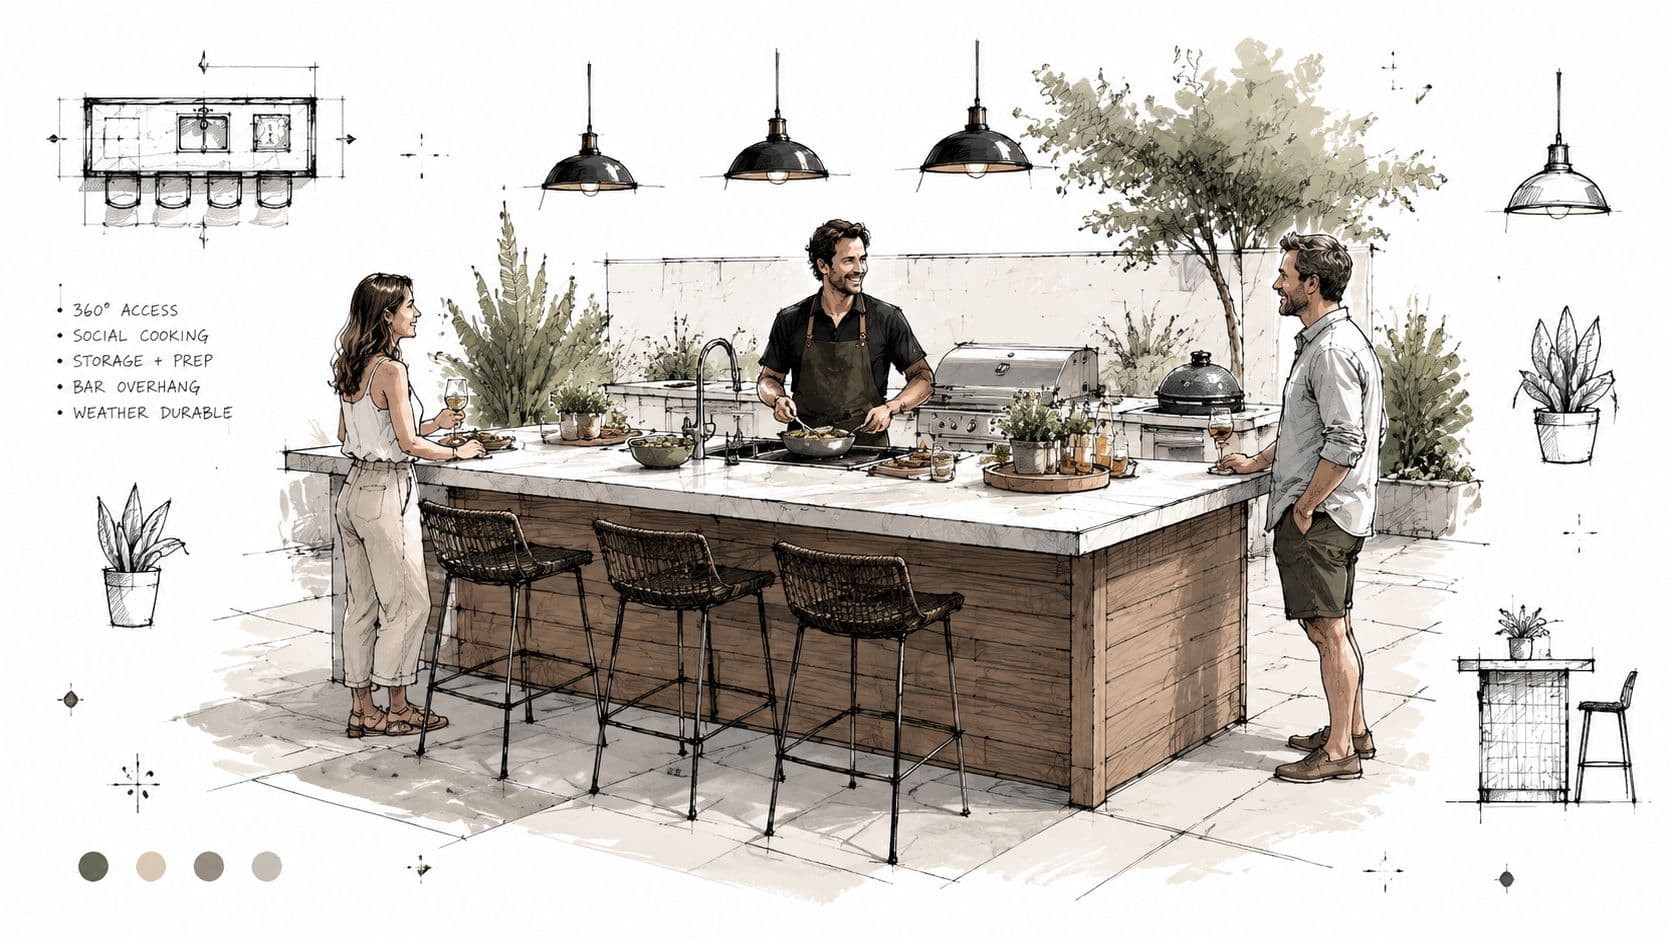
The island layout works best when there's enough open area around it to keep guests from crowding the hot zone. Build the grill and prep surface into the working side, then reserve the outer face for seating or standing room. I usually prefer a dry zone facing guests, with the hot zone tucked on the cook's side and the wet zone either omitted or placed at one end.
A simple version might look like this:
- Hot zone: Grill or griddle on the inward-facing side.
- Wet zone: Compact sink at one corner, only if you will use it.
- Dry zone: Serving counter and bar overhang facing the social side.
This is strongest in large, open backyards, pool patios, and coastal-style entertaining spaces where people naturally circulate around a center point.
The trade-off
The trade-off is exposure. An island needs more careful siting because there's no wall behind it to hide clutter, block wind, or simplify utility routing. It also asks more from your circulation planning. If stools pull out into the main walkway from the house to the yard, the layout starts fighting itself.
Keep the island for spaces where the kitchen deserves center stage. Don't force it into a patio that still needs room for a dining table, chaise lounges, and a clear path to the door.
Use OutdoorBrite to visualize the scale before committing. Islands often look smaller on paper than they feel on site, especially once you add seating and appliance clearances.
4. The Ultimate U-Shape
When someone cooks outside often, hosts regularly, and wants the backyard kitchen to function more like an indoor one, the U-shape usually rises to the top. It creates real separation between tasks, which is why it has become the dominant configuration for projects above a certain budget. In market reporting, U-shaped layouts are identified as the dominant configuration for outdoor kitchen projects exceeding $25,000.
Blueprint
This layout wraps the workspace on three sides, which makes zoning straightforward. One arm handles the hot zone. Another takes the wet zone. The third becomes your dry zone for prep, serving, and storage. The open side should face the dining or lounge area so the kitchen feels welcoming rather than boxed in.
For homeowners who want to map this precisely before construction, I'd use landscape design software for homeowners early in the process. A U-shape can be excellent, but only if aisle width, stool placement, and sightlines are tested before fabrication.
When it earns its footprint
The best U-shapes feel generous, not crowded. They suit large patios, formal entertaining spaces, and households where more than one person cooks at once. In a luxury backyard renovation, this is the layout that supports a grill, beverage refrigeration, a sink, broad prep counters, and separate serving space without everything colliding.
What doesn't work is making it too tight. If the center aisle feels pinched, people start backing into each other, and the whole advantage disappears.
- Hot zone: One full arm, ideally away from the guest approach.
- Wet zone: Opposite or adjacent arm, where cleanup can happen out of the main cooking lane.
- Dry zone: The remaining arm, reserved for prep, plating, and casual bar interaction.
Use OutdoorBrite to test sight lines from the house and from the seating area. A good U-shape lets you work efficiently while still seeing the pool, garden, or conversation zone.
5. The Versatile Peninsula
The peninsula is what I suggest when a homeowner likes the social appeal of an island but doesn't have enough room to float one properly. It projects into the space from a wall or main counter run, which gives you interaction without sacrificing too much circulation.
Blueprint
Think of it as a linear kitchen with one strategic extension. The main run usually carries the hot zone, while the peninsula becomes dry space for serving, seating, or prep. If you add a sink, the wet zone belongs back on the main run rather than at the peninsula tip, where hoses and cleanup tend to interfere with guests.
The shape works especially well in contemporary patios and transitional backyards where the kitchen needs to connect the house side to the outdoor room.
- Hot zone: Main wall or primary cabinet run.
- Wet zone: Main run, toward one end.
- Dry zone: Peninsula surface with optional bar overhang.
Why homeowners choose it
What I like about this layout is the soft boundary it creates. Guests know where to gather, and the cook still has a defined work side. It can also solve awkward geometry, especially when a patio is wide enough for activity but not deep enough for a true island.
The common mistake is overbuilding the projection. A peninsula that extends too far starts acting like an island but without the clearance an island requires. That's when stools feel jammed and walkways start to narrow.
A quick virtual test in OutdoorBrite is useful here because overhang proportions are hard to judge from a simple sketch. You want enough projection for comfort, but not so much that the kitchen reaches out into the traffic lane.
6. The Flexible Modular Kitchen
Modular kitchens are practical, not glamorous. That's exactly why they work for a lot of homeowners. Instead of locking every decision into masonry and fixed countertops, you build the kitchen in pieces and adjust over time.
Blueprint
Start with the three essentials: a grill unit, a prep surface, and enclosed storage. Then add refrigeration, a sink, or a bar component only if your habits justify them. For zoning, I still use the same hot, wet, and dry logic, but the difference is that these zones can move as your needs change.
That flexibility is one reason modular has gained traction. In one market report, 72% adoption of modular designs is cited in the U.S. outdoor kitchen market, with the appeal tied to reconfiguring appliances and counters without a structural rebuild.
Where modular shines
This layout suits DIY renovators, first-time outdoor kitchen buyers, and anyone unsure how permanent they want the setup to be. A modular stainless system on a clean paver pad can perform very well, especially in a family backyard where needs evolve. One year it's a grill and cabinet run. Later it might grow into a larger entertaining station.
The downside is visual cohesion. A modular kitchen only looks intentional when the base surface, backdrop, and surrounding furniture are handled well.
Buy flexibility on purpose. Don't buy it because you're avoiding planning.
OutdoorBrite helps here because you can mock up multiple arrangements before moving or buying components. That's particularly useful when you're deciding whether the beverage unit should sit with the cook or closer to guests.
7. The Integrated Entertainer
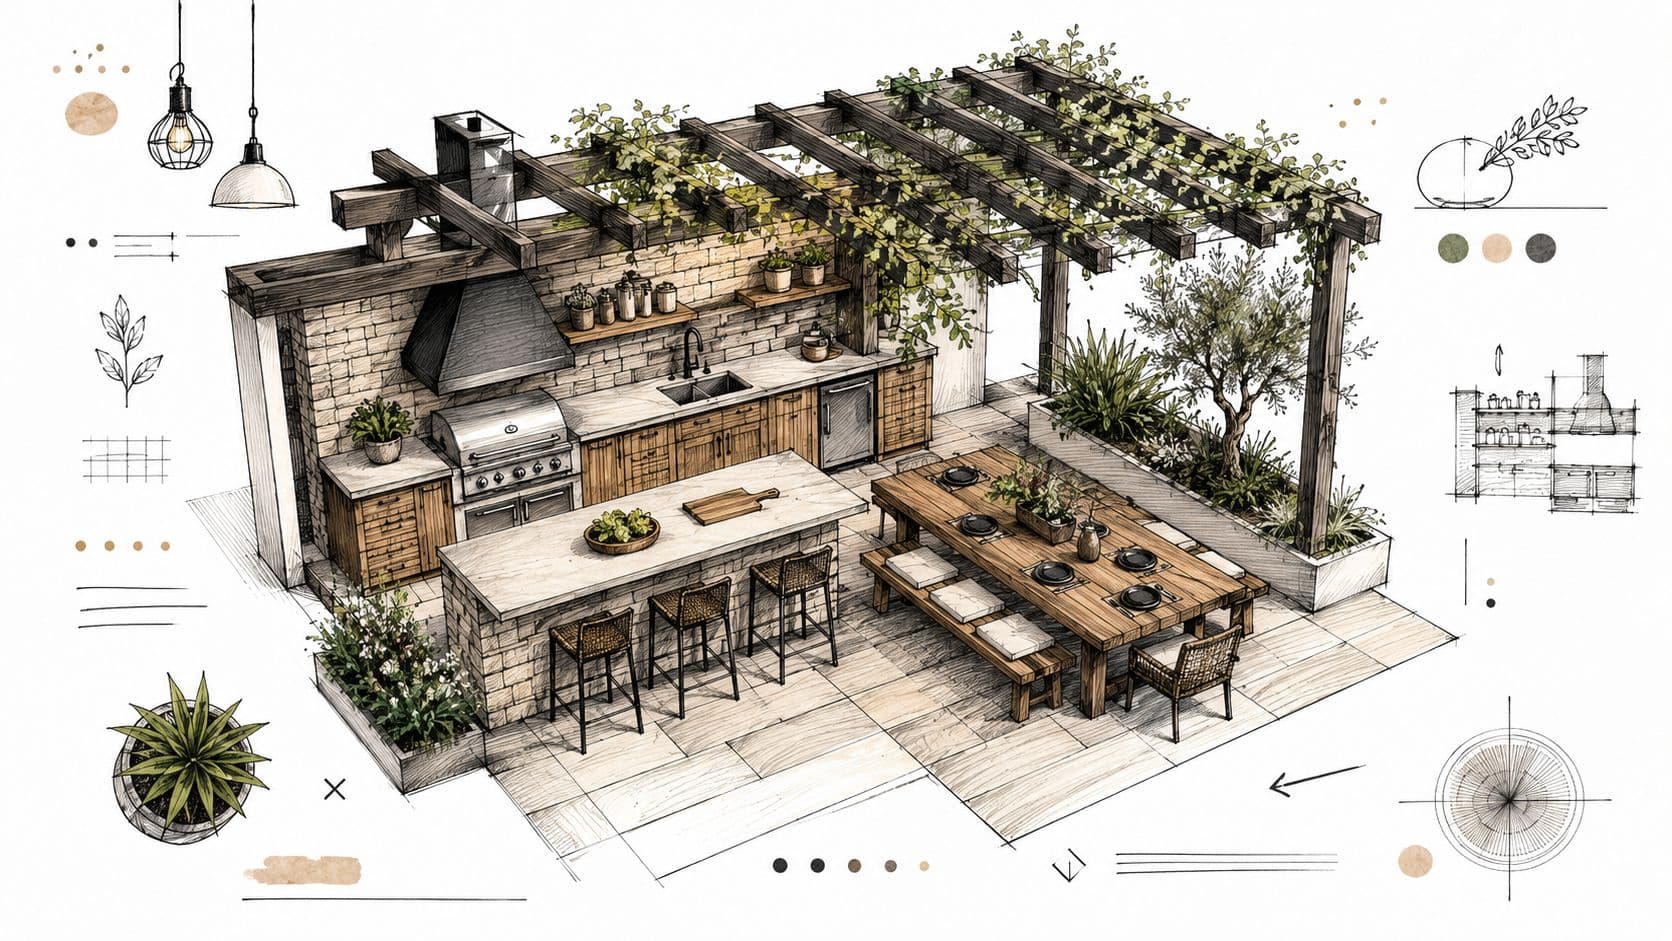
Dinner is ten minutes from the grill, kids are weaving between chairs, and someone needs a place to set a platter right now. This layout solves that kind of hosting pressure by tying the kitchen and dining area into one working composition, so cooking, serving, and sitting happen in the same zone instead of across the patio.
Blueprint
Plan for a clear serving relationship first. In practical terms, that usually means a dining table set 3 to 5 feet from the kitchen edge, close enough for fast service but far enough that chairs do not crowd the cook. I prefer the table perpendicular to the main counter run because it shortens the pivot from grill to plating area to table.
Zone it carefully. Keep the hot zone anchored on the kitchen side with proper landing space. Put the wet zone off the main serving path so one person can rinse or refill without blocking food coming off the grill. Use the dry zone as the bridge between kitchen and dining, with plating space, drinks, cutlery, or a pass-through counter.
This layout works best when the kitchen footprint is large enough to handle traffic from both sides. If you have less than about 14 feet of width to work with, the dining area often starts to interfere with prep and clean circulation. In tighter yards, a peninsula or compact island usually performs better.
What makes it work
Integrated entertaining depends on circulation more than square footage. The failure point is usually chair placement, not appliance count. Pull chairs back from the cook path, keep at least one direct route from grill to table, and avoid placing the fridge where seated guests have to stand up every time someone needs a drink.
Material continuity helps the whole arrangement read as one intentional outdoor room. A pergola over both zones, matching paving, repeated stone, or one consistent counter material will do more for cohesion than adding extra features. The Jennifer Gilmer Kitchen & Bath project shows this well, with indoor and exterior spaces tied together through finish discipline and shared visual language.
I use this layout for homeowners who host full meals outdoors, not just casual grilling. It costs more than a simple dining set next to a grill run because the spacing has to be disciplined and the materials usually need to carry across both zones. Done right, though, service feels easy and guests stay connected to the action.
Before building, test table size, chair pullback, and serving lanes with a digital mockup. You can design your backyard online free and check whether a six-seat table fits better tight to the counter or offset behind a serving ledge. That kind of virtual planning saves expensive corrections once the pergola posts, utilities, and finish surfaces are in place.
8. The Outdoor Living Room
Guests settle into deep chairs near the fire, someone asks for another drink, and the cook still needs a clear, efficient place to work. That is the test for an outdoor living room layout. It has to feel relaxed without turning the kitchen into dead weight.
Blueprint
Keep the kitchen footprint compact, but build it like a real workstation. A good starting range is about 10 to 14 feet for the kitchen run, with 12 to 16 feet between the cooking line and the main lounge grouping, depending on traffic and furniture depth. Put the hot zone at one end, away from upholstered seating and circulation. The dry zone should face the social side, usually with a short counter where drinks, snacks, and serving pieces can land. The wet zone is optional here. If the home already has easy access to an indoor sink, many homeowners skip the cost of exterior plumbing and use that budget on better seating, shade, or a fire feature.
The goal is one outdoor room with two clear jobs. Cooking happens in a controlled strip. Lounging happens where smoke, grease, and heat do not drift into conversation.
That indoor-outdoor continuity matters. The Jennifer Gilmer Kitchen & Bath project shows how shared finishes and disciplined material choices can tie the exterior space back to the house without making it feel overdesigned.
Where people get it wrong
The common failure is scale. Homeowners buy full lounge furniture, add a fire table, then leave themselves a token grill with almost no landing space. For this layout to work, the kitchen still needs enough counter for prep, plating, and a tray of drinks. I usually want at least 36 inches of usable counter beyond the grill, and more if the space will handle regular dinners instead of occasional cocktails.
Sightlines matter too. Seats should face the view, fire feature, or pool, but at least part of the lounge should still acknowledge the cook. If every chair turns away from the kitchen, the space feels split into two unrelated projects.
This layout works especially well on pool decks, covered patios, and backyards where the evening routine is more lounge-heavy than meal-heavy. Use low walls, planters, changes in paving direction, or a ceiling treatment overhead to separate zones without closing them off.
Before building, test the furniture depth, counter length, and walking lanes in a digital model. OutdoorBrite helps you try different lounge and kitchen proportions before you commit, so you can see whether the seating swallows the workspace or the kitchen feels too exposed. If you're comparing options, tools that let you design your backyard online free make it much easier to check those trade-offs before the patio is poured.
9. The Dynamic Multi-Level Design
A sloped yard can be a problem or an opportunity. Multi-level layouts turn grade changes into distinct zones for cooking, dining, and lounging. When done well, the kitchen feels anchored and the rest of the backyard unfolds around it.
Blueprint
Usually the kitchen belongs on the most stable, serviceable level. Put the hot and wet zones on that primary terrace so utility runs and cleanup stay manageable. Then use upper or lower levels for dining, firepit seating, or a poolside lounge. The dry zone can connect outward through a serving ledge or transition counter.
This approach is ideal for hillside homes, terraced gardens, and architect-led renovations where the site already has elevation shifts.
Before you watch the example below, note how much the success depends on paths and transitions, not just the kitchen itself.
The big caution
Drainage and access decide whether this layout succeeds. If water runs toward the cooking area or guests have to climb awkward steps with plates and drinks, the design stops feeling luxurious fast. I also tell homeowners to think carefully about who uses the space. Beautiful terracing can still become frustrating if every trip from grill to table involves repeated level changes.
A multi-level plan should reduce conflict between zones, not create a daily obstacle course.
OutdoorBrite is useful here because static drawings often hide how elevation affects sight lines. For inspiration on blending interior and exterior living in a coastal setting, this Jennifer Gilmer Kitchen & Bath project shows how connected spaces can feel intentional rather than fragmented.
10. The Dedicated Grill & Bar Zone
Saturday usually looks the same in this layout. One person is running the grill, two guests are posted at the bar with drinks, and nobody is crowding the prep surface. For homeowners who grill often but rarely cook full meals outside, that setup is usually more useful than forcing in a larger kitchen with appliances that sit idle.
Blueprint
Keep the hot zone tight and efficient. A 6 to 8 foot grill wall usually handles the basics well. That gives you room for the grill, 18 to 24 inches of landing space on at least one side, and a small base cabinet for tools or fuel access. Put the bar in its own lane, ideally 4 to 6 feet away, so guests can reach drinks without crossing into the cook's working area.
The wet zone is optional here. If plumbing is straightforward, add a compact prep sink or an ice bin at the bar side. If plumbing is expensive or the patio is far from the house, skip the sink and put the budget into refrigeration, durable counters, and better seating. The dry zone ties the whole plan together with room for trays, glassware, garnishes, and serving boards.
This layout fits best on patios that are at least 12 by 14 feet. Smaller spaces can still work, but aisle width becomes the make-or-break detail. Keep 42 inches behind the grill cook if possible, and 48 inches behind bar stools if that path also serves as a main walkway.
Who this layout suits best
This is a strong choice for households that entertain with drinks, appetizers, and grilled food rather than multi-course outdoor cooking. It also works well for game-day patios, poolside setups, and covered terraces where people tend to linger after the food comes off the grill.
The main trade-off is prep capacity. You gain a better social zone, but you give up some workspace, storage, and flexibility compared with an L-shape or U-shape kitchen. I usually advise homeowners to spend more on stool comfort and shade here than on extra appliances. Those choices get used every weekend.
Covered versions tend to perform better because the bar stays usable in more weather, and the cook is not working in full sun. Fire features can also complement this setup if they sit outside the grill circulation path and do not compete with the seating zone.
Use OutdoorBrite to test this one before you commit. It helps you check whether the bar stools block the main path, whether the grill has enough landing space, and whether the bar is close enough to feel connected without turning the hot zone into a traffic jam. That quick virtual pass can save you from building a layout that looks social on paper but feels cramped in real use.
10 Outdoor Kitchen Layouts Compared
A layout that looks good in isolation can fail once you add real circulation, appliance clearances, and serving habits. This comparison works best as a planning filter. Use it to match the shape to your yard, your cooking style, and the amount of infrastructure you are willing to build.
The table below gives you a quick read on complexity, cost pressure, and where each layout tends to perform best. I also recommend testing your top two options in OutdoorBrite before you finalize anything. A virtual pass helps you check hot, wet, and dry zones against the actual patio, instead of relying on rough sketches and guesswork.
| Layout | Implementation Complexity 🔄 | Resource & Cost ⚡ | Expected Outcomes 📊 | Ideal Use Cases 💡 | Key Advantages ⭐ |
|---|---|---|---|---|---|
| The Efficient L-Shape | Moderate 🔄, straightforward corner planning | Moderate ⚡, mid-range appliances, typical utilities | Efficient workflow and good counter area 📊 | Medium patios; homeowners wanting compact functionality 💡 | Space-efficient, multi-user friendly, customizable ⭐ |
| The Space-Saving Linear Layout | Low 🔄, simple single-line install | Low ⚡, lower install cost, minimal utilities | Simple footprint with a smaller prep zone 📊 | Narrow yards, balconies, secondary kitchens 💡 | Cost-effective, easy to maintain and upgrade ⭐ |
| The Social Island Hub | High 🔄, freestanding utilities and clearance planning | High ⚡, higher equipment and installation costs | Strong social focal point; high guest interaction 📊 | Large yards, frequent entertainers, premium builds 💡 | Central gathering, 360° access, flexible appliance layout ⭐ |
| The Ultimate U-Shape | High 🔄, complex three-sided utility and flow planning | Very High ⚡, extensive counters, appliances, utilities | Maximum workspace and storage; pro-level efficiency 📊 | Large properties and serious cooks who entertain often 💡 | Ample prep/storage, multiple cooks accommodated, efficient triangle ⭐ |
| The Versatile Peninsula | Moderate 🔄, anchored to existing wall; simpler than island | Moderate ⚡, cost-effective using existing structures | Balanced interaction with defined zones; moderate capacity 📊 | Moderate yards seeking island feel without full island footprint 💡 | Middle-ground cost/function, good traffic flow, built-in seating ⭐ |
| The Flexible Modular Kitchen | Low 🔄, plug-and-play components, easy reconfiguration | Low ⚡, lower initial expense; portable options | Highly adaptable; incremental upgrades possible 📊 | Renters, budget-minded homeowners, experimenters 💡 | Maximum flexibility, relocatable, low commitment ⭐ |
| The Integrated Entertainer | Moderate 🔄, combines dining and kitchen planning | Moderate ⚡, combined furnishings and utilities | Unified entertaining zone; short serving distance 📊 | Social hosts wanting cohesive cooking + dining experience 💡 | Easy service, social cooking, cohesive aesthetic ⭐ |
| The Outdoor Living Room | High 🔄, multi-zone planning with furniture and features | High ⚡, extensive furnishings, features, and utilities | Resort-like atmosphere; multiple activity areas 📊 | Large properties prioritizing lounging and socializing 💡 | Multi-zone experience, flexible seating, high comfort ⭐ |
| The Dynamic Multi-Level Design | Very High 🔄, engineering, terracing, and permits required | Very High ⚡, costly construction, drainage, and landscaping | Distinct zones with strong visual interest; improved site use 📊 | Sloped/hillside properties and high-end custom projects 💡 | Maximizes terrain, dramatic aesthetics, clear functional separation ⭐ |
| The Dedicated Grill & Bar Zone | Low–Moderate 🔄, focused grill/bar utilities and layout | Moderate ⚡, beverage equipment and compact build costs | High social engagement; drink-forward entertaining 📊 | Party hosts, sports fans, small-to-medium yards focused on socializing 💡 | Strong social focus, compact footprint, flexible mobile options ⭐ |
A few patterns usually decide the right choice faster than style alone. Linear and modular plans keep cost and construction demands down, but they ask you to be disciplined about prep space and storage. Island, U-shape, and multi-level layouts give you stronger zoning and better entertaining capacity, but utility runs, foundation work, and finish costs rise quickly.
If you want a practical mini-blueprint, start by checking whether each option can support three clear zones. Put the grill and any pizza oven in the hot zone, sink and cleanup in the wet zone, and refrigeration, serving, and pantry storage in the dry zone. Then confirm the dimensions. An L-shape or peninsula often works well in moderate footprints, while island and U-shaped kitchens need more room to keep aisles comfortable and safe.
OutdoorBrite is useful here because you can test those zones visually before construction starts. Drop each concept onto a photo of your yard, check whether the hot zone crowds a walkway, and see if the wet and dry zones are close enough to support real use. That step turns inspiration into a buildable plan and helps you avoid paying for a layout that fights the way you cook.
From Idea to Reality Visualize Your Dream Kitchen
You can spot a layout mistake the first time people use the space. A grill lid opens into a walkway. The sink ends up too far from the prep counter. Bar stools back into the main path to the yard. On paper, those problems look minor. Once the masonry, utilities, and countertops are in, they get expensive fast.
Good outdoor kitchen layout ideas need more than style. They need a working plan for dimensions, circulation, and zoning. The best layouts in this guide all follow the same basic test. The hot zone needs safe clearance around the grill or oven. The wet zone needs a practical relationship to prep and cleanup. The dry zone needs enough room for refrigeration, serving, and storage without forcing constant backtracking.
That is why visual planning matters before construction starts. A layout can look balanced in a simple sketch and still fail on a real patio with doors, windows, grade changes, and furniture already competing for space. I have seen homeowners choose a U-shape because it felt substantial, then realize the aisle width only works if nobody opens a cabinet door while someone else is cooking.
OutdoorBrite helps close that gap between inspiration and buildable design. You can place an L-shape, island, or peninsula onto a photo of your actual yard, test how each zone fits, and check whether your dimensions hold up in real conditions. That is especially useful with the mini-blueprints in this article. If a layout calls for wider aisles, stronger separation between hot and seating areas, or more room for service access, you can verify that before a contractor starts trenching gas or setting cabinets.
The softer decisions get clearer too. You can see whether the kitchen crowds the dining area, whether the lounge still feels inviting, and whether the whole setup looks proportionate to the house and patio. Those are design issues, but they also affect budget. Oversizing a kitchen often means more base construction, more finish material, and longer utility runs without giving you better function.
If financing is part of the project, OutdoorBrite Money may be one option to review while you move from concept to build. The main goal is simple. Choose a layout that fits how you cook, how you host, and how your yard works. Then test it visually before anything becomes permanent.
OutdoorBrite Money can help you move from ideas to action by pairing outdoor design planning with a platform built for visualizing real backyard upgrades. If you want to explore layouts, materials, and financing options in one place, take a look at OutdoorBrite Money.
See your yard reimagined
Start creating




