10 Paver Patio Design Ideas to Inspire Your Backyard
Explore 10 stunning paver patio design ideas for 2026. From herringbone to permeable pavers, find inspiration, costs, and pro tips to transform your space.
Your yard can look straightforward until the patio stakes hit the ground. The back door needs a clean landing. The grill wants a home near the kitchen. Furniture needs enough depth to pull chairs out without blocking circulation. Then the actual constraints emerge: slope, drainage, sun exposure, base depth, edge restraint, and a budget that has to cover more than just the pavers.
A well-designed paver patio earns its footprint. It creates a place to cook, dine, lounge, and move through the yard with intention, and it needs to do that without fighting the architecture of the house or creating maintenance problems a year later. Current housing and remodeling demand still points homeowners toward patios over more complex raised structures, which matches what installers and designers have seen for years. People want outdoor spaces that feel permanent, practical, and easier to expand in phases.
Good inspiration is easy to find. Good decisions are harder.
That is the gap this guide is built to close. Instead of giving you a gallery of pretty patios with no context, each idea is framed around where it works best, what it costs in practice, what can go wrong, and how to keep the finished job looking intentional rather than pieced together. That matters because the right pattern for a small grilling pad is rarely the right choice for a large entertaining patio, and the cheapest layout on day one is not always the lowest-cost option after five freeze-thaw cycles.
I also recommend testing concepts before you order material. A best free patio design app can help you compare layouts, color blends, border options, and furniture spacing in your own yard photos, which cuts down on expensive second-guessing. OutdoorBrite and similar outdoor design tools are useful for pressure-testing ideas early, before excavation starts and every change order gets expensive.
Table of Contents
- 1. Herringbone Pattern Pavers
- 2. Mixed Material Pavers
- 3. Circular and Curved Paver Designs
- 4. Permeable and Eco-Friendly Paver Systems
- 5. Sunburst and Radiating Paver Patterns
- 6. Running Bond and Offset Brick Patterns
- 7. Geometric and Tessellation Paver Designs
- 8. Large Format and Oversized Paver Designs
- 9. Colored and Stamped Concrete Paver Effects
- 10. Multi-Level and Raised Paver Patios with Seating Edges
- 10-Item Paver Patio Design Comparison
- From Idea to Installation Visualize Your Perfect Patio
1. Herringbone Pattern Pavers
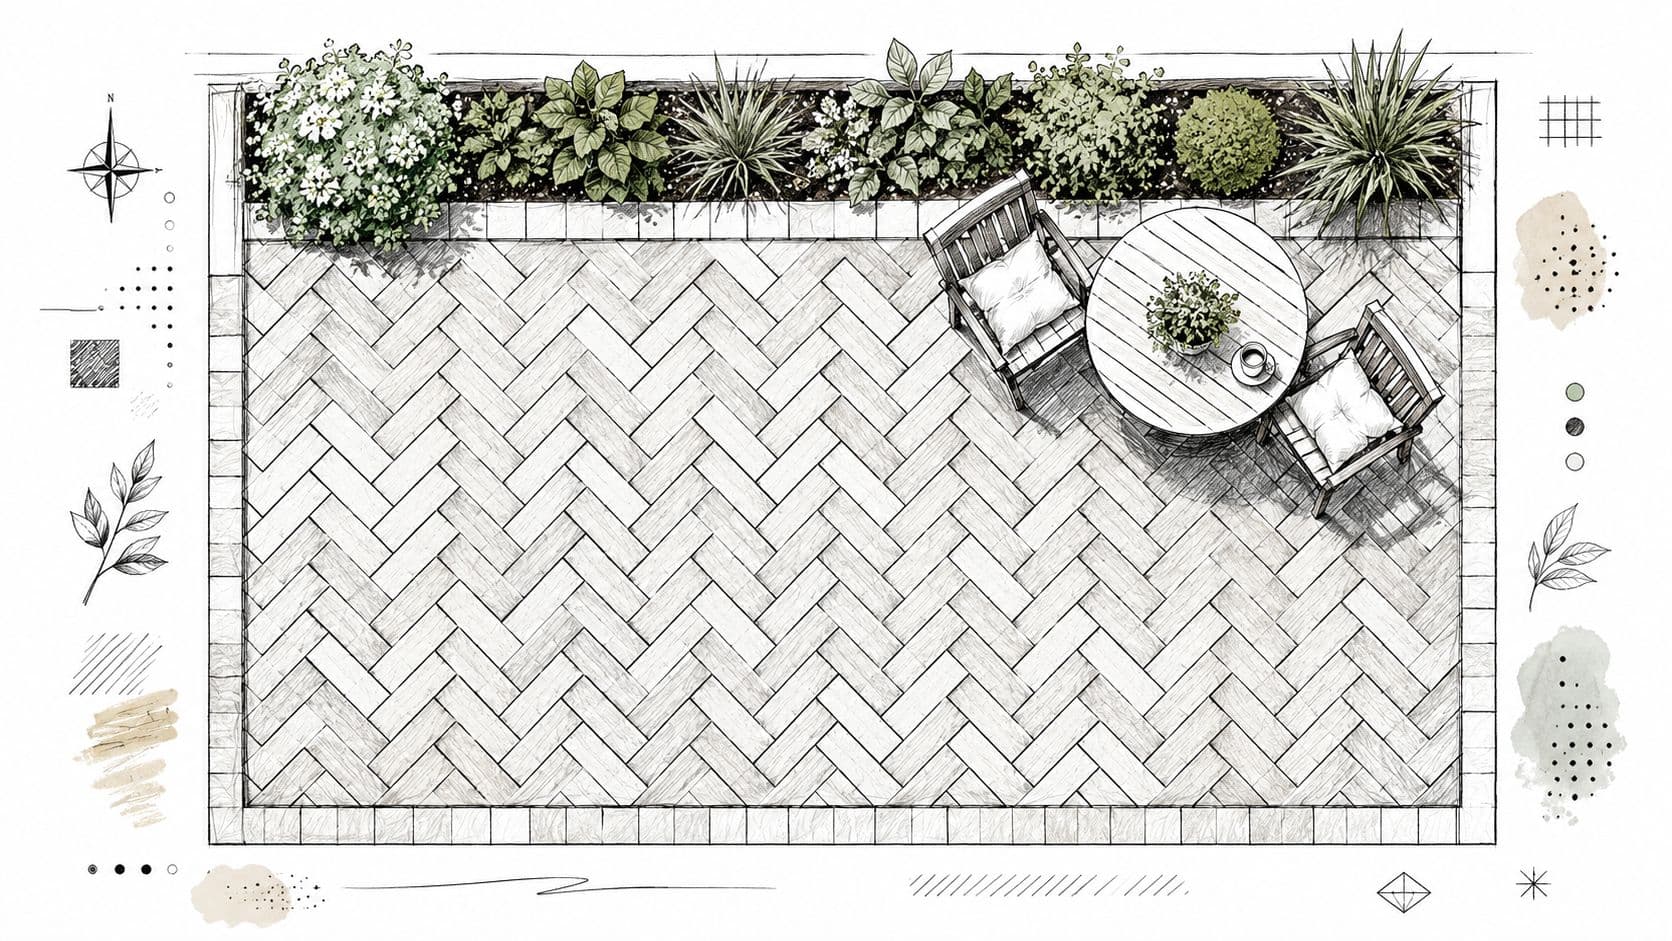
Herringbone is one of the safest smart choices in paver patio design ideas because it does two jobs at once. It looks elegant, and it handles foot traffic well. The interlocking direction changes keep the surface visually active without needing a loud color mix.
This pattern works especially well when the patio sits close to the house and needs to feel architectural instead of decorative. I've seen it fit equally well beside traditional brick homes, stucco Mediterranean exteriors, and cleaner transitional builds where the furniture does most of the styling.
Why it works
Rectangular pavers laid on a diagonal create movement. That matters on plain rectangular patios, where a simple grid can feel flat or cheap. Herringbone gives the eye somewhere to go.
It also hides slight color variation nicely, so neutral pavers usually perform better than heavily blended tones.
Practical rule: Let the pattern be the star. If you choose a busy color blend and a busy layout, the patio starts fighting itself.
Best fit and watch-outs
Use herringbone for dining patios, grill zones, and any space that gets constant circulation. It also works well in phased projects where you'll add a pergola, fire pit, or planting beds later.
A few details make or break it:
- Preview the angle first: Use the best free patio design app to compare a 45-degree layout against a straighter orientation in your actual yard.
- Protect drainage early: Set slope before laying pavers. A pattern can't save a patio that holds water.
- Expect more cuts at the edges: Herringbone usually creates more perimeter waste than simpler patterns, so ordering extra material is standard practice.
- Use a strong border: Soldier course or a clean contrasting edge keeps the pattern from looking unfinished.
Realistically, this is a pattern I'd recommend when you want timeless over trendy. It rarely looks dated, and that's hard to say about many patio trends.
2. Mixed Material Pavers
A patio often looks expensive when it uses materials with restraint, not when it uses one premium product everywhere. Mixing pavers, brick, stone, gravel, or even a small deck insert can break up a large hardscape, define how each area functions, and keep the budget under control.
I use this approach when a single material would feel flat or oversized. It works especially well on patios that need separate zones for dining, lounging, and circulation, or on remodels where the new patio has to tie into an existing walk, pool coping, or porch material.
Best use cases, costs, and trade-offs
Mixed-material patios make the most sense when each surface has a job. A concrete paver field with a clay brick border is one of the safest combinations because the texture shift is visible, the detailing is simple, and the price stays reasonable. Adding natural stone insets or porcelain feature bands creates a sharper custom look, but labor and layout complexity rise quickly.
Typical costs depend on the materials and how often the installer has to switch patterns, cuts, or base details. In practice, a straightforward two-material patio usually lands above the cost of a single-material layout, but below the cost of using premium stone or porcelain across the full footprint. The value comes from putting higher-end material where people notice it first.
That trade-off matters.
How to keep the design cohesive
The mistake is giving every material equal visual weight. Good mixed-material patios need a clear pecking order.
Use this framework before you finalize the layout:
- Pick one dominant surface: Let one paver handle most of the square footage so the patio reads as one design.
- Limit supporting materials: One accent material is often enough. Two can work if one is quiet, such as gravel or a narrow border.
- Match the undertones: Warm brick fights cool gray porcelain. Samples need to be checked outdoors, side by side, in morning and late-day light.
- Plan for thickness and base changes: Brick, stone, porcelain, and concrete pavers often require different setting methods or height adjustments. Ignore that early and you create lippage and drainage problems.
- Use material changes to signal purpose: Borders, dining insets, stepping transitions, and fire pit zones make sense. Random inserts usually look decorative for the sake of it.
One more tip from the field. Scale decides whether this style looks cohesive or cluttered. In a compact suburban yard, two materials usually beat four. In a larger backyard, a restrained mix can add rhythm without making the patio feel chopped up.
Before installation, mock up the pairings in an AI visualization tool such as OutdoorBrite. It is one of the easiest ways to test whether a brick border improves the layout or just adds noise. That preview helps clients spend on the parts that will read well from the house and cut the accents that do not earn their cost.
3. Circular and Curved Paver Designs
Curves can rescue a rigid yard. If your house, fence, and property lines already give you a lot of hard angles, a curved patio edge or circular seating area can soften the whole composition.
Circular and radiused layouts work best when the outdoor setting supports them. Think cottage gardens, Mediterranean planting, decomposed granite paths, or pools and planters that already use arcs.
When curves make sense
Use curves when you want the patio to feel less formal and more connected to its surroundings. They're especially effective around fire pit zones, garden seating areas, and pathways that transition into a main patio.
They also help with odd property lines. A curved edge can disguise an awkward corner better than forcing a square patio into the wrong footprint.
Curves should guide movement, not just decorate the outline. If no pathway, seating arc, or planting bed supports the shape, the curve often feels arbitrary.
Layout tips that save headaches
Curved work takes more field judgment than straight-line installation. Small inconsistencies show up quickly.
Keep these points in mind:
- Mark the shape full-scale first: Rope, hose, or marking paint will tell you more than a paper sketch.
- Repeat the same radius where possible: Random curve changes usually read as mistakes.
- Plan edge restraint carefully: Curves need strong edge control or they'll loosen visually over time.
- Watch drainage at low points: Water tends to reveal bad geometry faster on curved layouts.
A circular patio can look beautiful beside a curved bench or a low retaining wall. It usually performs less well under a rigid dining set with a rectangular table. Match the furniture plan to the geometry or the layout will always feel slightly off.
4. Permeable and Eco-Friendly Paver Systems
A patio that puddles after every storm never feels finished. Permeable paver systems solve a practical problem first. They let water pass through the joints and into a specially built base, which can reduce runoff and make the surface more usable after rain.
That makes them a smart fit for sites with drainage pressure, downspout discharge nearby, or local rules that push projects toward more responsible stormwater handling. They also work well for homeowners who want a greener build without giving up the clean look of a paved patio.
Best use case
Use permeable pavers where water management is part of the brief, not an afterthought. They perform well on patios connected to rain gardens, gravel bands, native planting, and other low-input outdoor strategies.
They are less convincing on sites with heavy sediment washing across the surface or under large trees that drop constant debris. In those settings, maintenance becomes the deciding factor.
What you gain, and what it costs
The biggest upside is function. Water has somewhere to go besides the patio edge, which can reduce splash, runoff, and muddy low spots around the hardscape.
The trade-off homeowners often miss is that the system only works as well as the base and joint material. A permeable patio installed like a standard paver job will not stay permeable for long.
Use this framework before you commit:
- Best use case: Yards with pooling issues, runoff concerns, or a broader eco-conscious renovation plan
- Main advantage: Better drainage and a surface that feels less sealed and heat-heavy
- Main risk: Joints can clog if nearby beds shed mulch, soil, or fines onto the patio
- Typical cost: Usually higher than standard pavers because the base prep, aggregate layers, and installation standards are stricter
- Smart pairing: Native plant beds, gravel shoulders, French drains, and controlled roof runoff
Installation tips that separate a good result from a callback
Base prep matters more here than with a standard patio. The stone layers need the right depth, the right aggregate, and clean separation from surrounding soil. Skip that, and the patio may still look good on day one while slowly losing the drainage performance you paid for.
I also recommend looking beyond the patio itself. If a mulch bed slopes toward the surface, or a gutter dumps silt across the joints, maintenance goes up fast. A permeable system works best when the surrounding details support it.
Before breaking ground, use an AI visualization tool like OutdoorBrite to test how permeable pavers will look with gravel margins, planting beds, and drainage features. That step helps catch a common design mistake. Choosing the right paver, then surrounding it with materials that undermine both the appearance and the water-handling plan.
Annual cleaning is part of ownership. For the right site, that trade-off is worth it.
5. Sunburst and Radiating Paver Patterns
Sunburst layouts aren't subtle. That's their appeal. A radiating pattern pulls attention to the center and gives a patio instant structure, especially when a fire feature, fountain, or dining table deserves a real focal point.
This is one of those paver patio design ideas that can feel spectacular in the right footprint and forced in the wrong one. It needs room, and it needs a reason to exist.
Best use case
A sunburst pattern is strongest on a patio built around gathering. Fire pit circles, round dining zones, and formal entertainment areas are the natural fit.
It performs less well on narrow side yards, cramped builder-grade pads, or patios that already have several competing visual elements. If the furniture, pergola, and planting are all demanding attention, a radiating floor pattern can tip the whole space into overload.
What makes it succeed
The center must matter. That's the first rule.
Use these filters before committing:
- Anchor the middle: Fire bowl, fountain, sculpture, or a clearly defined table grouping.
- Keep colors restrained: Strong geometry reads best with a limited palette.
- Leave open viewing room: The pattern needs enough unobstructed space to be seen.
- Light it properly: Evening lighting can make the pattern legible after dark instead of flattening it.
Homeowners often love this pattern in inspiration photos but forget how much furniture can cover. If chairs, loungers, and planters hide most of the layout, you're paying for complexity nobody will experience.
6. Running Bond and Offset Brick Patterns
Running bond is the quiet professional in the room. It doesn't announce itself, but it almost always works. The staggered layout softens long straight lines and gives brick patios a settled, traditional character that suits older homes especially well.
If herringbone feels too formal and a stacked grid feels too modern, running bond is often the middle ground.
Why this pattern lasts
The offset rhythm breaks up repetition. That's why it feels more natural than a rigid checkerboard. On brick patios, especially tumbled or color-varied units, the effect is warm and forgiving.
It also fits homes where historical character matters. Colonial-style houses, cottage gardens, and traditional Southern backyards all benefit from a pattern that feels established rather than trendy.
Where it performs best
Use running bond when you want calm texture instead of pattern drama. It works well for walk-out kitchen patios, pathways that connect to a patio, and narrower spaces where a more complicated pattern would feel crowded.
A few implementation notes help:
- Use quality clay brick if authenticity matters: The aging character is hard to fake.
- Balance the cuts at both ends: Bad edge planning makes even a simple pattern look sloppy.
- Add a border if you need more finish: Running bond can feel plain without a frame.
- Expect some softening over time: Minor settling often suits this style rather than hurting it.
According to EBD Studios' patio design statistics roundup, homeowners increasingly favor patio structures that can be expanded later with features such as pergolas, fire pits, or turf grids. Running bond is a strong base pattern for that phased approach because it doesn't lock you into a highly stylized look on day one.
7. Geometric and Tessellation Paver Designs
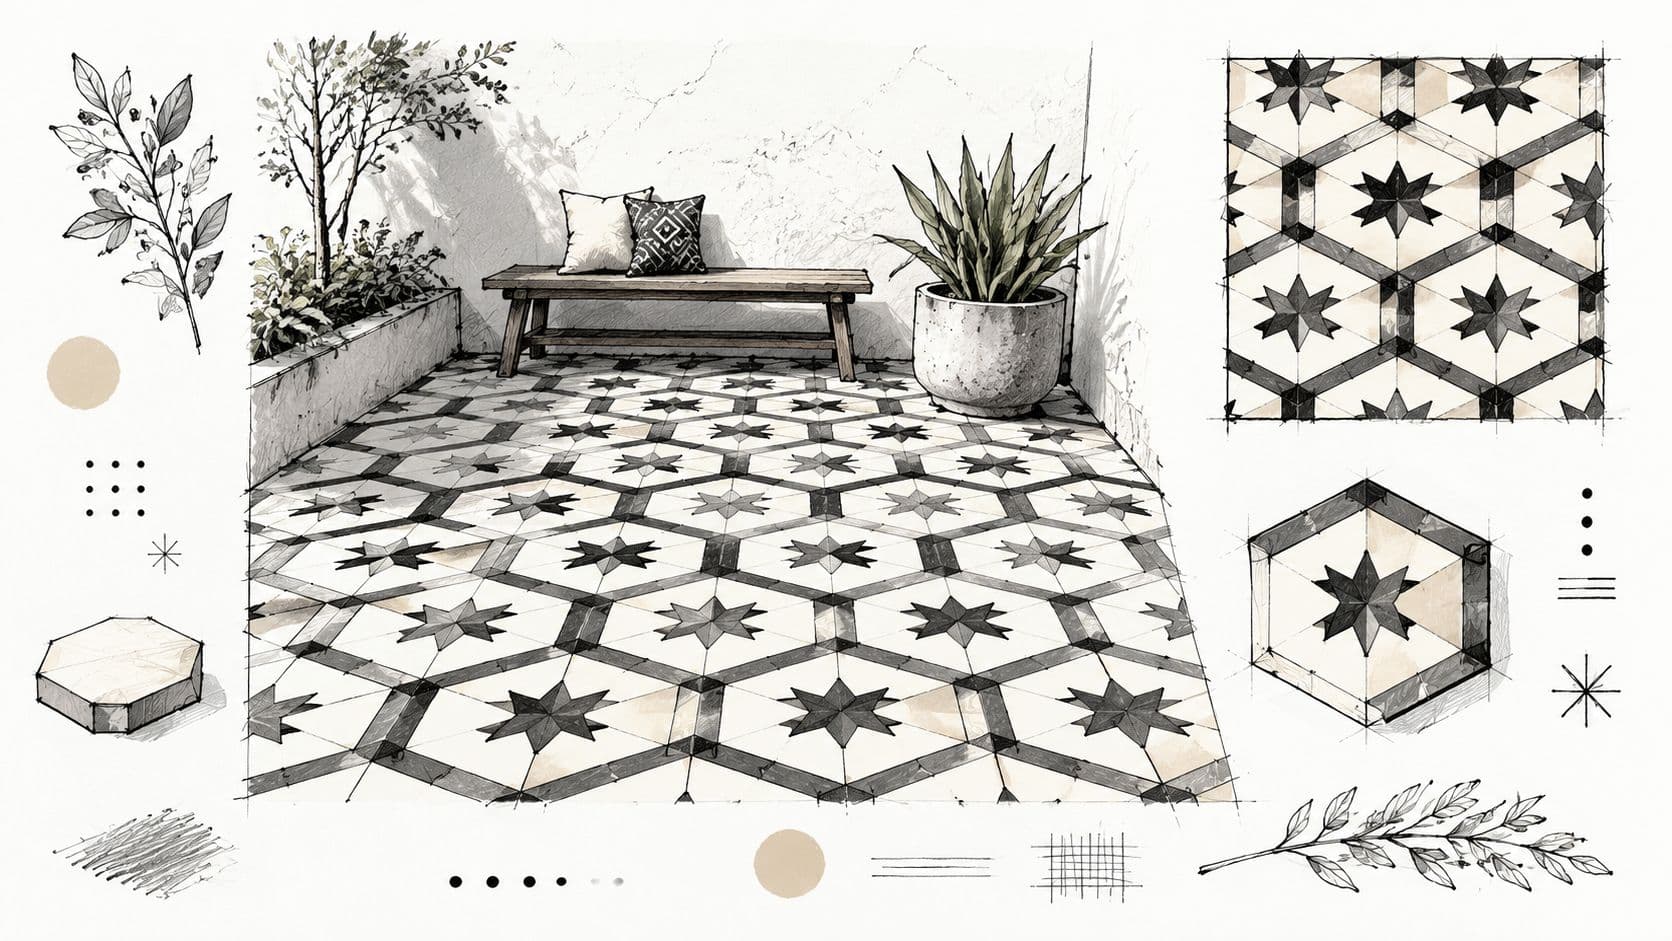
A homeowner falls in love with hex pavers on Pinterest, then sees the layout staked in their own yard and realizes the pattern is fighting the house, the furniture, and the grill island. That happens a lot with geometric patios. These layouts can look sharp, custom, and architectural, but they need more discipline than standard field patterns.
Hexagons, cubes, diamonds, and repeating tessellations work best when the patio itself is meant to be a visual focal point. I use them on contemporary homes, courtyard patios, and compact entertaining areas where the paving can carry some of the design weight.
Where geometric layouts make sense
Choose this direction if the goal is a patio with identity. Geometric paving earns its keep in spaces with restrained planting, clean-edged furniture, and strong lines in the home exterior. On a busy backyard with lots of color, multiple seat groupings, and several add-on features, the same pattern can start to feel crowded.
Cost matters here too. Expect geometric or tessellated layouts to run higher than a standard running bond or simple modular field because installation takes more layout time, more cuts, and tighter quality control. Material pricing ranges widely by shape and manufacturer, but labor is usually the bigger jump. If the budget is tight, one smart move is to use the pattern as an inset panel or dining-zone feature instead of across the entire patio.
I almost always recommend testing this style before ordering pallets. An ai patio design generator helps compare scale, color balance, and furniture fit before the crew starts cutting stone. That step saves clients from expensive pattern regret.
Pros, trade-offs, and design control
The upside is obvious. A strong geometric layout gives a patio a custom feel that plain rectangular fields rarely match.
The trade-offs are just as real:
- Best use case: Modern homes, side courtyards, plunge pool decks, and smaller patios that need a design focal point
- Main advantage: High visual impact without adding built structures
- Main drawback: Busy patterns show layout mistakes fast
- Budget reality: Usually mid-to-high cost because of cutting, planning, and install time
- Repair note: Keep extra units from the same production run, especially with specialty shapes
Pattern mapping matters more than homeowners expect. Crews need a clear layout plan before the first restraint goes in, and future repairs go much smoother when the original pattern sequence was documented. I have seen beautiful tessellations ruined by improvised edge cuts near steps and columns.
How to make it look expensive instead of overdesigned
Use fewer variables.
Keep the color palette tight, usually two tones or one field color with a subtle accent. Let the paving pattern be the feature instead of adding a loud border, ornate furniture, and high-contrast planters all at once. Geometric patios also benefit from simpler joint lines at the perimeter, where complexity tends to pile up.
If a client wants the graphic look but not the full cost of specialty pavers, I sometimes compare it against stamped concrete services for secondary patio zones or adjacent walkways. It is not the same product, and it will not give the same unit-by-unit depth, but the comparison helps clarify where real pavers are worth the spend and where a patterned surface treatment may be enough.
This kind of design benefits from seeing movement and scale in action:
One final rule keeps these patios successful. If the surface pattern is doing a lot, everything above it should calm down. That balance is what makes geometric paving feel intentional instead of restless.
8. Large Format and Oversized Paver Designs
You walk into the backyard, and the patio feels bigger before you even measure it. That is the main appeal of large-format pavers. Fewer joints, longer sightlines, and wider surface planes make the space read as calmer and more architectural.
This approach fits modern homes especially well, but it is not limited to strict contemporary design. I also use oversized pavers on transitional projects where the goal is to quiet a busy yard, simplify the hardscape, and make furniture, planting, or a fire feature stand out more clearly.
Where this option makes sense
Large-format and oversized pavers work best when the patio is meant to feel like an outdoor room instead of a decorative pattern showcase. Good use cases include:
- contemporary or transitional homes
- medium to large patios with open layouts
- spaces with clean-lined furniture and restrained planting
- backyards where fewer joint lines will improve the overall look
Common sizes include 12x24 and other elongated formats, though the right module depends on the scale of the house and the amount of cutting required at borders, steps, and door thresholds.
Pros, trade-offs, and real installation risk
The upside is visual control. The surface looks quieter, more expensive, and less busy than small-unit systems.
The trade-off is tolerance. Bigger pavers show installation mistakes faster. A slightly uneven base, inconsistent bedding layer, or poor edge restraint is easier to spot when each unit spans more area. On some products, replacement can also be less forgiving because matching large units later is harder than swapping a common smaller paver.
Bigger pavers reward precision. They also expose shortcuts.
That matters on a budget. If the choice is between oversized pavers installed over weak prep and a simpler paver installed over a well-built base, I would fund the base first every time.
What they cost
Costs vary by region, site access, material line, and the amount of cutting around the perimeter. In practice, large-format patios usually carry a higher installed price than standard modular pavers because handling is slower, the base needs tighter tolerances, and waste can climb if the layout is not planned carefully.
Use this style when the visual payoff matters enough to support better prep and cleaner detailing. If the budget is tight, reserve the oversized format for the main entertaining zone and simplify the side yard, utility path, or secondary seating area with a more economical material. In some projects, I compare those secondary zones against stamped concrete services to keep the premium look focused where people gather.
How to keep the result high-end
Restraint does the heavy lifting here. Stick with a tight color range and let scale do the work. Oversized pavers look best when the furniture layout, step geometry, and planting beds are aligned to the grid instead of fighting it.
Before installation, test the pattern against the house with backyard design ai. That step helps catch a common mistake. Homeowners often choose a paver they like in isolation, then realize the scale feels off once it is placed next to windows, columns, sliders, or a pool coping line.
One last field tip. Dry-lay a sample area large enough to see at least a few full repeats, not just two or three pieces. Large-format paving is all about proportion. If the scale is right, the patio feels custom. If the scale is off, the whole yard feels slightly awkward, even when the material itself is beautiful.
9. Colored and Stamped Concrete Paver Effects
Not every project needs true segmental pavers or natural stone. Sometimes the right move is a decorative concrete surface that mimics the look of higher-end materials while keeping the design straightforward.
This option is useful for rental properties, broad entertainment slabs, and homes where budget discipline matters more than collecting rare materials. It can also bridge style gaps well, especially on transitional homes that don't demand a highly authentic historic material palette.
Where this option makes sense
Choose colored or stamped concrete effects when you want a finished look with less pattern complexity. This is often the right fit for homeowners who care more about overall cohesion than material purity.
A patio near a pool, a large grill terrace, or a resale-focused backyard can all benefit from this approach if the texture and color are selected carefully.
What separates good from disappointing
The contractor matters more than the pattern catalog. Decorative concrete can look convincing, or it can look obviously fake.
Use these guardrails:
- Request field samples: Color shifts dramatically in outdoor light.
- Coordinate with the house: Match undertones to siding, brick, trim, and roof.
- Prioritize slip resistance: Texture and sealer choice matter on wet surfaces.
- Protect the finish with maintenance: Re-sealing and cleaning aren't optional if you want the color and texture to hold up.
If you're exploring this direction, look at examples from local stamped concrete services and compare them to actual paver installations nearby. The gap between average work and skilled decorative work is wide.
10. Multi-Level and Raised Paver Patios with Seating Edges
A sloped backyard often creates one of two outcomes. You either get a patio that feels awkwardly dropped into the grade, or you use the slope to build a layout with clear purpose.
Multi-level and raised paver patios work best when the yard already wants structure. A dining terrace near the house, a lower lounge pad, and a seat wall that also handles grade change can make the whole space feel custom instead of improvised. This is one of the few design moves that solves circulation, grading, and seating at the same time.
It also asks more from the build.
Where this option makes sense
Use level changes when the yard has a walk-out basement, a noticeable slope, or competing functions that need separation without spreading hardscape across the whole lot. A raised edge can define a dining area. A lower section can hold a fire pit or conversation set. Seating walls earn their keep on smaller patios because they reduce the need for extra chairs and keep the footprint cleaner.
A 3D preview helps here because top-down sketches hide one of the biggest risks. Proportion. A wall that looks balanced on paper can feel too tall from the lawn or too heavy from the kitchen window. A backyard design ai tool lets you test stair placement, wall height, and sightlines before excavation starts.
The trade-offs to understand first
This style usually costs more than a single-level patio because every change in height adds labor, base work, cuts, and coordination. Seat walls also need to be built like real retaining features when they hold back soil. That means proper base prep, drainage, and cap detailing. If those parts are rushed, the patio can settle unevenly or hold water where people sit.
Stairs deserve special attention. I keep them wide, obvious, and comfortable to use at night. Narrow steps and inconsistent riser heights are where good-looking patios start to feel amateur.
Details that make it look expensive
- Put walls where the grade already needs support: The best seating edge is one that solves a construction problem and adds function.
- Keep step geometry consistent: Uneven risers feel wrong immediately, even if the patio looks fine in photos.
- Plan drainage early: Water should move away from the house, away from wall backs, and away from stair landings.
- Use capstones with enough depth for real seating: A perched edge is not the same as a comfortable seat wall.
- Light the level changes: Low-voltage step lights or wall lights improve safety and make the patio read clearly after dark.
Many patios are not especially large, so dividing the space by use often works better than trying to make one flat rectangle do everything. In practice, that might mean one raised dining platform and one lower gathering zone, rather than forcing dining, lounging, and circulation into a single surface. The result feels more intentional, and it usually functions better day to day.
10-Item Paver Patio Design Comparison
| Pattern | 🔄 Implementation Complexity | ⚡ Resource Requirements & Cost | ⭐ Expected Outcomes | 📊 Ideal Use Cases | 💡 Key Advantages / Tips |
|---|---|---|---|---|---|
| Herringbone Pattern Pavers | High, precise alignment and cutting; skilled labor required | $15–30 / ft² installed; moderate material variety; 10–15% waste | Very durable and elegant; excellent load distribution | Formal entertaining, high-visibility front patios, luxury outdoor kitchens | Excellent structural integrity; hides imperfections, plan for 10–15% waste |
| Mixed Material Pavers (Stone, Brick, Concrete Blend) | Medium–High, coordination of differing materials and thicknesses | $12–25 / ft² installed; variable by premium material use | Designer-quality appearance with cost optimization | Budget-conscious homeowners seeking designer results; multi-zone spaces | Cost-effective focal accents; test samples in natural light before buying |
| Circular and Curved Paver Designs | High, increased cutting and layout complexity | $14–28 / ft² installed; 10–20% higher waste | Soft, dynamic movement; guides traffic and adds visual interest | Cottage, Mediterranean, contemporary naturalistic yards; artistic homeowners | Softens landscapes and guides flow, maintain consistent curve radii |
| Permeable and Eco-Friendly Paver Systems | High, specialized base prep and installers | $18–35 / ft² installed; specialized materials; possible incentives | Strong environmental benefits: stormwater reduction, cooler surfaces | Eco-conscious homeowners, areas with stormwater regs, green-certified projects | Reduces runoff and may qualify for incentives, perform soil infiltration test |
| Sunburst and Radiating Paver Patterns | Very High, precise geometric planning and cutting | $20–40 / ft² installed; high labor and cutting waste (15–25%) | Dramatic focal point; very high visual impact | Large entertainment patios, luxury properties, strong architectural focal points | Highly photogenic focal design, best for ≥200–300 sq ft; verify focal element |
| Running Bond and Offset Brick Patterns | Low–Medium, straightforward staggered layout | $8–18 / ft² installed; minimal waste (<5%) | Timeless, durable, long-lived performance | Traditional/colonial homes, historic properties, budget-conscious projects | Low waste and easy repairs; proven structural performance |
| Geometric and Tessellation Paver Designs | Very High, custom cutting, expert design and installation | $25–50+ / ft² installed; high material/labor cost; 20–30% waste | Highly artistic and unique; exceptional visual sophistication | Artistic/eclectic homeowners, accent patios, large installations (min ~250 sq ft) | Statement-making designs, limit to 2–3 colors and use experienced installers |
| Large Format and Oversized Paver Designs | Medium–High, heavy handling and precise leveling required | $15–35 / ft² installed; reinforced base and special equipment | Sleek, modern, low-maintenance with visual continuity | Contemporary/minimalist homes, modern outdoor living spaces | Fewer joints for easy maintenance; require laser-level installation and reinforced base |
| Colored and Stamped Concrete Paver Effects | Medium, proper base and sealing required; less cutting | $8–18 / ft² installed (poured/interlocking); low upfront cost | Realistic premium look at lower cost; moderate lifespan (20–25 yrs with sealing) | Budget projects, rentals, commercial sites, transitional homes | Affordable mimicry of stone/brick; plan for resealing every 2–3 years |
| Multi-Level and Raised Paver Patios with Seating Edges | Very High, structural engineering and complex staging | $20–40 / ft² installed; 30–50% premium possible; permits likely | High functionality and architectural interest; distinct zones | Sloped lots, design-forward homeowners, large entertaining properties | Integrated seating and improved drainage, consult structural engineer and plan ADA access |
From Idea to Installation Visualize Your Perfect Patio
A patio can look right on paper and still feel wrong the first weekend you use it. I've seen homeowners choose a pattern they loved in a sample board, then realize the scale fought the house, the color absorbed too much heat, or the furniture layout never really worked. Many patio mistakes happen in the planning stage, before the base is graded and the first pallet shows up.
That is why visualization matters. Earlier sections covered style, cost, and installation complexity. The next decision is proving which option fits your yard, your house, and the way you use the space.
A simple four-part filter works well here. Start with use. A dining patio needs different clearances than a lounge area, and a grill zone needs more forgiving circulation than a quiet reading corner. Then check style fit. Oversized pavers, brick patterns, curved layouts, and mixed materials each create a different relationship with the home's architecture. After that, look at ownership realities such as repairs, cleaning, sealing, future additions, and access for utilities. Last, test the design before you commit money to excavation and materials.
OutdoorBrite is useful in that testing phase. Upload a photo of the yard, try different paver patterns and layout directions, and compare options side by side before installation starts. That preview helps with decisions that are hard to judge from samples alone, especially contrast levels, curve placement, border widths, and the visual weight of large-format pavers. If budget is part of the conversation, OutdoorBrite Money may be one practical option to review alongside the design process.
Good patios are usually decided in the details.
Lighting, drainage, edge treatment, step locations, and furniture spacing shape whether the finished space feels polished or patched together. A clean rendering can also expose practical conflicts early, such as a fire pit crowding circulation, a seating wall cutting into table clearance, or a dark paver blend making a small yard feel tighter. If the patio will be used at night, coordinate with a qualified outdoor lighting electrician before final installation so conduit routes, fixture locations, and service access are planned from the start.
The best result is a patio that suits the house, drains correctly, and still feels good after years of use. Seeing that direction clearly before construction begins is one of the easiest ways to avoid expensive changes later.
If you're comparing patio options and want to reduce guesswork before you spend on materials and labor, OutdoorBrite Money gives you a place to start by visualizing design directions from a real photo of your yard.
See your yard reimagined
Start creating