DIY Landscape Planner Guide to Plan Your Perfect Backyard
Discover a step-by-step diy landscape planner guide to assess your yard, map zones, choose plants, and use AI previews for a budget-friendly outdoor design.
You've saved photos of patios, planted borders, pergolas, and fire pits, but your own yard still feels impossible to organize. The dining table blocks the back door, the proposed planting bed sits in deep shade, and the path to the shed cuts straight through the space where everyone wants to sit. Inspiration isn't the problem. The missing piece is a practical DIY yard planner that turns scattered ideas into a usable plan.
A strong plan starts with how people move, gather, garden, store equipment, and maintain the property. It also separates the project into realistic phases, so you can build the parts that matter most without committing to an expensive all-at-once renovation.
Table of Contents
- Why Use a DIY Landscape Planner
- Assess Your Site and Take Accurate Measurements
- Create a Scalable Base Plan
- Design Zones Circulation and Hardscape
- Choose Plants and Materials
- Estimate Budget Phase and Secure Permits
- Refine Your Plan with AI Visualization and Checklists
Why Use a DIY Landscape Planner
A yard can look attractive in a sketch and still work badly in daily life. A patio may have enough room for furniture but no comfortable route from the kitchen. A garden bed may be beautiful but difficult to water. A fire feature may become the visual centerpiece while leaving no clear space for chairs or circulation.
A planner gives you a place to test those decisions before you buy materials. You can map existing conditions, compare layouts, estimate quantities, and identify conflicts while changes are still inexpensive. That's the main practical advantage. You're solving problems on paper instead of after excavation.
The market also shows why homeowners need a clearer planning process. The 2026 National Gardening Survey reported that U.S. gardening spending reached $79.0 billion in 2025, while per-household spending rose to $740. Those figures describe a large, established category of outdoor improvement, but spending alone doesn't guarantee a successful result.
Treat the yard as connected rooms
Think of your property as a series of outdoor rooms with relationships between them:
- Arrival: The front walk, entry planting, lighting, and place to pause.
- Gathering: Dining, conversation, cooking, or a fire feature.
- Activity: Play, exercise, gardening, or space for pets.
- Service: Sheds, bins, hose access, deliveries, and maintenance routes.
- Retreat: A quieter area screened from doors, streets, or neighbors.
A phased plan might begin with drainage and access, continue with the main hardscape, then add planting and decorative features. That sequence prevents you from installing plants where a future path, utility trench, or patio extension will go.
Assess Your Site and Take Accurate Measurements
Don't begin with plant symbols or furniture icons. Begin outside with a tape measure, a long straightedge, a smartphone camera, and a notebook. A laser measure can speed up long distances, but it won't replace careful observations about slope, drainage, shade, or access.
Build the site record in layers
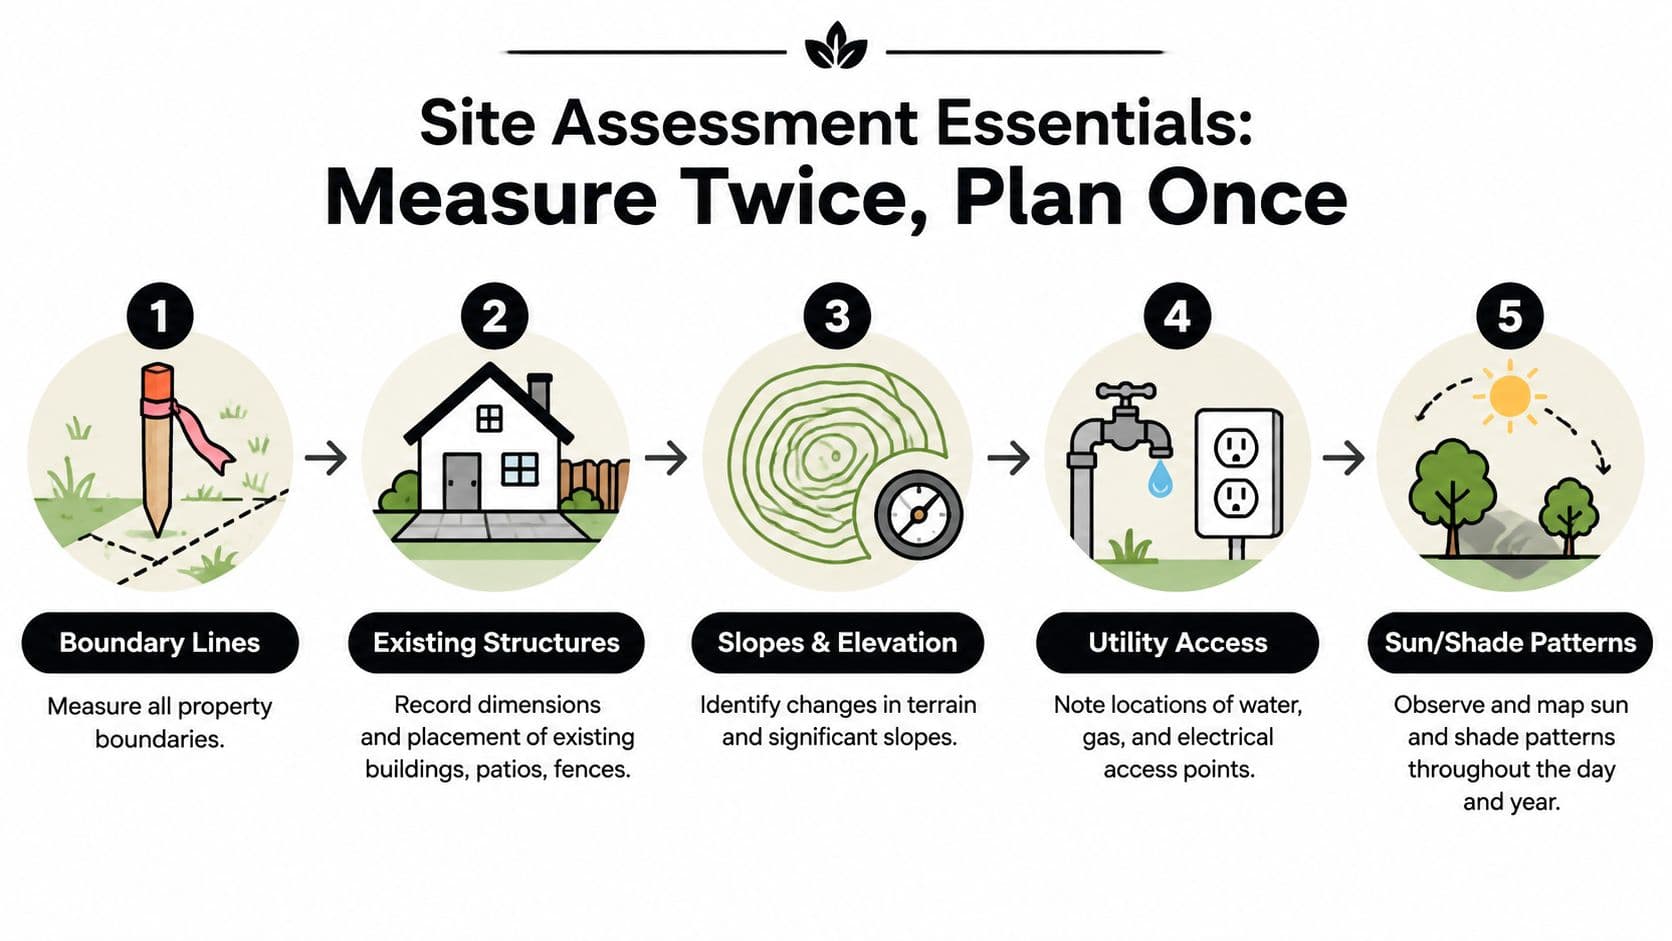
Start at the property boundary and work inward. Record the house footprint, garage, driveway, existing patio, fence lines, gates, retaining walls, mature trees, downspouts, hose bibs, outdoor outlets, utility boxes, and any access route used to bring materials into the yard.
Then study the ground. Walk the site after rain if possible and note where water collects, runs, or leaves muddy areas. Mark slopes with arrows rather than relying on memory. A modest change in elevation can affect patio construction, step locations, drainage, mowing, and the direction of a walkway.
Sun and shade deserve their own layer. Photograph the same areas at different times and label each image. Note seasonal changes too, because a tree that casts light shade during one part of the year may create a much darker planting location later.
Use a simple measurement system
Create a rough grid over the yard by measuring from two fixed reference points, such as a house corner and a fence corner. Locate every important feature by its distance from those references. This method is more reliable than estimating positions from a single sketch.
Write measurements immediately and photograph each feature with a visible reference point. If a boundary, utility location, or mature tree is uncertain, mark it as approximate and verify it before construction. A neat drawing built on a wrong measurement is still a wrong plan.
Create a Scalable Base Plan
Your base plan is the neutral drawing underneath every future idea. It should show what exists now, not what you hope to build. Keep it uncluttered, use a consistent scale, and save a clean version before adding zones, plants, or materials.
Draw the fixed elements first
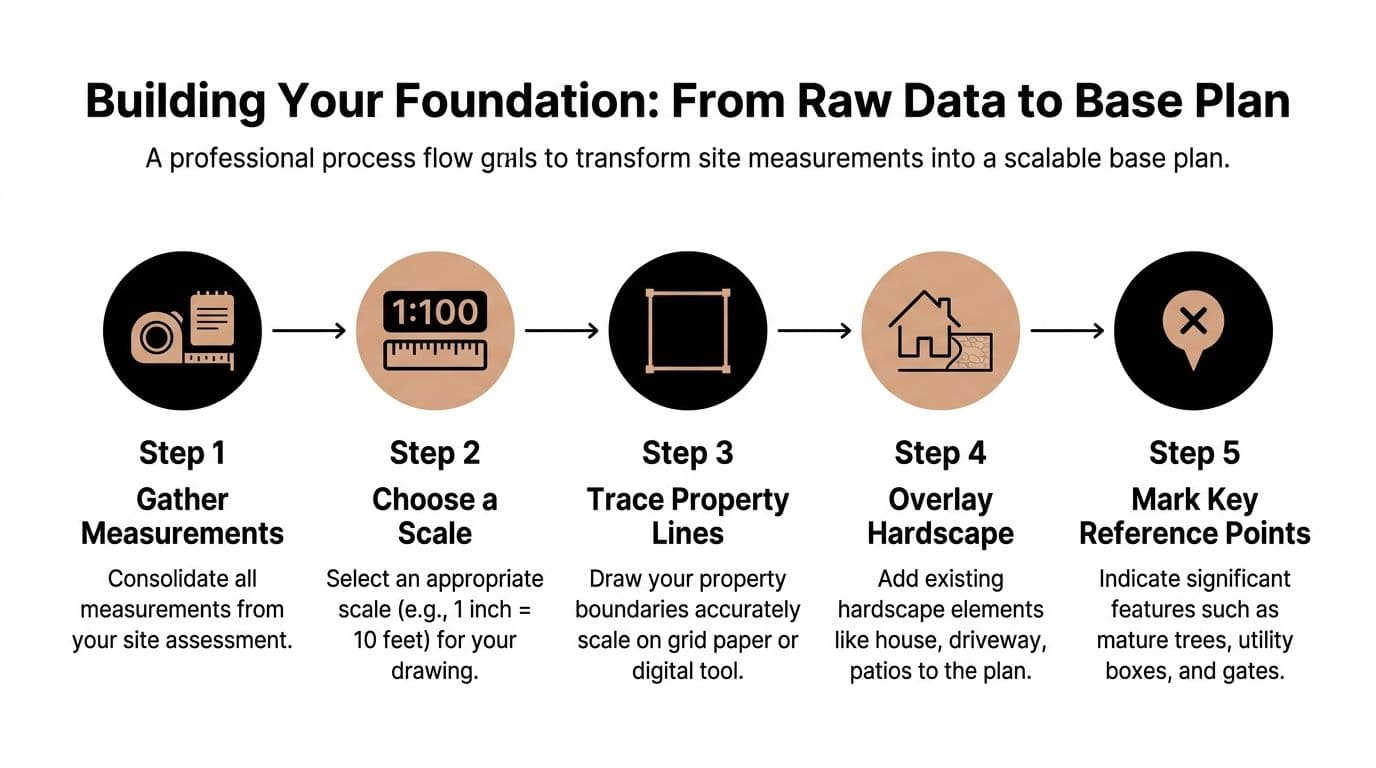
Transfer the property outline to grid paper or a digital canvas. Add the house, driveway, existing walks, patios, fences, walls, and other structures. Next, mark reference points that won't move easily, including mature trees, gates, steps, utility boxes, downspouts, and outdoor water access.
Use different line styles so the drawing stays readable. Solid lines can represent buildings and permanent hardscape. Dotted lines can show property edges or uncertain measurements. Circles around trees should reflect trunk location and approximate canopy spread, not just a decorative symbol.
Choose a scale that lets the entire site fit on the page while preserving useful detail. If the yard is large, create a whole-site plan and separate enlarged plans for complex areas. Keep the same reference points on both drawings so you can move between them without confusion.
Work on paper or screen
Grid paper is often enough for a first draft. Trace paper placed over the base plan makes it easy to test several layouts without redrawing the site. For digital work, compare options in landscape design software that supports layers, measurement labels, and printable plans.
Before moving forward, perform a scale check. Measure a known feature on your drawing and compare it with its actual measurement. If the house, driveway, or patio doesn't match, correct the scale before placing anything else.
Design Zones Circulation and Hardscape
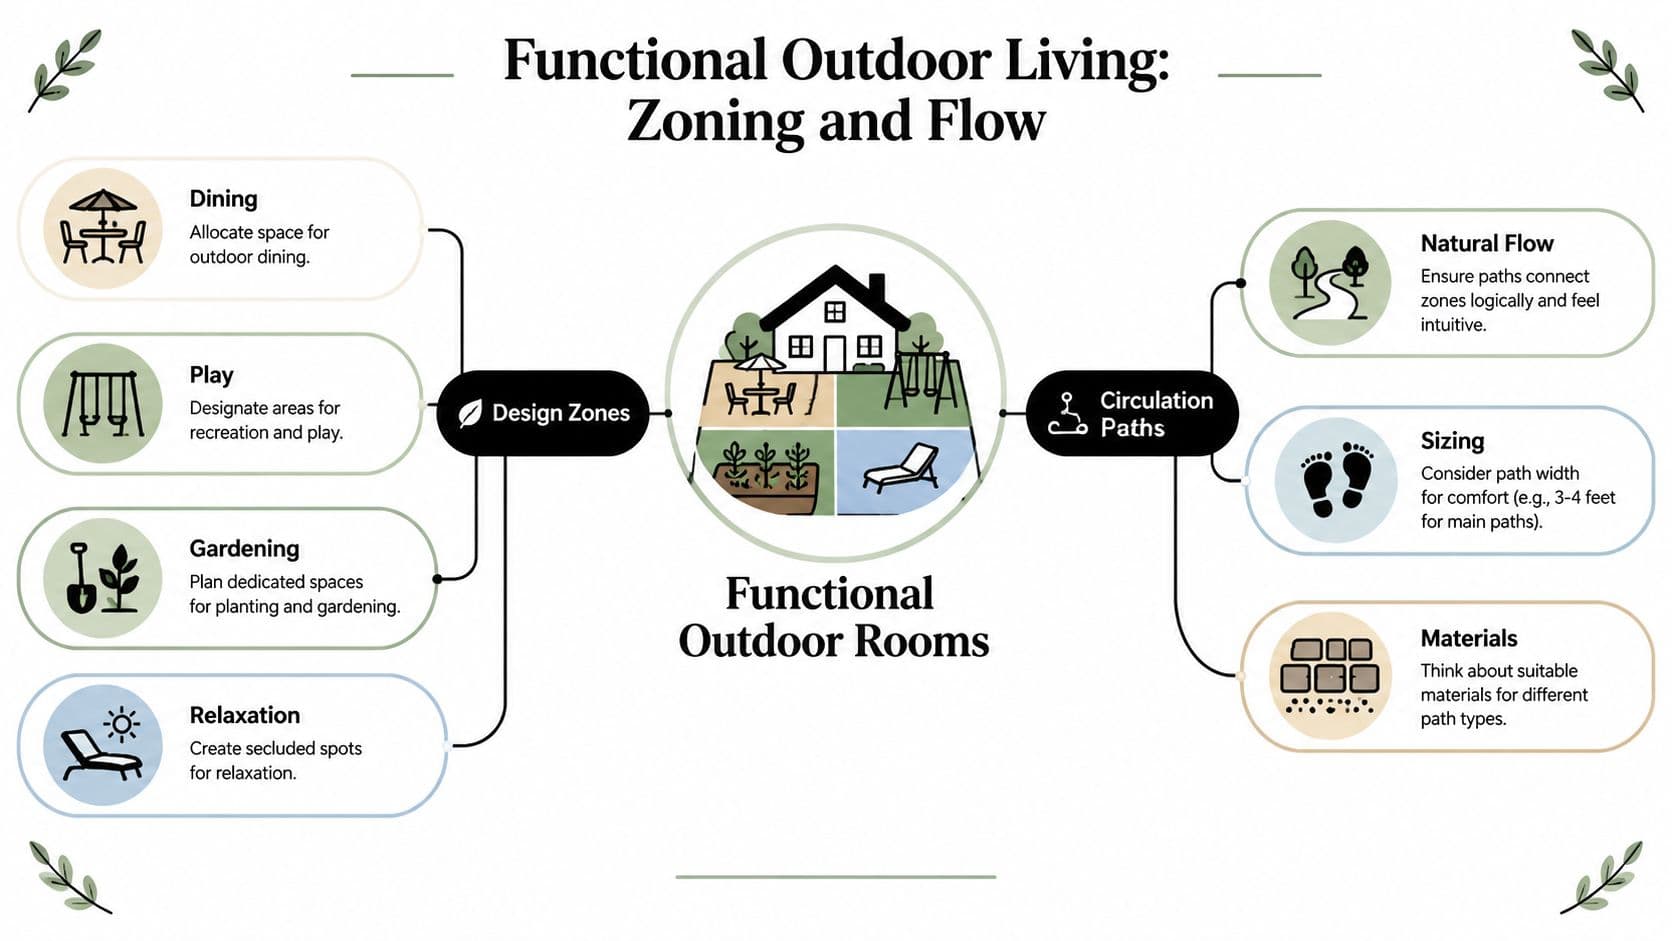
A functional outdoor area begins with activities, not objects. Instead of starting with “I want a pergola,” start with “We need a shaded dining area near the kitchen.” The feature follows the use. This prevents attractive additions from taking over space that people need for movement.
Recent coverage from the National Association of Landscape Professionals describes growing interest in multi-functional outdoor areas, while also identifying circulation as a planning gap in much DIY content. That distinction matters. A yard can contain all the right features and still feel awkward if the routes between them don't make sense.
Place activities before structures
Mark the zones your household will use:
- Dining: Keep it close to the kitchen or grilling area, with room to pull chairs out and walk around the table.
- Relaxation: Place seating where views, shade, privacy, and quiet support longer stays.
- Play: Keep active movement away from fragile planting and hot cooking areas.
- Gardening: Put beds where water access and regular observation are convenient.
- Service: Preserve a route for bins, tools, deliveries, and maintenance equipment.
Draw circulation as lines before you draw paths as finished materials. Trace the routes people already take, then identify where those routes conflict with furniture, planting, or doors. A main route should feel direct. Secondary paths can be less formal, but they still need a clear destination.
Let hardscape support the flow
Patios, steps, paths, and retaining edges establish the structure of the yard. Avoid choosing materials before deciding where the hardscape must go. Pavers may suit a formal design, gravel may support a looser garden character, and decking can work well where elevation or drainage makes a raised surface practical. Each option affects edging, maintenance, furniture stability, and future repairs.
For shade and structure, review Outdoor Leisure Living's pergola designs as visual references, then place a pergola only after checking sightlines, door clearance, shade patterns, and the route around it.
Practical rule: Draw the walking routes in a different color from the activity zones. If a route cuts through a seating area, redesign the layout before selecting materials.
Choose Plants and Materials
Plant selection should answer three questions: Will the plant suit the site, how much care will it require, and will its mature size fit the plan? A plant that looks perfect at the nursery can become a maintenance problem if it outgrows a narrow bed, dislikes the available light, or needs more water than the location can provide.
Start with site conditions rather than style. Group planting areas by sun exposure, soil behavior, moisture, and wind. Then choose a palette that repeats a few forms, colors, or textures across connected zones. Repetition creates cohesion without forcing every bed to look identical.
Compare plants by maintenance burden
Low-maintenance planting doesn't mean no-maintenance planting. It means the design matches the care you're willing to provide.
- Lower intervention: Durable plants suited to the local conditions, simple bed edges, mulch, and generous spacing.
- Moderate intervention: Mixed perennial borders, seasonal color, ornamental grasses, or plants that need regular shaping.
- Higher intervention: Formal hedges, delicate specimens, dense cottage-style planting, and features that require frequent pruning or replacement.
Native and regionally adapted plants are useful candidates, but confirm their mature dimensions and site preferences with a local nursery, extension service, or reputable plant database. Avoid filling every empty space immediately. Empty soil is easier to mulch than an overcrowded bed is to correct.
Select materials as a system
Hardscape materials should coordinate with the home, the intended use, and the maintenance plan. Pavers offer defined patterns and repairable sections, but they need a stable base and careful edge restraint. Decking creates a warmer visual surface and can handle level changes, but it brings ongoing cleaning and inspection needs. Gravel installs with fewer rigid components, yet it can migrate into planting beds and become difficult for furniture or wheeled equipment.
Make a small sample board before ordering. Place plant foliage, paver samples, paint colors, and wood finishes together in outdoor light. A material that works in a showroom may look too bright, too cool, or too busy beside the house and existing surfaces.
Estimate Budget Phase and Secure Permits
A useful budget begins with quantities, not a single attractive project total. List every phase and assign materials to it. For a planting bed, that may include soil improvement, edging, mulch, plants, delivery, and disposal. For a patio, include excavation, base material, surface material, edge restraint, joint material, tools, and access considerations.
The 2023 HortTechnology study found that 13% of households purchased DIY yard equipment, spending an average of $329 per year on those items. That makes tool planning part of the outdoor project budget, especially when a project requires equipment you won't use often.
Build a quantity worksheet
Use measured areas and volumes wherever possible. A rectangular bed can be calculated from length multiplied by width, while irregular beds can be divided into smaller shapes. For soil, mulch, gravel, or base material, multiply area by the intended depth, then confirm the result with the supplier's calculator or product guidance.
Create columns for:
- Scope: The specific task, such as bed preparation or path installation.
- Quantity: The measured amount, with units clearly labeled.
- Unit cost: The price for one bag, plant, board, paver, or delivery.
- Equipment: Owned, rented, borrowed, or hired.
- Contingency: A reserved allowance for uncertain site conditions, without treating it as available spending.
For broader planning, use OutdoorBrite's guide to what to budget for outdoor upgrades, then replace general categories with your own measured quantities and local supplier prices.
Phase the work deliberately
A sensible sequence usually protects completed work:
- Preparation: Clear debris, confirm access, and resolve utility questions.
- Groundwork: Address grading, drainage, and soil preparation.
- Hardscape: Install patios, steps, paths, edging, and structural elements.
- Planting: Add trees, shrubs, beds, ground covers, and lawn.
- Finishing: Install furniture, lighting, mulch, and decorative details.
Permit rules vary by location and by project type. Contact your local building, planning, or public works office before removing a significant tree, changing grades near property boundaries, building structures, or altering drainage. A practical reference on tree removal permit requirements can help you understand the questions to ask, but your local authority remains the decision-maker.
Refine Your Plan with AI Visualization and Checklists
A scaled plan tells you whether elements fit. A visual rendering helps you judge whether they belong together. Use both. A realistic preview can reveal that a proposed wall feels too dominant, a planting palette lacks seasonal structure, or a seating area faces an unattractive service view.
Start with a clear photo taken from the main viewing position. Include the house, existing hardscape, fences, mature plants, and the areas you're considering changing. Keep the original photo unchanged so you can compare every concept against the actual site rather than against a heavily edited image.
Test variations with purpose
OutdoorBrite can turn a photo of a yard, garden, patio, or front yard into realistic redesign concepts. Upload the image, choose a style direction, and compare alternatives for planting, hardscape, furniture, and outdoor features. Its elements editor can place features such as fire pits, pergolas, and planting beds so you can examine different arrangements before purchasing materials.
For a focused planting layout, an AI garden design workflow can help you test bed shapes and planting concepts from an image. Treat the result as a visual planning aid, not a construction document. Confirm dimensions, mature plant sizes, drainage, structural requirements, and local rules independently.
Run a final quality check
Before ordering, compare the visual concept with the base plan and ask:
- Does every zone have a clear purpose?
- Can people reach each zone without crossing another activity?
- Do doors, gates, bins, hoses, and tools remain accessible?
- Will the planting conditions support the selected species?
- Does the phased sequence avoid removing work later?
- Are quantities, deliveries, permits, and maintenance responsibilities written down?
Save the final plan with separate versions for the base map, circulation, hardscape, planting, lighting, and budget. That record makes revisions easier and gives anyone helping with the work a shared reference.
OutdoorBrite lets you turn a yard photo into realistic outdoor design concepts, compare styles, and test features such as planting beds, pergolas, and fire pits before you build. Visit OutdoorBrite to refine your DIY outdoor design planner with visual options that support both attractive design and practical circulation.
See your yard reimagined
Start creating