10 Flower Bed Layout Plans for Any Yard
Explore 10 flower bed layout plans by yard size, shape, style, and maintenance level, with measurements, plant ideas, and practical setup tips.
You're standing in the yard with a hose, a tape measure, and several competing ideas. A narrow border could frame the walkway, an island bed could break up the lawn, terraces could tame the slope, or a kitchen garden could make the space productive. The attractive option isn't automatically the right one. The best flower bed layout plans match the yard's geometry, viewing angles, access needs, sun exposure, soil, and the amount of maintenance you can sustain.
Start with measurements rather than plants. Mark the proposed outline with rope or a garden hose, note where you'll walk and work, and check the bed from windows, patios, decks, and the street. A visual preview can save you from buying edging, soil, or plants for a shape that feels wrong once it's installed. OutdoorBrite can help homeowners compare alternative concepts on a photo of their own yard before construction begins. Use the templates below as adaptable starting points, not rigid prescriptions.
Table of Contents
- 1. Rectangular Border Beds
- 2. Island Beds
- 3. Tiered and Terraced Beds
- 4. Curved and Organic Beds
- 5. Keyhole and Teardrop Beds
- 6. Raised Beds and Planters
- 7. Spiral and Mandala Beds
- 8. Perennial Succession and Pollinator Wildlife Beds
- 9. Color-Blocked and Monochromatic Beds
- 10. Edible and Kitchen Garden Beds
- 10 Flower Bed Layouts, Side-by-Side Comparison
- Choose a Layout You Can Maintain
1. Rectangular Border Beds
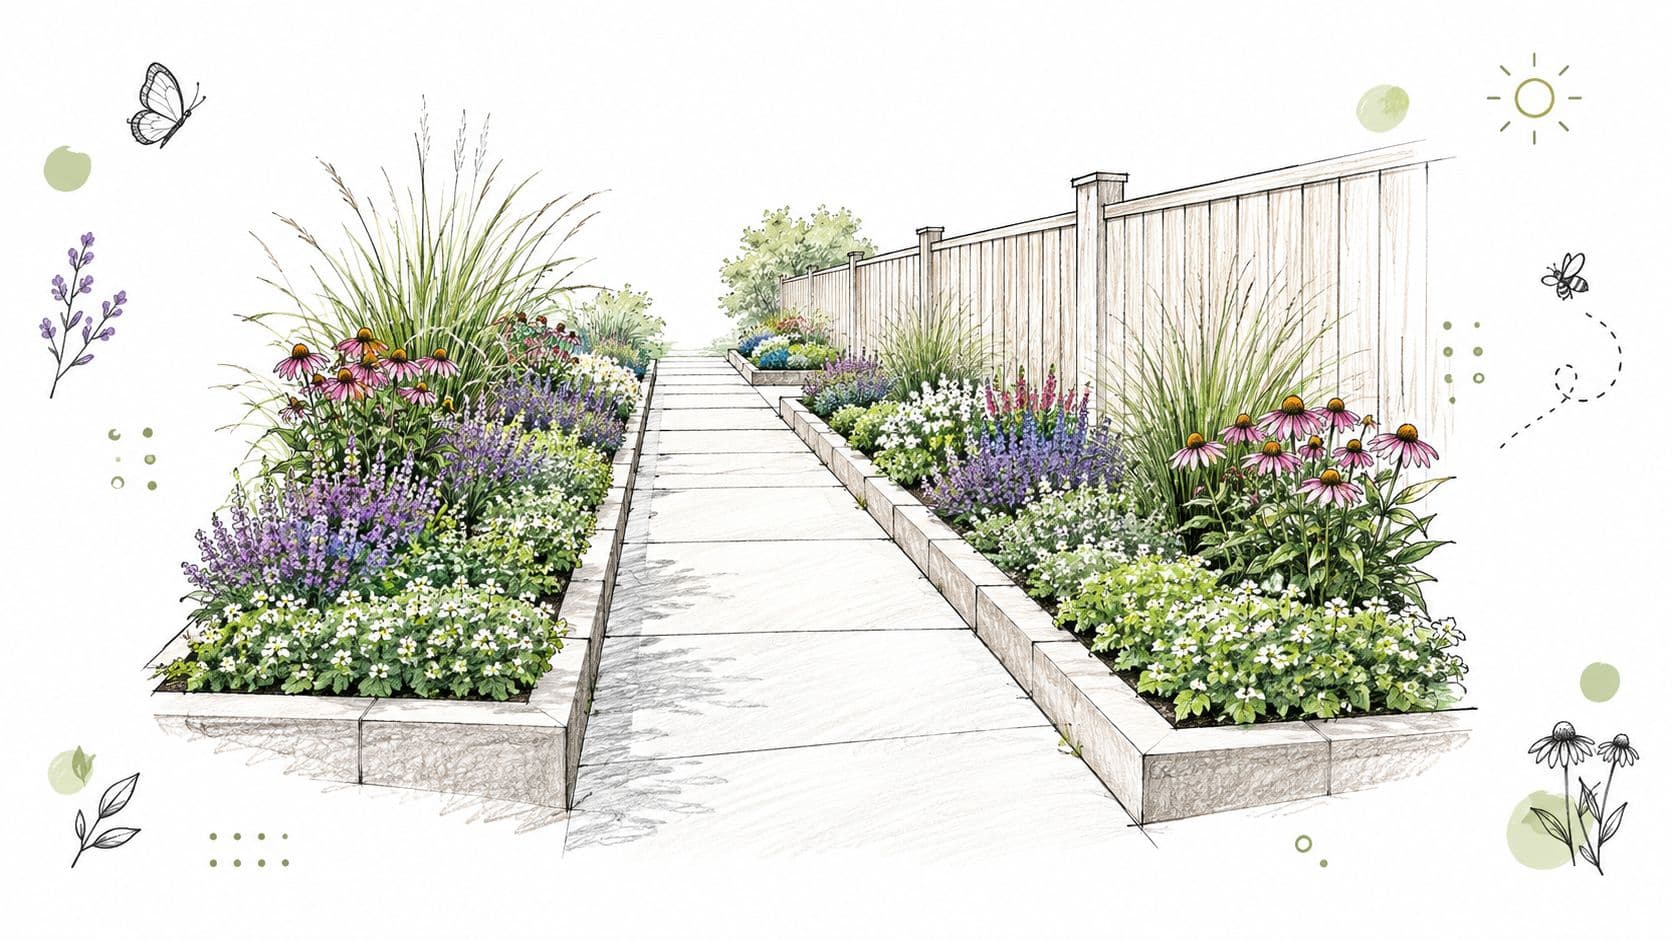
Rectangular beds are the dependable workhorses of garden design. They frame walkways, foundations, fences, patios, and property lines with an outline that's easy to measure, edge, mulch, irrigate, and replant. A pair of parallel beds along a front path can create a formal entrance, while one asymmetrical rectangle beside a modern patio can look deliberately restrained rather than traditional.
The shape also makes plant placement predictable. In a narrow bed, repeat a small group of plants instead of filling every gap with a different specimen. In a wider border, place low plants toward the viewing side, medium plants through the middle, and taller plants behind them. Cornell Extension recommends using bed width as a design constraint, with 2 to 3 feet suitable for small yards and 6 to 8 feet supporting the varied heights and continuous bloom associated with traditional English perennial borders. Cornell Extension's flower-bed design guidance also places plants under 1 foot in the front third, 1 to 3 feet in the center, and those over 3 feet toward the rear.
Where the rectangle earns its space
Use contrasting edging when you want a crisp outline. Steel, stone, brick, or a sharply cut spade edge can reinforce a modern or formal scheme, while softened planting can keep the same geometry from feeling severe. Multiple rectangles can create rhythm along a long façade, but avoid dividing a small yard into too many disconnected boxes.
Before ordering materials, test the border against actual sight lines with the best free garden design software. A bed should frame a doorway or view, not hide it, and you'll want enough room to reach the center without stepping into planted soil.
2. Island Beds
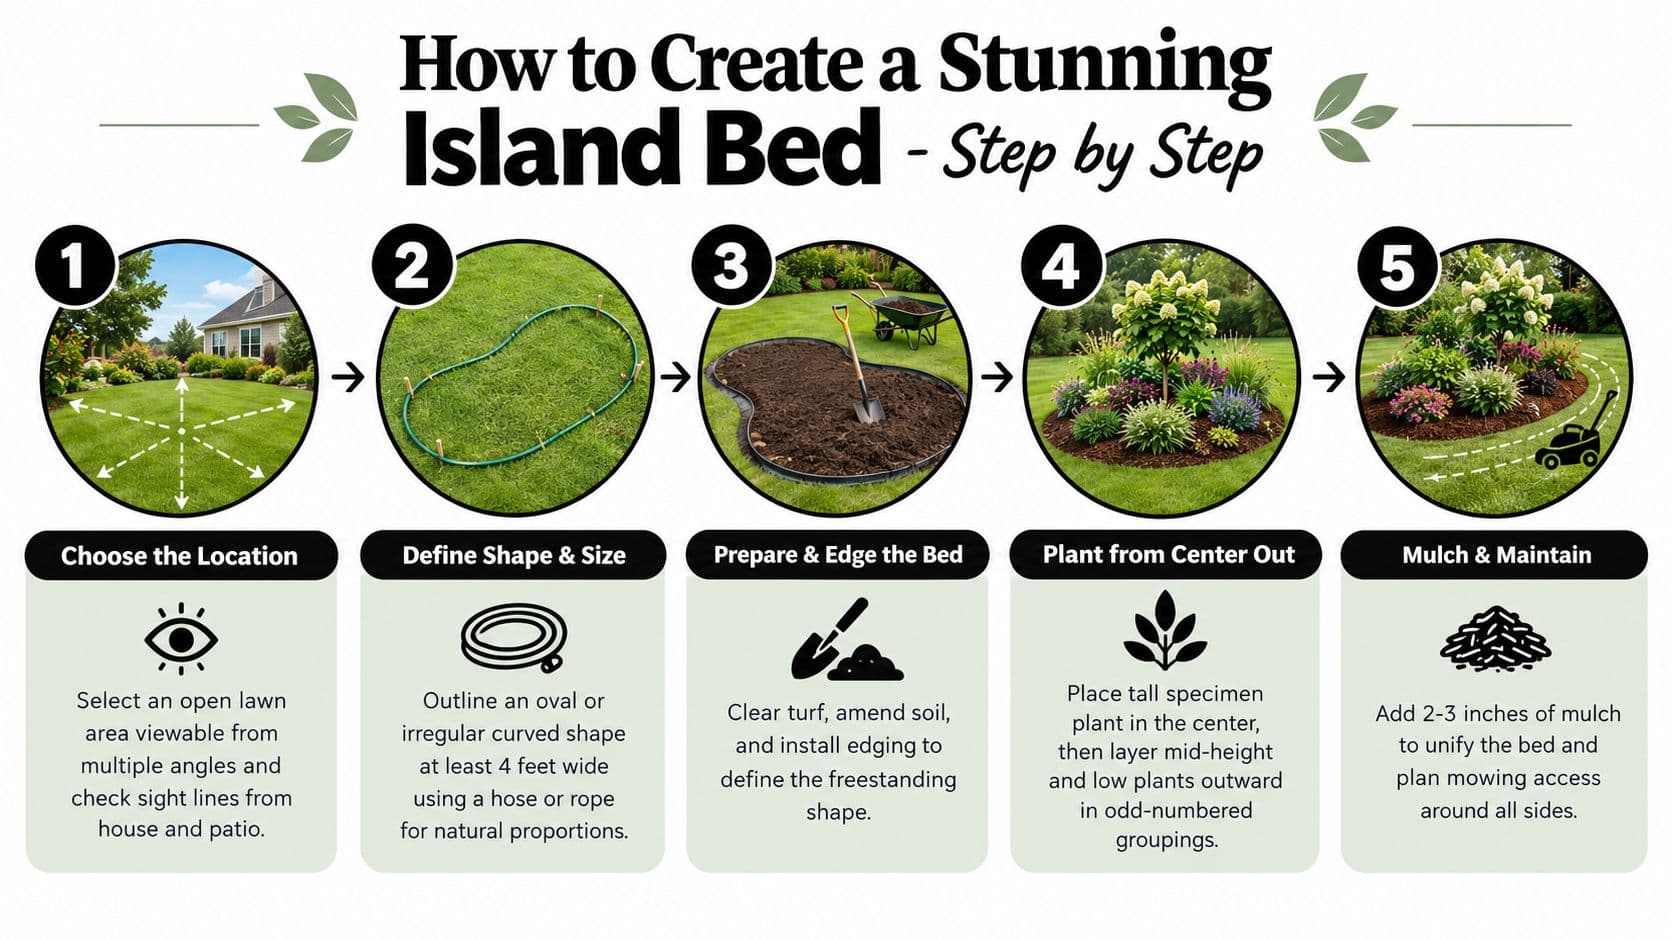
An island bed sits free of walls and fences, so every side becomes part of the composition. That makes it a strong choice for a broad lawn, an arrival court, or an open backyard that needs a visual anchor. A central bed of ornamental grasses can suit a modern yard, while a specimen tree surrounded by low Mediterranean planting can give a larger space a clear center.
The trade-off is maintenance from all directions. You can't hide an awkward rear edge behind a fence, and tall plants placed carelessly in the middle may obscure shorter plants when viewed from the house. Build the composition from the center outward, then walk around it before planting. The tallest element usually belongs near the center, with the planting descending toward the perimeter so the bed reads well from multiple approaches.
Practical rule: Treat an island bed as a small three-dimensional garden, not as a border viewed from one side.
A very narrow island often looks accidental. Plan a broad enough footprint for layered planting, and use repeated groups rather than isolated “onesie” plants. Odd-numbered groups can create a more relaxed rhythm, while a restrained palette prevents the bed from becoming a collection of unrelated purchases.
Keep the island efficient
Choose plants with similar water needs, particularly when the bed is exposed to wind and reflected heat from paving. Drought-tolerant plants can reduce the attention an isolated bed demands, but they still need an establishment plan. Mulch can unify the surface visually and help retain moisture. Colorado State Extension recommends about 4 inches of wood-chip, gravel, grass-clipping, or similar mulch for weed suppression, while warning that more isn't better because excessive depth can affect plant crowns and stems. Colorado State Extension's mulch guidance supports planning the edging and plant spacing around that material depth.
3. Tiered and Terraced Beds
A slope can be a maintenance problem, a drainage risk, and a missed design opportunity at the same time. Tiered beds divide that grade into planting levels, giving each terrace a more usable surface and turning erosion control into a visible garden structure. Timber-framed ornamental terraces suit a contemporary property, while stone-edged levels can support a quieter, more naturalistic planting scheme.
The important distinction is structural. A decorative raised edge on a gentle slope is one thing. Retaining soil on a steep grade is another, and the wall, drainage, soil weight, and access route need to work together. Water pressure behind a retaining wall can cause failure, so drainage behind the structure is not an optional finishing detail. For steep or complex sites, structural design belongs with a qualified professional rather than an improvised weekend installation.
Design each level as a microclimate
Sun, wind, reflected heat, and water movement can change from one tier to the next. Put plants that tolerate drier conditions where runoff leaves quickly, and reserve more moisture-loving selections for places that hold water without becoming saturated. Native plants suited to local conditions often make a better starting palette than forcing the same plant mix onto every level.
Maintainable terraces need paths or steps between levels. Without them, pruning, weeding, watering, and harvesting become awkward, and the garden will gradually receive less care. Visualize the walls, paths, mature plants, and soil volumes before committing to excavation. A digital concept can reveal whether the terraces will look balanced from the house and whether the upper levels will block lower planting.
A successful terrace should feel like a sequence of garden rooms, not a stack of retaining walls.
4. Curved and Organic Beds
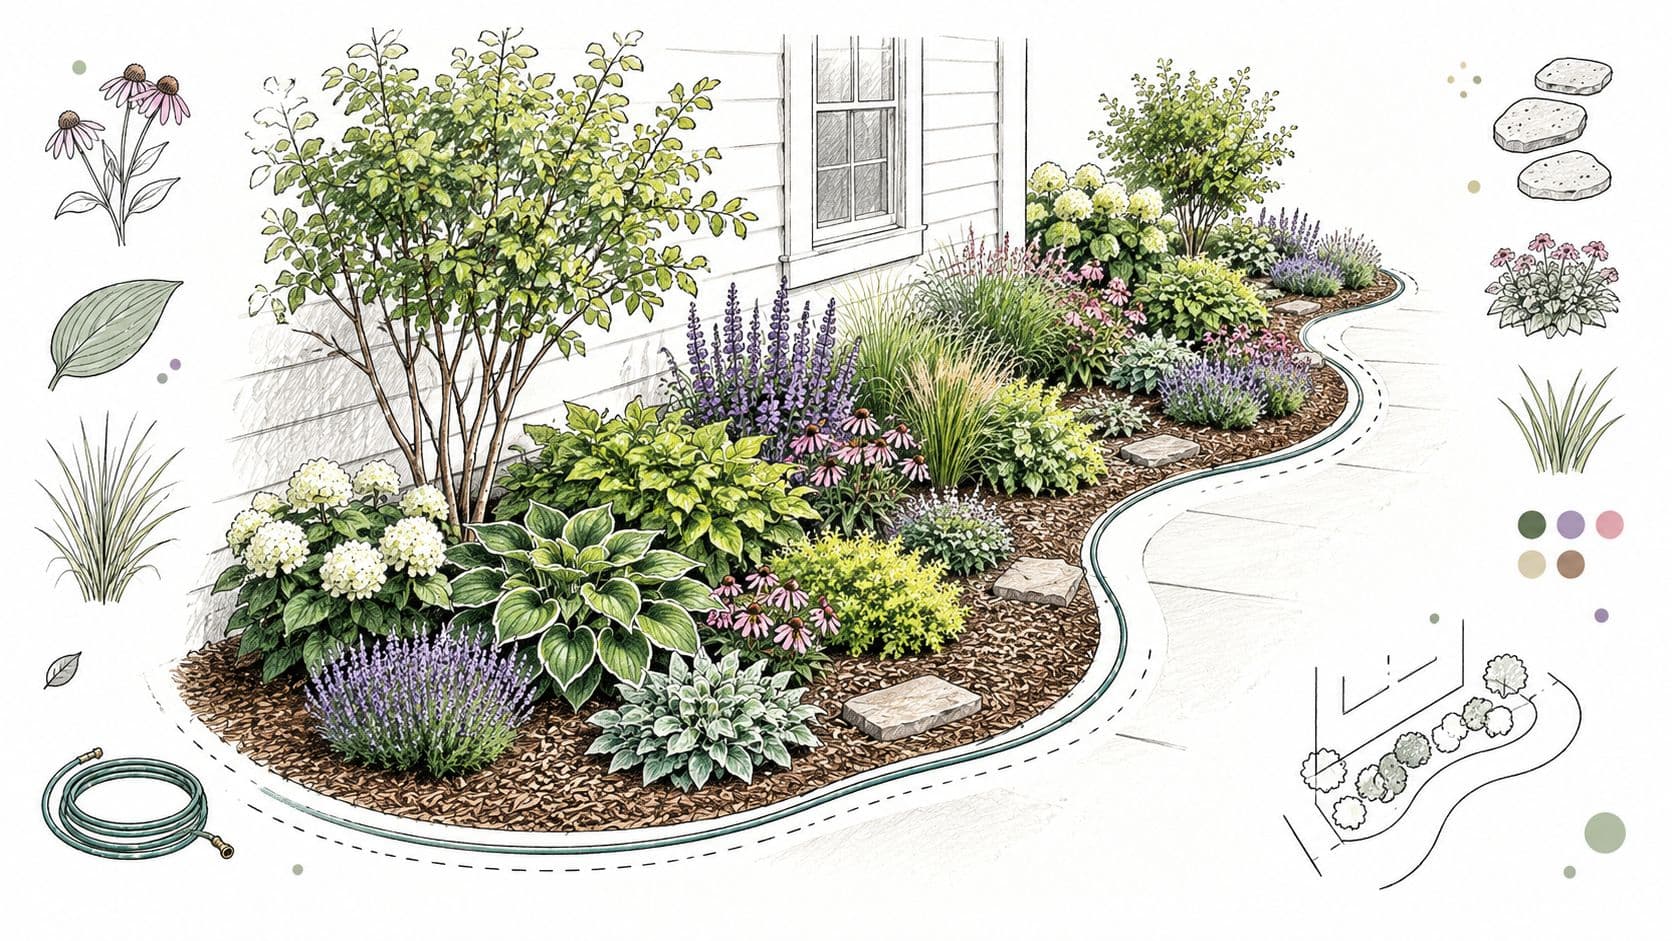
Curved beds soften the hard lines of a house, driveway, patio, or rectangular lawn. Their flowing edges work naturally with cottage gardens, woodland planting, and looser styles, especially when the planting repeats in drifts rather than forming isolated dots. A broad curve can lead the eye toward a doorway, tree, bench, or distant view.
The most common failure is overworking the outline. Tight wiggles are difficult to edge, mow around, and plant convincingly. Lay a hose or rope on the ground and adjust it from the main viewing positions. If the curve only looks attractive from directly above, it isn't doing enough practical work in the yard.
Give the curve enough depth
A shallow ribbon limits you to a single row and makes the organic outline feel decorative rather than planted. A deeper bed allows a foreground layer, a middle drift, and occasional focal plants at the outer points of the curve. Taller plants can emphasize those broad turns, but keep sight lines open near entrances, windows, and steps.
Use edging that can follow the bends without creating sharp kinks. Flexible metal or plastic edging can work, while stone and brick require more careful layout. A hose test also helps estimate the eventual mulch area, which matters before you calculate material quantities.
Curved beds suit naturalistic planting, but they still need a visual system. Repeat foliage color, flower form, or a small selection of reliable plants along the length. The result will look intentional without losing the softness that made you choose the curve. For a quick visual comparison, try a garden ai design concept using a photograph of the actual border.
5. Keyhole and Teardrop Beds
Keyhole and teardrop beds combine a rounded planting area with a narrow access stem. The shape solves a practical problem: a deep bed can hold a dense ornamental collection, but the gardener still needs to reach the center without compacting soil or stepping over plants. A central rose display, a perennial demonstration garden, or a Japanese-inspired focal area can all benefit from this arrangement.
The access stem should feel like part of the design, not an afterthought. Cover it with mulch, gravel, or steppers, and make it comfortable enough to use while carrying tools or a watering can. If the path is too narrow, you'll avoid it. If it's too broad, the bed loses the compact efficiency that makes the keyhole form useful.
Balance access and display
Keep the rounded head visually generous compared with the stem. A simple way to test the proportion is to draw the head and path on paper, then mark the walking route from the house or main gate. The most visible plants can ring the perimeter, where they'll be seen from multiple directions, while less showy fillers occupy the interior.
This layout works especially well when the bed has one strong center or a repeated circular rhythm. It's less effective for a long foundation border, where the access stem can interrupt movement without providing a meaningful destination. Add low lighting along the path if the bed is near an evening entertaining area, but keep fixtures subordinate to the planting.
Before digging, mark both the head and stem full-size. Walk through the proposed route, turn with a bucket, and check whether nearby lawn or paving leaves enough room for mowing and circulation. The finished bed should make access easier, not merely create a more unusual outline.
6. Raised Beds and Planters
Raised beds lift the planting area above existing ground, making them useful where soil is compacted, poorly drained, contaminated, or difficult to work. They also bring plants closer to the gardener, which can help people who need a more accessible or physically comfortable planting height. Urban patios, rooftops, community gardens, and minimalist yards often use raised beds because the frames create an immediate architectural order.
The material changes the character and the long-term cost. Cedar and composite boards can suit a residential garden, while stone or metal may provide a stronger visual statement. Avoid treating the frame as the whole design. A grid of identical boxes can look efficient but sterile unless plant repetition, paths, and surrounding paving give it a coherent rhythm.
Build the maintenance plan into the layout
Good access matters more than squeezing in another row. Position beds so you can reach the planting area from the paths, and leave enough circulation space for watering, harvesting, and moving soil. Drip irrigation can deliver water consistently, particularly where containers dry quickly, but it should be planned before the beds fill with roots.
Use a quality garden soil blend rather than relying on topsoil alone, and provide an effective barrier where roots or weeds could invade from below. Mulch helps reduce exposed soil and simplifies upkeep. The exact depth depends on the crop and structure, so don't confuse a mulch layer with the deeper growing medium plants need.
Raised beds can also be stacked or grouped at different heights for visual interest. That approach works beside a patio, but it increases the number of edges and corners to maintain. Choose a layout you can repair and refresh without dismantling the entire arrangement.
7. Spiral and Mandala Beds
Spiral and mandala beds turn planting into a visible pattern. A spiral can guide the eye inward, while a mandala can organize herbs, flowers, vegetables, or stone details around a central point. These forms suit an artistic courtyard, a community garden feature, a sensory garden, or a small yard that needs one memorable focal area.
The appeal comes with a clear trade-off. Curved compartments and narrow wedges create more edging, more transitions, and more decisions than a simple rectangle. If the pattern is too intricate, plants will blur the geometry and maintenance will become frustrating. Choose a pattern that remains legible at the distance from which you'll usually view it.
Plan movement before color
Sketch the spiral or radial divisions, then assign each section a planting role. Fragrant herbs can make the route engaging, while contrasting foliage can preserve the pattern when flowers fade. Different plant heights can reinforce the direction of the spiral, but avoid placing tall selections where they block the central view.
Permanent edging helps preserve the shape, especially where lawn grows aggressively into the bed. Stepping stones can create a route through the center, but they need stable placement and enough room around them for plant growth. A design tool can help test proportions, color sequences, and the relationship between the pattern and nearby structures before you buy materials.
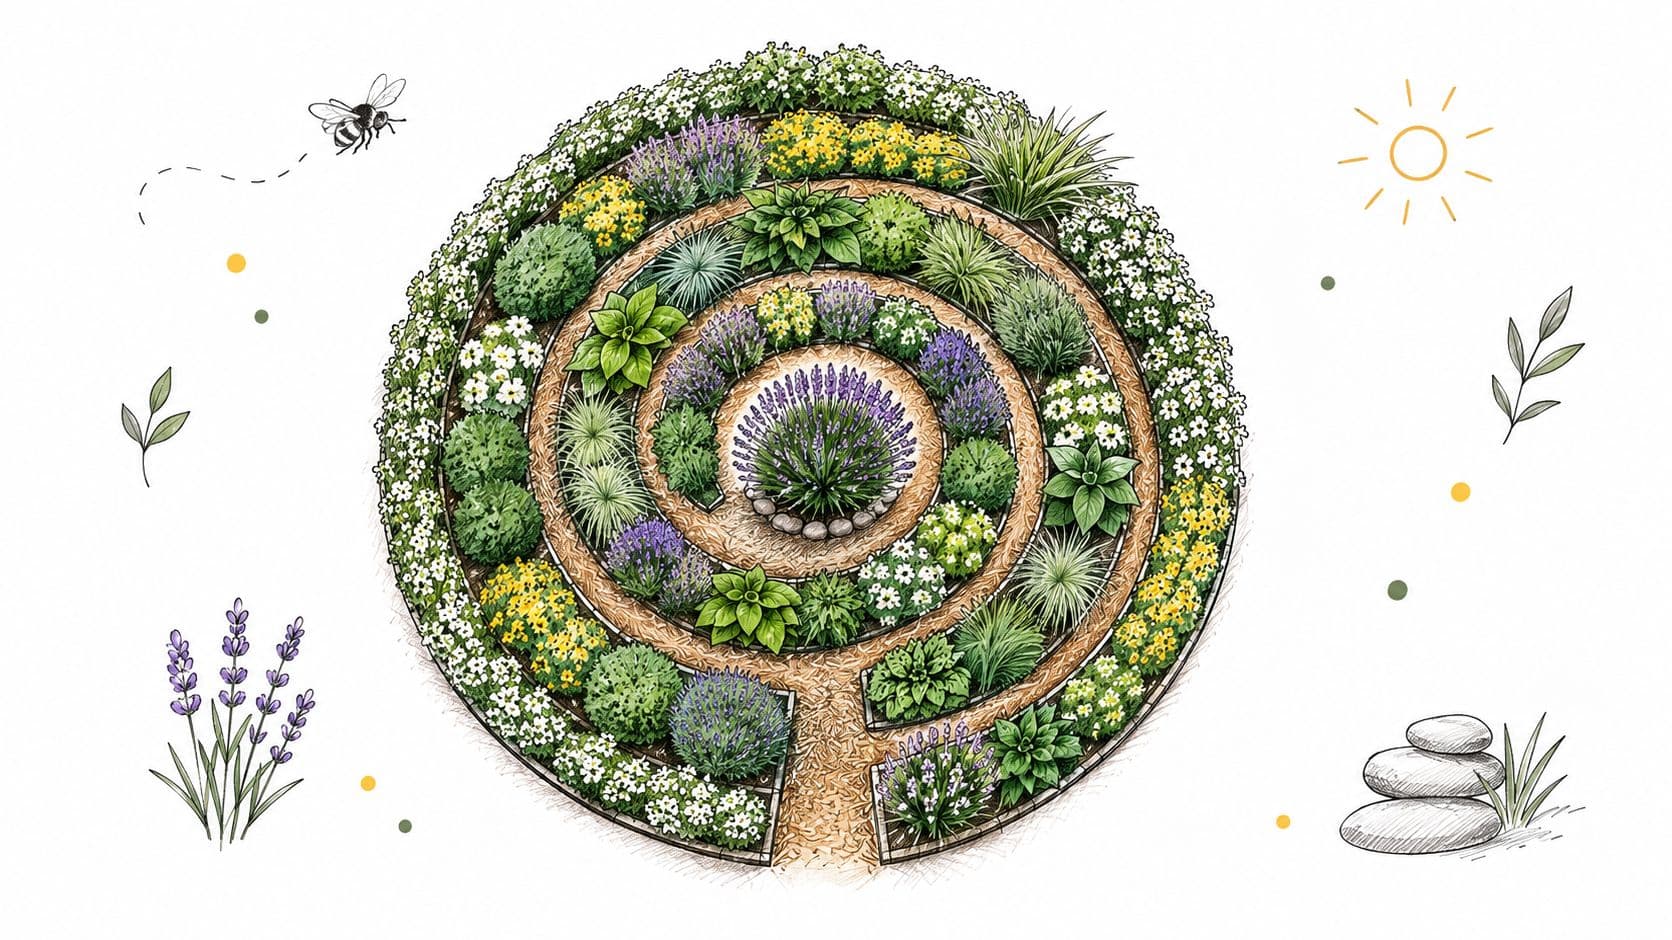
Use this layout when the geometry itself is part of the experience. If your priority is fast installation and simple mowing, a rectangular or gently curved bed will usually serve you better.
8. Perennial Succession and Pollinator Wildlife Beds
A layered mixed border can deliver more than a burst of flowers. By combining perennials, grasses, shrubs, bulbs, and locally appropriate native plants, you can create a sequence of seasonal interest while giving pollinators and other garden wildlife more varied resources. A suburban pollinator garden might combine spring bulbs, summer perennials, and fall asters, while a looser native border can rely on foliage and seed heads after flowering slows.
The layout should follow mature size and seasonal role, not the appearance of plants in their nursery pots. Put structural shrubs and grasses where they can hold the composition, repeat dependable perennials in groups, and reserve small accents for gaps that need them. Research plants suited to your local hardiness conditions and consult a regional native plant society before choosing species.
Design for the whole year
Write bloom periods on a simple seasonal map. Mark where the bed will have flowers, where foliage will carry the design, and where seed heads or stems can remain for winter interest and insect shelter. A bed that looks sparse in one season may be intentionally making room for another layer, but a bed with several simultaneous gaps will need editing.
Leave some dead stems and leaf litter through winter where it's safe and appropriate. This can make the garden look less manicured, so place tidier evergreen structure near prominent views and let wilder areas occupy the background or outer edges. The approach fits current interest in more natural, pollinator-friendly, lower-maintenance beds, as described in guidance on pollinator garden planting.
Group plants by water needs as well as color and height. Waterwise planning works best when irrigation zones follow those groups, rather than treating a moisture-loving perennial and a drought-tolerant native as identical neighbors.
9. Color-Blocked and Monochromatic Beds
Color-blocked beds organize the planting palette around a deliberate visual relationship. A white garden with silver foliage can feel calm and luminous, while a purple bed supported by burgundy leaves can look rich even during a pause in flowering. Analogous colors create a quieter transition, while bold opposing colors deliver immediate energy.
The design succeeds when foliage does part of the work. Flowers open and fade, but leaf shape, texture, and color remain in the composition for much longer. Include plants with different heights and forms within each color family, or the bed may read as a flat patch of blooms rather than a garden with depth.
Make the color plan durable
Start with a small palette and assign each color a location. Long-blooming plants can maintain the dominant note, but seasonal bulbs, annuals, and late perennials can take over as the garden changes. Repeat the same color or foliage accent in more than one area so the bed feels connected rather than divided into unrelated blocks.
A monochromatic scheme doesn't mean every plant should look the same. Pair upright flowers with rounded leaves, fine grasses with broad foliage, and matte surfaces with glossy ones. Texture keeps a white, purple, or sunset-colored bed interesting when individual blooms are between flushes.
Preview the scheme against the house, fence, paving, and neighboring plants. A color that looks refined in a catalogue can become harsh against warm brick or disappear beside dark siding. Build the planting around the view you use, not only the image that inspired you.
10. Edible and Kitchen Garden Beds
An edible bed can be productive without looking like a utility plot. Potager gardens combine vegetables, herbs, fruit, and flowers in a structured arrangement, while raised beds can organize a small urban garden into clear planting zones. Edible flowers such as nasturtiums and calendula add color, herbs along the perimeter remain convenient to harvest, and berry bushes or fruit trees can provide height and structure.
Start with what you'll use. A small, well-maintained garden is more valuable than an ambitious layout that becomes overgrown during the busiest part of summer. Divide the space into beds and paths, then place crops according to access, mature size, sun, and watering needs. Keep tall crops from shading shorter ones, and avoid putting frequently harvested herbs behind plants that spread across the path.
Combine production with rotation
Plan successive crops so the bed keeps working as seasons change. Spring lettuce can give way to summer tomatoes, followed by fall greens, while flowers occupy edges or open corners. Rotate plant families between beds in later seasons to reduce repeated soil depletion and disease pressure.
Raised beds can improve drainage and simplify maintenance, but they also dry faster and may need a deliberate irrigation system. Drip irrigation is useful for consistent watering, especially when different crops are grouped according to their needs. Add compost regularly as part of the soil-management plan rather than treating it as a rescue measure after fertility declines.
For a practical planning workflow, use these free garden layout planning tips before purchasing lumber, soil, seed, or starts. Draw the paths first, then fit the growing areas around the routes you'll use.
10 Flower Bed Layouts, Side-by-Side Comparison
| Layout Type | 🔄 Implementation Complexity | ⚡ Resource & Maintenance | ⭐📊 Expected Outcomes | Ideal Use Cases | 💡 Key Advantages / Tips |
|---|---|---|---|---|---|
| Rectangular Border Beds | Low, simple, linear planning and construction | Low, minimal materials; easy edging and upkeep | ⭐⭐⭐, defined spaces, efficient planting, easy maintenance | Along fences, pathways, vegetable plots, formal yards | Use contrasting edging; vary plant heights; cost-effective |
| Island Beds | Medium, requires 360° composition and sight-line planning | Medium, more planting, irrigation, and mowing consideration | ⭐⭐⭐⭐, strong focal points, high plant visibility | Open lawns, focal specimen displays, breaking large turf areas | Plant odd-numbered groupings; center specimen; ≥4 ft wide |
| Tiered / Terraced Beds | High, engineering, retaining walls, and drainage design | High, substantial materials and long-term structural maintenance | ⭐⭐⭐⭐, solves slopes, prevents erosion, dramatic architecture | Sloped/hillside properties, erosion-prone sites, multi-level design | Install proper drainage; hire pros for steep grades; add access paths |
| Curved / Organic Beds | Medium–High, free-form layout needs careful staging | Medium, curved edging and mowing are more labor-intensive | ⭐⭐⭐, softens hard edges, improves visual flow and naturalism | Cottage, woodland, naturalistic gardens, irregular yards | Outline curves with a hose; keep curves generous; use curved edging |
| Keyhole / Teardrop Beds | Medium, precise proportions for head and access stem | Medium, unique edging and pathway maintenance | ⭐⭐⭐, maximizes planting with center access; reduces compaction | Display gardens, high‑traffic viewing areas, dense specimen beds | Make stem ≥2.5 ft; use ~2:1–3:1 head:stem ratio; define path with mulch |
| Raised Beds / Planters | Low–Medium, buildable DIY but needs planning for soil | Medium, soil purchase, more frequent watering, periodic soil refresh | ⭐⭐⭐⭐, improved drainage, accessibility, better soil control | Urban plots, poor soil sites, accessible/therapeutic gardens, veg | Use cedar/composite; install drip irrigation; use quality soil mixes |
| Spiral / Mandala Beds | High, precise geometry and segmentation required | High, permanent edging and complex maintenance | ⭐⭐⭐⭐, striking focal feature; efficient perimeter planting | Herb spirals, small focal gardens, artistic or permaculture sites | Use proportional guides (golden ratio); install permanent edging; plan colors |
| Perennial Succession & Pollinator / Wildlife Beds | Medium–High, requires plant knowledge and sequencing | Medium, establishment period (1–3 yrs) and periodic thinning | ⭐⭐⭐⭐, season‑long interest, biodiversity and habitat value | Naturalistic borders, pollinator habitat, conservation-minded gardens | Plan bloom succession; choose natives; leave winter stems for insects |
| Color-Blocked / Monochromatic Beds | Medium, needs color theory and seasonal planning | Medium, may require seasonal replanting to maintain color | ⭐⭐⭐, strong curated visual impact; photo-friendly displays | Small spaces, formal/modern gardens, staged landscapes | Use a color wheel; include foliage color; layer heights for depth |
| Edible / Kitchen Garden Beds | Medium, layout for rotation, companion planting, succession | Medium–High, regular watering, feeding, and annual soil amendments | ⭐⭐⭐⭐, productive food yield, educational and economic benefits | Home veg plots, potagers, community or rooftop gardens | Start small (4×8), rotate crops, use raised beds and drip irrigation |
Choose a Layout You Can Maintain
The strongest flower bed layout plans solve a specific problem. Rectangular borders suit edges and defined views. Island beds anchor open lawns. Terraces make slopes usable, while raised beds address access and poor soil. Curves soften architecture, keyhole forms improve access to deep planting, and spiral or mandala designs make geometry the feature. Pollinator borders support seasonal succession, color-blocked beds sharpen the visual palette, and edible layouts connect ornament with production.
Shortlist plans by measuring the space and identifying the primary viewing angles first. A bed that looks balanced from the street may feel crowded from the kitchen window. Mark doors, paths, mower routes, hose access, utility features, and places where you'll stand to weed, prune, harvest, or admire the planting. If you can't reach a section comfortably, assume it won't receive consistent care.
Let the site narrow the plant list. Check sun exposure, drainage, wind, reflected heat, and existing soil before choosing a style. Group plants with similar water requirements, particularly if you're planning a drought-adaptive or native bed. Climate-aware layouts often use drought-tolerant natives, xeriscaping principles, rain-garden functions, and grouped irrigation rather than treating every ornamental plant as if it needs the same conditions. This approach can reduce plant failure while keeping the design polished and intentional.
A beautiful bed is a design you can still reach, water, edge, and edit after the first flush of enthusiasm has passed.
Plan plants by mature size and seasonal contribution. Decide which selections provide structure, which fill the middle, which soften the edge, and which carry color during quieter periods. Repeated groups usually create more visual clarity than buying one of every plant that catches your eye. Leave room for growth, mulch, and access instead of filling every available inch on installation day.
Calculate materials from the final outline. Measure the bed area before ordering mulch, soil, edging, pavers, or irrigation components, and remember that a deeper mulch layer affects crowns, stems, edging height, and the finished grade. Compare at least two concepts on the same photograph of your yard before spending money. OutdoorBrite can generate realistic redesign concepts from an image of a garden, front yard, patio, or backyard, then let you compare styles and refine elements such as planting beds. Its landscaping calculators can also help estimate materials such as mulch, pavers, and sod.
Maintenance deserves the final vote. If you have limited time, choose fewer plant types, repeat dependable performers, simplify the edges, and group irrigation by water need. If you enjoy seasonal editing, a more complex perennial, color, or geometric design may reward the extra work. For long-term results, include the care of adjacent features too, including fence cleaning and protection practices such as those described in this guide to cedar fence care.
Visit the site with your measurements, photos, and two or three shortlisted layouts. Preview each option from the places you use, remove any design that blocks access or exceeds your maintenance tolerance, and only then buy materials and plants.
OutdoorBrite lets you upload a photo of your yard or existing border, test flower bed styles, and compare realistic concepts before installation. Visit OutdoorBrite to preview your strongest layout, refine the planting area, and estimate materials for the project you're ready to build.
See your yard reimagined
Start creating