Garden Design and Layout That Actually Works
Learn garden design and layout principles that turn a blank yard into a space you'll use. Covers zoning, scale, plant placement, styles, and planning.
You're standing at the edge of a bare or overgrown yard with a phone full of saved garden photos and no clear place to begin. The patio seems too large, the planting beds have no obvious shape, and every plant at the nursery looks like it could work somewhere. Yet the problem usually isn't taste. It's that a few layout decisions haven't been made in the right order.
Effective garden design and layout works like planning a house. You decide what each space must do, how people move through it, how large each feature should be, and which conditions will help plants thrive. A modern visual preview can then place those decisions on a photo of your own yard, helping you spot awkward proportions before buying plants, paving, or furniture.
Table of Contents
- Why Most Garden Layouts Feel Off
- Zoning Your Yard Like Rooms in a House
- Getting Scale and Proportion Right
- Circulation and the Journey Through the Garden
- Plant Placement Driven by Microclimate
- Matching a Garden Style to Your Home
- From Plan to Planting in a Real Workflow
- A Short Checklist Before You Start Digging
Why Most Garden Layouts Feel Off
A homeowner once showed me a garden photo with all the ingredients people usually want: a dining table, lawn, flowering borders, a path, and a small tree. Nothing looked objectively bad. Still, the arrangement felt crowded. The table blocked the easiest route to the shed, the tree competed with the view from the kitchen, and the planting bed narrowed the lawn into an uncomfortable strip.
The missing ingredient was a layout decision. The owner had chosen attractive elements separately, but hadn't decided how they should work together. A garden can contain beautiful plants and expensive materials while still feeling disjointed because the relationships between features haven't been resolved.
Practical rule: If a garden feels wrong, inspect the arrangement before replacing the plants.
Four decisions appear in almost every successful yard:
- Zoning: What activities belong in each part of the garden?
- Scale: How much space does each activity or feature need?
- Circulation: How do people, tools, and equipment move between zones?
- Microclimate: Where do sun, shade, wind, heat, and moisture create different growing conditions?
These decisions apply whether you're arranging a small patio or planning a large property. A compact yard doesn't eliminate them. It compresses them. A dining area, planting border, and circulation route may overlap, but each still needs a clear job.
The same issue appears indoors. If you buy a sofa before measuring the doorway, you may discover that the furniture can't enter the room. If you place cabinets without considering the walking route, the room feels awkward even when the cabinets look good. Garden layout follows the same logic. A path, patio, tree, or hedge must fit the movement and views around it.
Homeowners working on larger or more elaborate outdoor spaces may also find this backyard design guide for luxury homeowners useful for thinking about outdoor rooms and entertaining areas. The principle is simple: plan the space before shopping for its contents.
A photo-based preview makes skipped decisions easier to see. Place a proposed patio on the actual yard image and you may notice that it overwhelms the lawn. Add a curved path and you may see that it leads nowhere useful. Move a tree into a sightline and you can judge whether it frames the view or blocks it. The rest of the process becomes much easier once the yard is treated as a set of deliberate choices rather than a collection of things you like.
Zoning Your Yard Like Rooms in a House
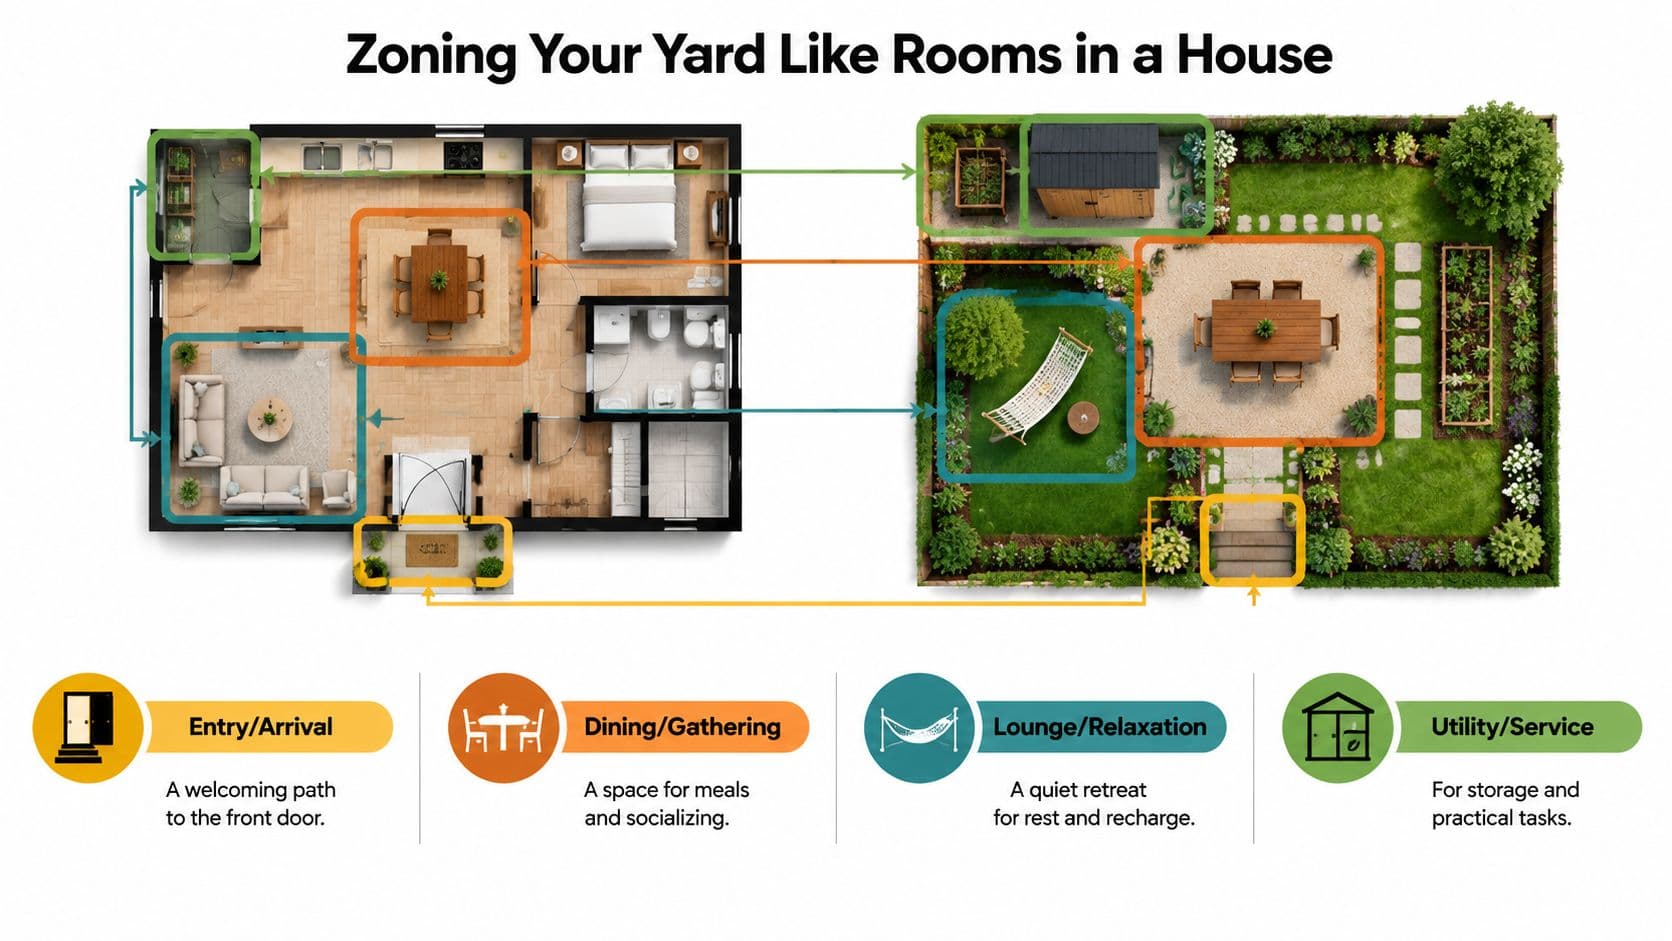
Start with activities, not plants. In a living room, you decide whether the space is for conversation, television, reading, or a mixture of those activities before choosing the furniture. Garden zoning uses the same approach.
Most homes need some version of four outdoor rooms:
- Entry or arrival: The route from the pavement, driveway, gate, or front door. It should make the entrance clear and welcoming.
- Dining or gathering: A patio, deck, terrace, or firm surface where people can sit, eat, and talk.
- Play or utility: Space for children, pets, bins, tools, laundry, storage, or practical work.
- Quiet retreat: A bench, hammock, reading corner, or planting-led area that offers separation from the busiest zone.
Not every garden needs four separate areas. On a small patio, the dining and retreat zones may share the same furniture, while a narrow side passage may combine arrival and utility. On a larger property, each activity can occupy its own room with planting or level changes providing separation.
Give each zone a job
Take a 20-by-30-foot backyard, which provides 600 square feet before subtracting structures or access routes. You might allocate roughly 180 square feet to a dining area, 180 square feet to play or flexible lawn, and the remaining space to a planting border and connecting circulation. Those areas don't need to be perfect rectangles. Soft shapes often fit a garden better than rigid boxes, provided each zone can still perform its purpose.
Ask these questions while standing outside:
- Where will people sit when the ground is wet?
- Can a child or dog move without crossing the dining area?
- Can you reach the shed, bins, or compost without walking through a flower bed?
- Does the quiet spot feel separate, even if it's only a few steps from the house?
- Which view should people see first from the kitchen or living room?
Furniture helps test the answer. Mark a table with string, place chairs around it, and walk between them. Use pots or cardboard to outline a future border. The yard will reveal problems faster when you test full-size shapes instead of relying on a small sketch.
Maintenance belongs in the zoning conversation too. A planting area beside a lawn may look tidy, but the mower still needs a clean edge and access. If a tree or shrub will require regular care, leave enough approach space around it. A resource on professional post care for trees can help you think beyond installation and include the ongoing work in your layout.
Once the zones are clear, judge their scale. A dining zone that technically fits a table may still be too tight for people to pull out chairs. A retreat corner may need less floor area but more visual enclosure. Each outdoor room must be sized for what happens inside it.
Getting Scale and Proportion Right
Stand beside the patio and look at the space from a person's height. Scale asks whether each feature feels right for the people using it and for the area around it. Proportion compares one element with another. A small chair beside a massive raised bed may disappear, while a large tree surrounded by tiny flowers can make the planting feel unfinished.
Start with the human figure as your measuring tool. An average standing person is roughly 6 feet tall, so screens, trees, structures, and seating that relate to this familiar height are often easier to read. A seating area twice as deep as it is tall can feel grounded, while a shallow platform pressed against a tall screen may feel cramped.
The same test applies to a focal point. A tree, sculpture, water feature, or brightly colored plant must have enough visual presence to hold attention from the place where people will view it. A useful starting relationship is a viewing distance of about two-and-a-half to three times the focal point's height, based on the supplied garden design guidance. Walk to that distance in the yard and check whether the feature still feels noticeable without taking over the view.
Use the site as a measuring tape
The following reference points turn an abstract design decision into something you can mark on the ground.
| Element | Recommended Size | Why It Works |
|---|---|---|
| Two-person path | 3 to 4 feet wide | Allows two people to pass or walk together comfortably |
| Dining zone | At least 9 by 9 feet | Gives chairs room to pull out around a table |
| Focal point viewing distance | About 2.5 to 3 times its height | Keeps the feature visible without making it feel overwhelming |
| Standing person reference | Roughly 6 feet tall | Provides a familiar human scale for screens, trees, and structures |
Treat these measurements as starting points, not fixed rules. A path used by one person can be narrower, while a route beside a busy kitchen door may need more room. Wide dining chairs also require more clearance than a small café set.
Place the smallest and largest objects within the same view. A mature tree can feel stranded in an open lawn when its trunk rises directly from short turf. Low groundcovers, grasses, or a broad planting bed connect the canopy visually to the ground. Around a large architectural feature, too many small plants create visual noise instead of balance.
Your own photo can test the decision before any digging begins. Add a proposed pergola, tree, or patio to the image, then compare its size with the house, fence, windows, and furniture. If the feature already looks oversized on screen, construction will not make it feel more comfortable. Adjusting a virtual outline is easier than moving paving or removing an established tree.
Circulation and the Journey Through the Garden
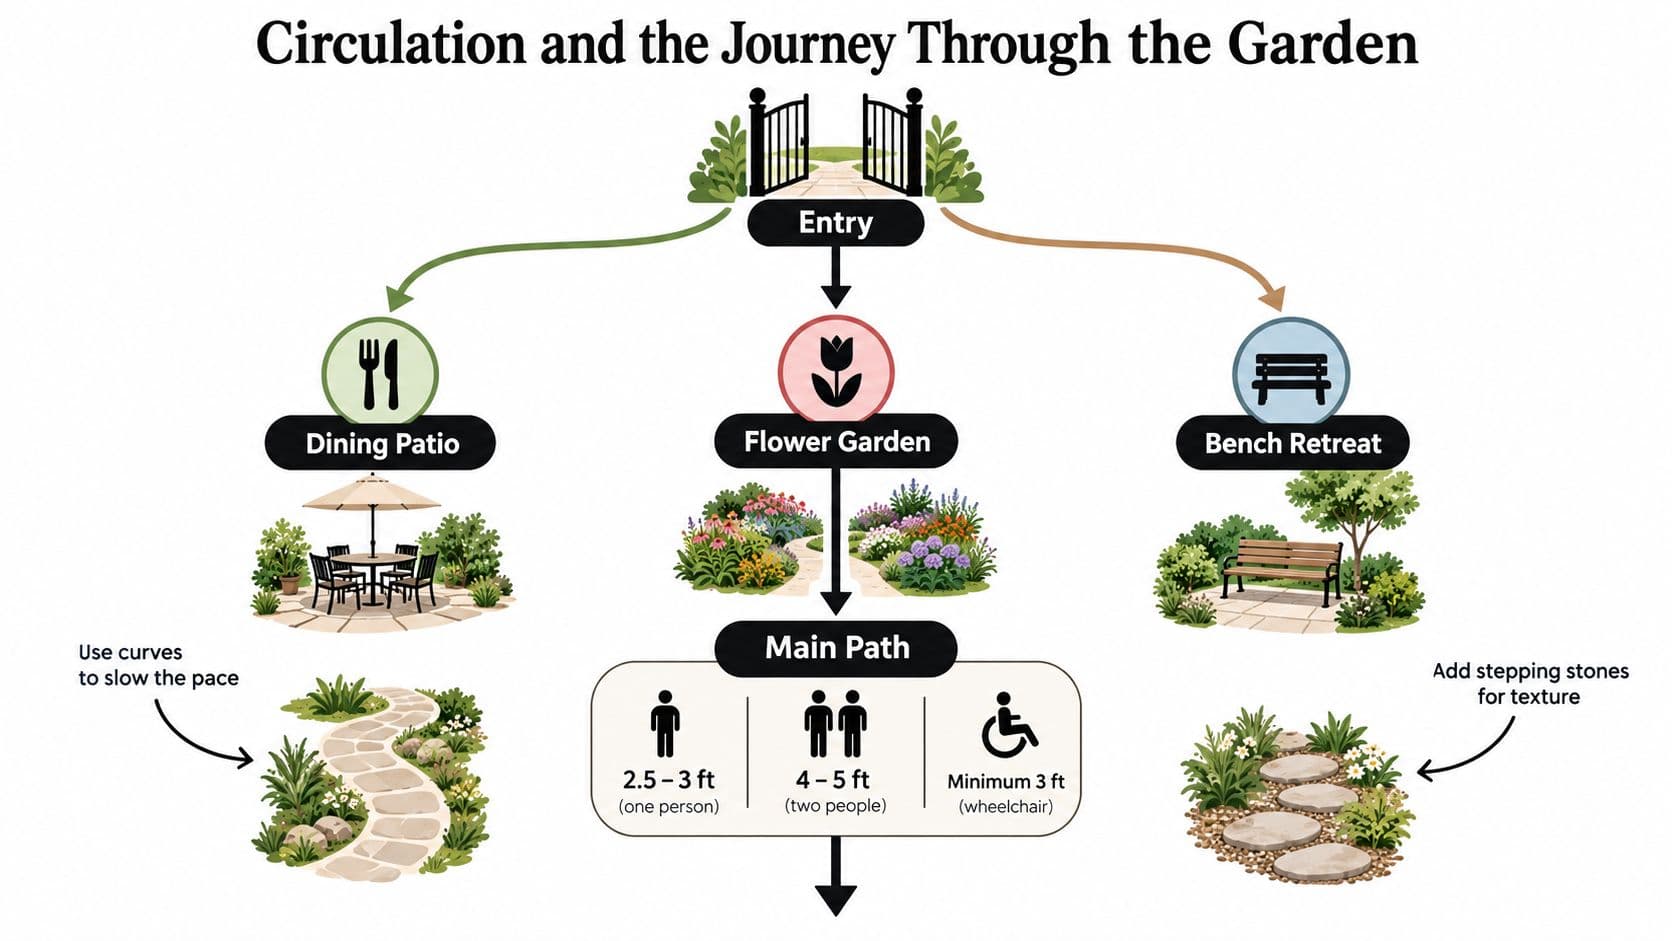
A garden needs hallways just as a house does. Circulation is the path system that connects the entry, patio, lawn, beds, storage, and retreat areas, while also controlling what people see as they move.
A person walking alone can often use a path about 2.5 to 3 feet wide. Two people side by side need about 4 to 5 feet, while a primary route can feel more generous at 6 feet or more. These widths should be checked against gates, steps, furniture, planting growth, and the direction in which doors open.
Make transitions visible
A path doesn't have to be straight, but it should make its destination understandable. When it meets a patio, lawn, or planting bed, use a transition to signal that the character of the space is changing:
- Change from gravel to paving at a dining area.
- Widen the route where people pause or turn.
- Use edging to keep planting from spilling into the walking line.
- Add stepping stones where a secondary route crosses lawn.
- Let a curve slow movement and conceal part of the garden.
A well-planned garden reveals itself in stages. A bench at the end of a path, a bright shrub beyond a hedge, or a sculpture partly hidden around a bend gives the eye a reason to continue. The destination doesn't need to be dramatic. It only needs to create a clear visual pull.
Circulation must also serve maintenance. A mower needs roughly 4 feet of turning room, according to the practical planning guidance in the brief, and a wheelbarrow works best with a direct run to a compost corner or storage area. Before finalizing a path, push a wheelbarrow through the proposed route and check whether gates, corners, and planting beds leave enough clearance.
For visual planning, compare several route options on your own yard image with the Best landscape design apps. A preview can reveal whether a path cuts the lawn into awkward fragments or whether a wider arrival route improves the approach to the house.
Plant Placement Driven by Microclimate
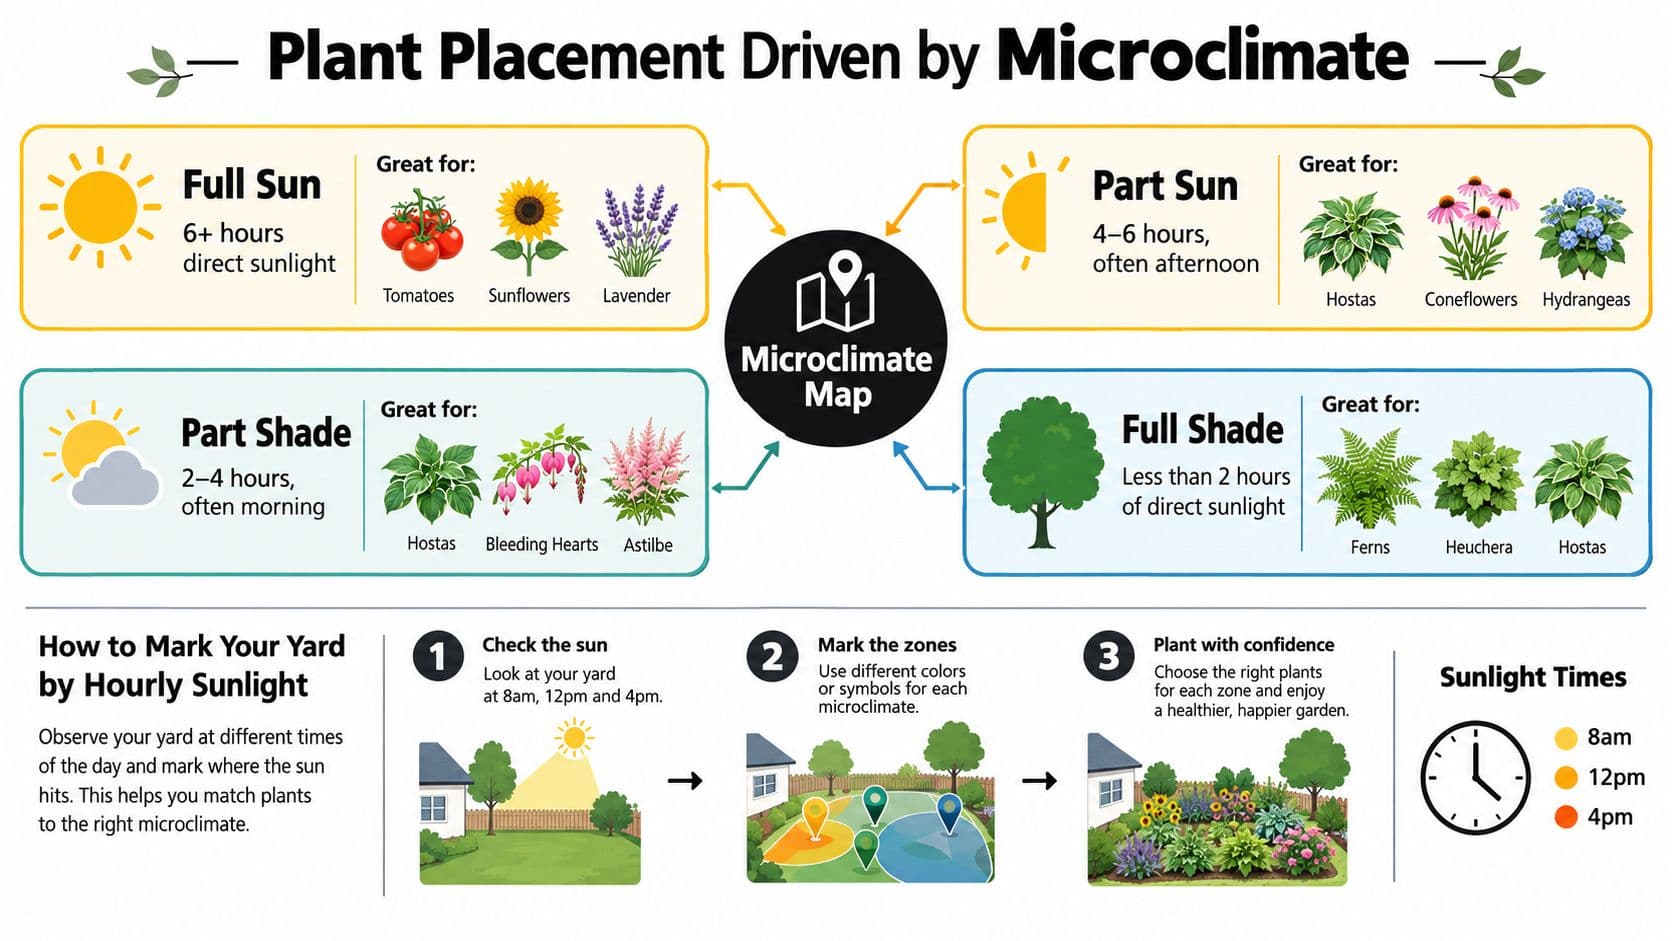
Walk from the sunny patio to the corner behind a fence and the difference becomes clear. A microclimate map records what each part of the yard can support. Walls, fences, trees, paving, and drainage can make nearby areas differ in light, moisture, temperature, and wind.
Observe before choosing plants. Mark shade at 9:00 a.m., noon, and 3:00 p.m. on the summer solstice, winter solstice, and an equinox, using the recording method recommended by the Australian Native Plants Society. Overlay those notes to find places that remain shaded, receive partial light, or stay exposed for much of the day.
Read heat, moisture, and exposure
Sunlight is only one part of the test:
- North-facing walls can create cooler, lower-light pockets.
- South-facing masonry can reflect heat and dry soil near the wall.
- Downhill areas may collect cold air and form frost pockets.
- Downspouts and low points can remain wetter than other parts of the garden.
- Open corners may receive stronger wind than sheltered spaces near the house.
Group plants by the conditions they need, rather than by where you found them in a nursery. Mediterranean herbs and ornamental grasses may suit a hot, dry corner. Woodland perennials and hostas may prefer cooler light beneath a tree canopy. Moisture-loving plants can work near a downspout when drainage and water quality are suitable.
Irrigation should follow the same grouping. Florida Water Star recommends placing plants with similar moisture and maintenance requirements together, with at least 90% of plants should be grouped this way as its benchmark. Its guidance also uses mature plant width to set spacing. Compatibility is generally met when plants have room to mature or sit at least half their mature width apart. See the Florida Water Star plant grouping criteria for the technical basis.
Planting rule: Put plants together because they want the same conditions, then make the group attractive through repetition, texture, and seasonal change.
Layering keeps each group readable. Place canopy trees first, followed by mid-height shrubs, perennials, and groundcovers. Like shelves at different heights, these layers share light, root space, and moisture without forcing every plant into the same level.
Preview the arrangement on your own yard photo before buying plants or changing hardscape. For a broad, exposed area, start with full sun garden plans that work, then adjust the plant palette to suit your soil and local climate.
Matching a Garden Style to Your Home
Style should begin with the house, the climate, and the time available for upkeep. Garden design has moved through formal geometry, enclosed spaces, broad naturalistic lawns, and eclectic compositions across periods from Ancient and Classical gardens to modern work. The garden history timeline identifies the earliest surviving detailed garden plan as dating to about 1400 BCE, from the garden of an Egyptian high court official at Thebes.
That history offers a useful starting point: a successful layout can take many forms. Choose a visual language that supports the building and the way you use the yard, then test it on a photo of your own property before buying plants or committing to paving.
| Style | Plant Palette | Typical Hardscape | Maintenance | Best Suited To |
|---|---|---|---|---|
| Formal | Repeated shrubs, clipped hedges, restrained flowering plants | Stone, brick, symmetrical paving | Regular trimming and edging | Traditional architecture and orderly plans |
| Cottage | Layered perennials, annuals, climbers, self-sowers | Brick paths, painted timber, informal stone | Frequent seasonal attention | Older homes and relaxed, informal settings |
| Modern | Limited palette, architectural grasses, bold foliage | Large-format paving, concrete, steel, timber | Controlled but consistent upkeep | Contemporary buildings and strong geometry |
| Naturalistic or prairie | Grasses, perennial drifts, wildflowers, native species | Gravel, mown paths, simple timber or stone | Lower intervention after establishment | Larger lots and natural-looking spaces |
| Mediterranean | Drought-tolerant plants, herbs, grasses, succulents | Gravel, terracotta, rendered walls, warm stone | Lower watering needs where climate fits | Hot, dry climates and sunny courtyards |
The table uses descriptions rather than fixed maintenance hours because the same style can demand different work in different yards. Fertile soil may make a cottage garden demanding, while efficient routines can simplify a formal one. Prairie planting also needs careful establishment and seasonal management before it settles.
Architecture provides practical clues. Symmetrical beds and clipped hedges can echo a traditional façade. Loose planting can soften an older cottage, while strong rectangles and repeated materials can reinforce a contemporary extension. Gravel, terracotta, and drought-adapted plants suit a hot, dry setting, but may struggle in a cool, wet climate.
Style also responds to resources, fashion, and place. The history of garden design describes movement from controlled layouts toward broader compositions, including later Dutch influence after William III brought a freer gardening style to England after 1688. Apply that lesson to your own yard by treating style as a flexible framework. Repeating decisions about zoning, scale, circulation, and microclimate matters more than collecting items from a style list. Use a marked-up yard photo to compare those choices before installation.
From Plan to Planting in a Real Workflow
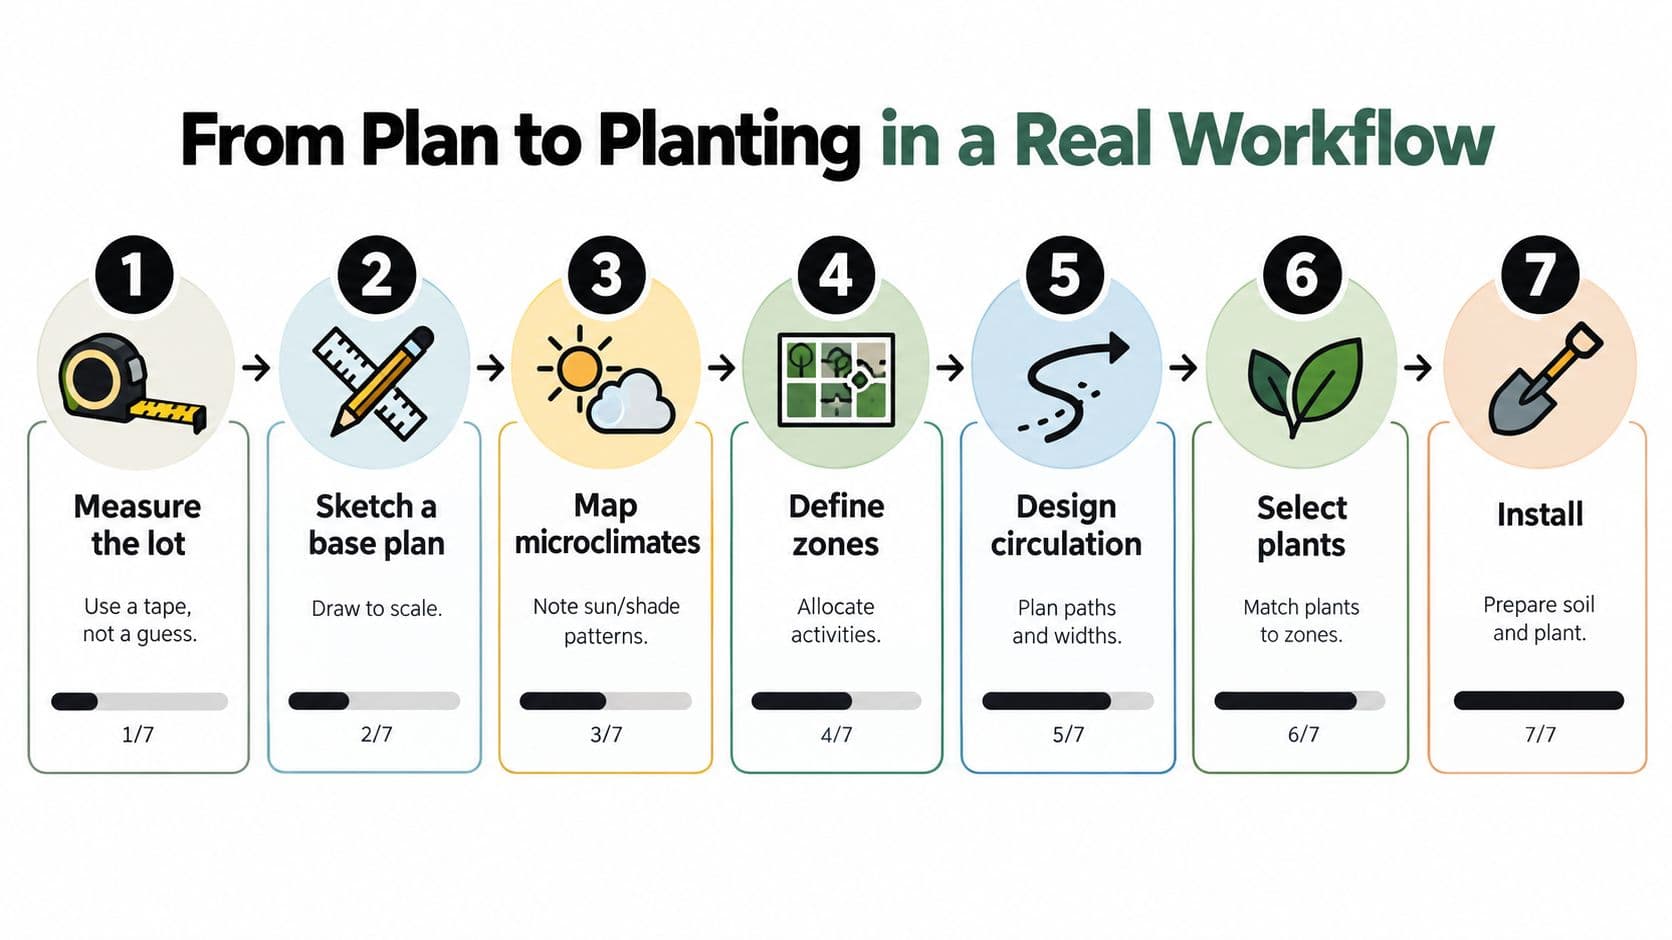
A workable garden begins with decisions in a set order. Start with what the yard can support, then shape the appearance, and preview the result on your own photo before buying plants or building hardscape. The same sequence works for a small courtyard, a family garden, or a large plot.
Seven decisions in working order
-
Measure the lot. Record the boundaries, house, doors, windows, existing trees, utility covers, steps, and storage with a tape. Draw a base plan at a fixed scale, such as 1:50 on graph paper, so distances remain honest.
-
Sketch the zones. Mark soft shapes for dining, play, utility, retreat, and planting. Give each area a clear activity before choosing plants. A zone is a destination, not a shopping list.
-
Plot circulation. Draw the main route first, followed by secondary paths. Mark each path's width and check that routes connect useful destinations without cutting across planting beds. Walk the lines in your mind from the front door to the shed, patio, and seating.
-
Map microclimates. Add sun, shade, wind, wet areas, reflected heat, and cold pockets. These observations guide plant placement and help determine where seating will remain comfortable.
-
Add style cues. Choose materials, plant forms, edging, and colors that relate to the house. Style should sit over the functional plan, like paint on a well-built room, rather than replace the decisions about use and movement.
-
Preview the arrangement. Upload the plan or a clear yard photo to an ai for garden design tool. Place furniture, paths, beds, and structural features over the actual image, then compare options before committing. OutdoorBrite can turn a photo of a backyard, garden, patio, or front yard into redesign concepts and allow adjustments to features such as planting beds, fire pits, and pergolas.
-
Build the plant list. Choose plants by microclimate, mature size, moisture demand, and intended layer. Resolve structural trees and shrubs first, then fill the borders with smaller plants.
A visual preview supports decisions, but it does not replace drainage checks, local plant knowledge, or construction drawings. It can reveal whether the patio dominates, whether a path creates a useful journey, and whether the planting mass fits the house.
Homeowners planning contractor-led work can share the finished concept when discussing expert landscaping by Premier Gardens. One clear image gives everyone a common reference for materials, proportions, access, and planting intent.
Current homeowner preferences also favor practical resilience. Research on garden carbon footprints supports reducing high-emission materials, limiting intensively managed lawn areas, increasing perennial and tree cover, and reducing ongoing inputs. Reporting on 2026 garden trends identifies demand for native planting, pollinator gardens, climate-adapted species, shade, and cooling features. It records native planting requests rising 23% year over year, privacy features rising 10%, shade and cooling rising 13%, and traditional lawn square footage falling 25%. These figures come from Monrovia's 2026 garden trend reporting, reinforcing the value of site conditions before adding a lawn by default.
A Short Checklist Before You Start Digging
Take this list outside with a pencil. The order matters because each decision affects the next one.
- Measure the lot: Record the boundaries, house, doors, existing features, and service points. Draw the base plan to scale.
- Name the activities: Sketch three to five zones, even if some will overlap in a small yard.
- Mark circulation: Connect the zones and write the intended width beside every path.
- Observe conditions: Note sun, shade, wind, wet spots, reflected heat, and cold pockets at different times of day.
- Choose one style cue: Borrow a line, material, color, or plant form from the home's architecture and repeat it.
- Preview the layout: Test the arrangement on a photo of the actual yard before ordering plants or hardscape.
- Group the plant list: Sort plants by microclimate and water needs, not by nursery aisle.
- Install structure first: Place major trees, shrubs, screens, paths, and patios before filling every bed.
- Phase the project: Break the work across seasons if the full build is too large for one weekend.
- Review after a year: Watch how people move, how plants mature, and where maintenance becomes difficult, then adjust the plan.
This turns garden design and layout into a repeatable decision sequence. You don't need a perfect burst of inspiration. You need measurements, observations, clear zones, workable paths, suitable plants, and a visual test before the shovel goes in.
OutdoorBrite lets you upload a photo of your yard and explore realistic garden concepts, including different styles, planting layouts, patios, and outdoor features, before you spend on materials. Visit OutdoorBrite to test your layout ideas on your own space and refine the direction you want to build.
See your yard reimagined
Start creating