
Landscaping Corner Lot
Practical landscaping corner lot guide covering sight-triangle rules, privacy, drainage, plant selection, and design ideas that balance curb appeal
You pull into the driveway and notice how easily someone on the side street can see your patio. From the kitchen window, the front yard looks just as exposed. A hedge seems like the obvious fix, until you realize it could block the intersection, crowd the sidewalk, or sit directly across the route rainwater takes through the yard.
Landscaping a corner lot starts with the space you must keep open, not the plants you want to buy. Establish the sight triangle, drainage paths, and permitted locations for structures first. Then build privacy and curb appeal around those boundaries, rather than paying to undo an attractive but impractical installation.
Table of Contents
- Why Corner Lots Are Designed Differently From the Start
- Mapping the Sight Triangle Before You Plant Anything
- A Pre-Design Compliance Workflow That Prevents Costly Rework
- Privacy and Screening Options That Survive the Corner Rule
- Drainage, Setbacks, and the Water Problem Across Two Streets
- Plant Selection by Zone Instead of by Style
- Two Corner-Lot Design Examples Compared Side by Side
- Lighting, Hardscape, and Ongoing Maintenance That Protects the Plan
Why Corner Lots Are Designed Differently From the Start
An interior-lot design often has a clear distinction between the public front yard and the private backyard. On a corner, that distinction gets blurred. A patio that feels tucked behind the house from the main street may be completely exposed from the other approach.
Consider a homeowner who wants a continuous evergreen hedge around the property. From the kitchen, that hedge promises privacy. From the intersection, it may hide an approaching cyclist. At ground level, the same planting bed might interrupt drainage or leave no room to prune without standing on the sidewalk.
These aren't separate design problems. They're competing uses of the same narrow strip of land.
Begin with the public edges
Street-frontage responsibilities aren't a recent invention. In April 1685, Charleston property owners were required to clear bushes, stumps, young pines, and weeds from their frontage at their own expense, as documented in the Charleston County Public Library's history of street trees. That history helps explain why the edge of a residential property isn't treated as another private garden bed.
Walk both street-facing edges before sketching anything. Look toward the house from the sidewalk, toward the intersection from the driveway, and outward from the rooms where privacy matters.
The following concept map identifies the pressures to put on that first sketch.
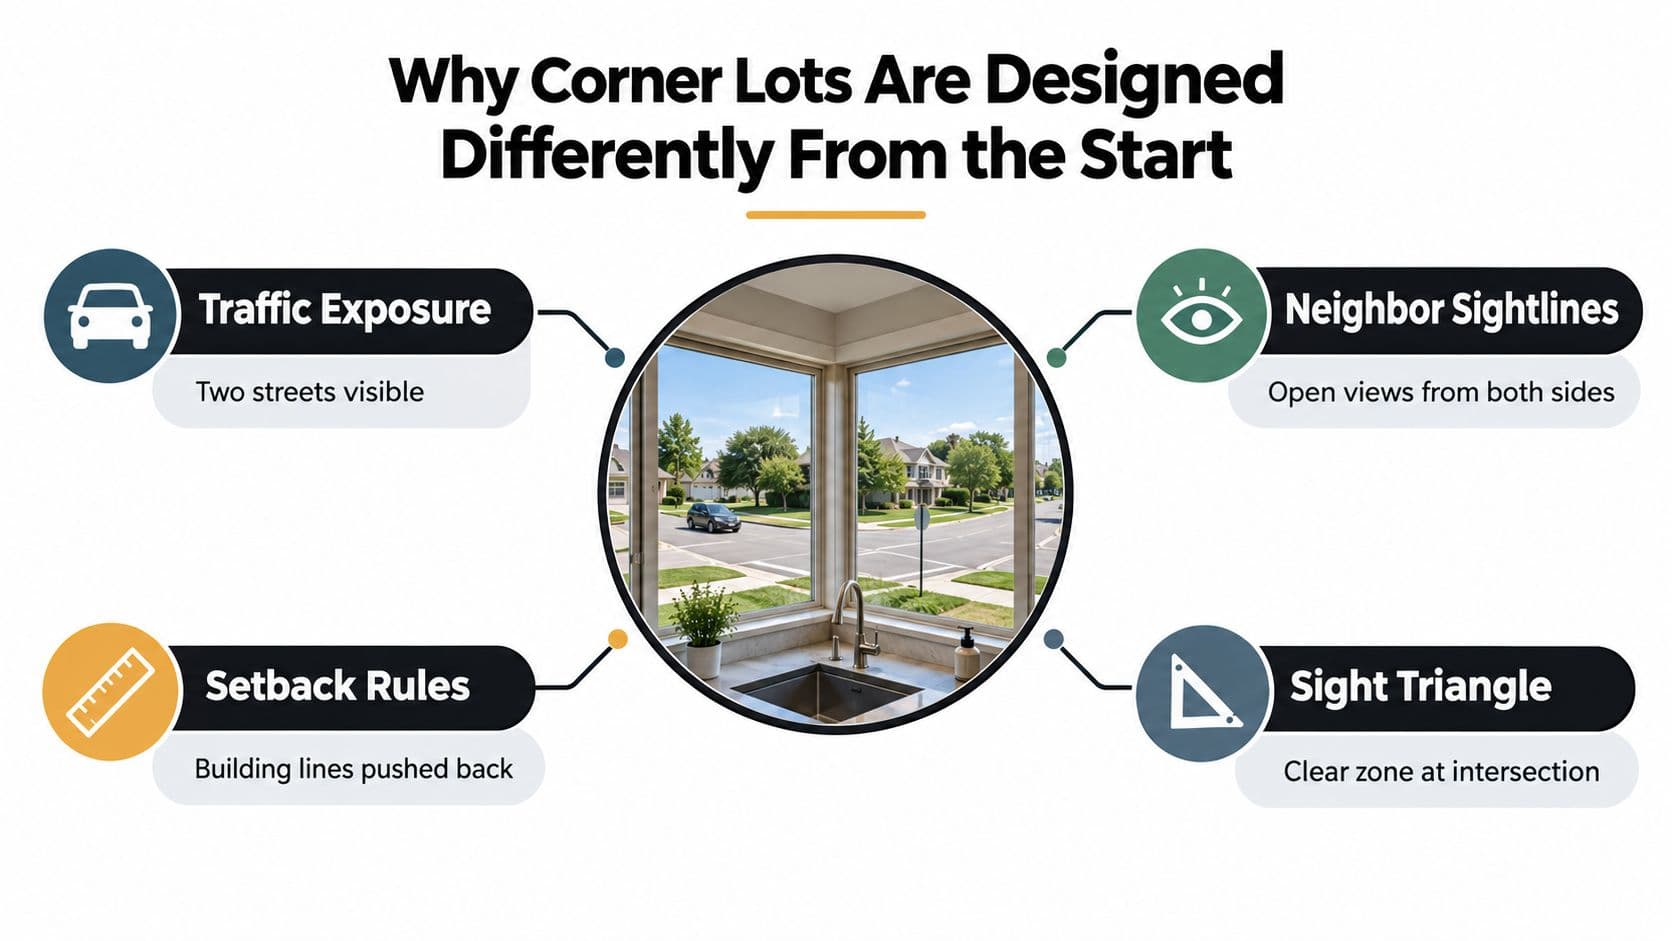
- Traffic exposure: Identify where drivers, cyclists, and pedestrians need to see across the property.
- Household privacy: Mark the actual window, dining area, or seating position you want to protect.
- Street-facing space: Reserve room for access, maintenance, and the applicable setbacks.
- Water movement: Note where runoff enters, travels, and leaves.
Design priority: Protect the necessary open space first. Put visual enclosure where it won't compete with safety or water movement.
A successful plan can still feel generous and planted. It works inward from the street boundaries instead of extending a backyard design outward until something conflicts.
Mapping the Sight Triangle Before You Plant Anything
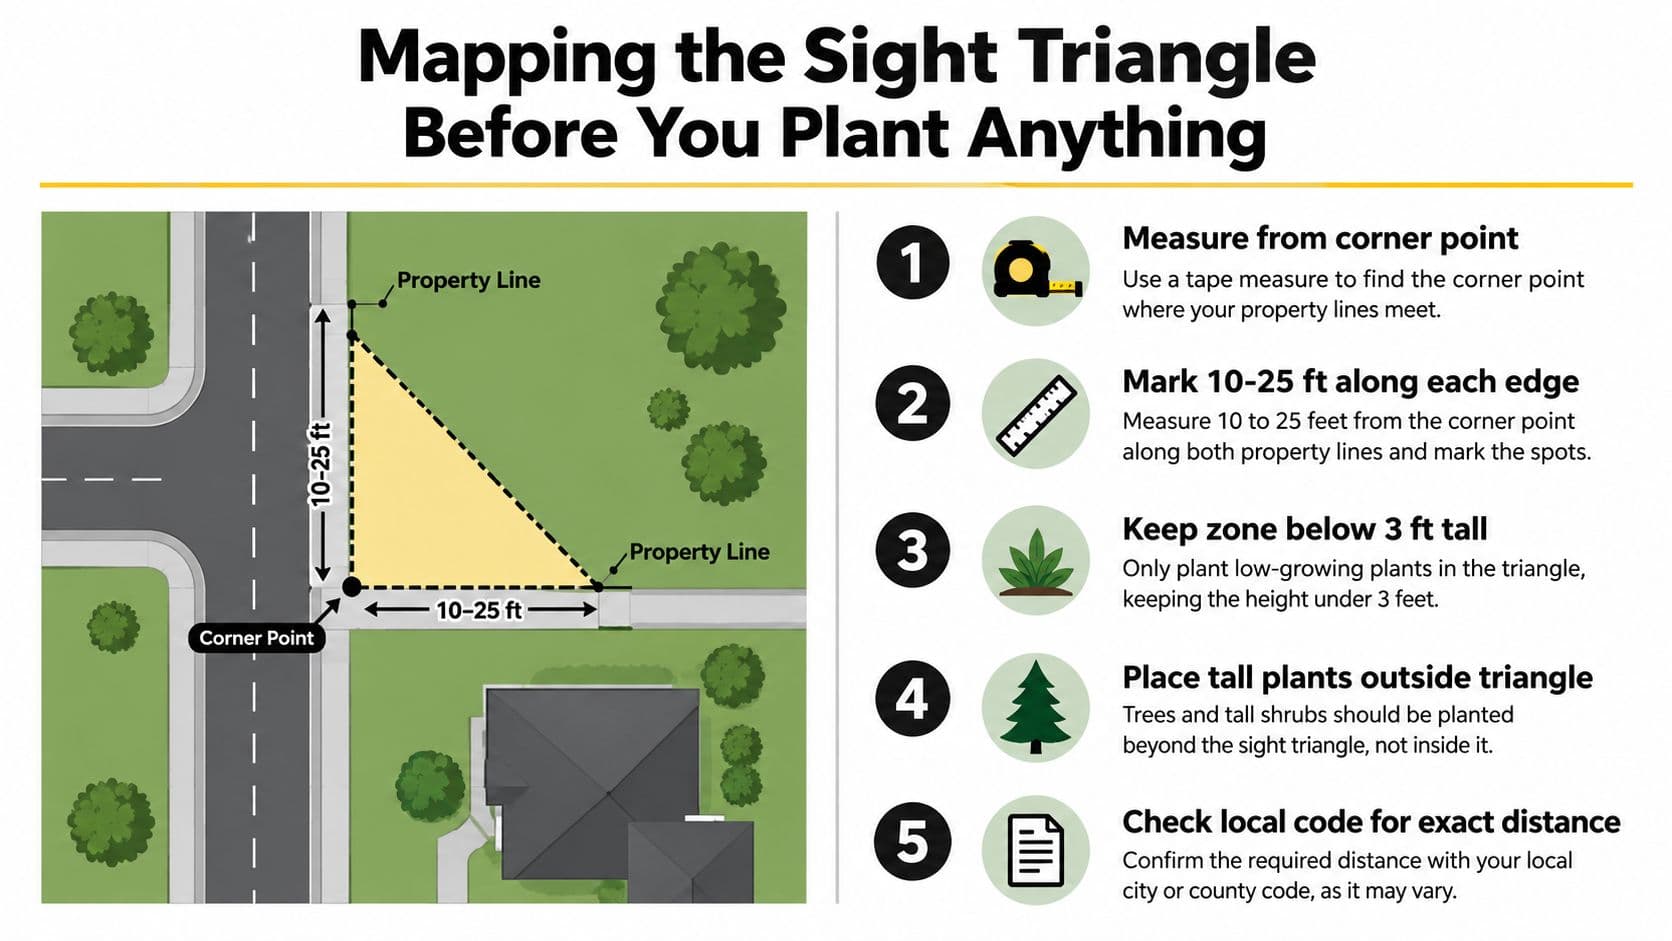
The sight triangle is the intersection clearance area that lets road users see approaching traffic. Treat it as a mapped exclusion zone for incompatible features, not as a warning written in the margin of a planting plan.
Phoenix provides a useful example of how detailed these rules can be. Its landscaping visibility requirements limit fences, walls, and hedges within the triangle to 3 feet, restrict obstructions between 3 and 10 feet, and permit a tree only when its trunk doesn't exceed 1 foot in diameter. Those are Phoenix requirements, not a universal specification for your property.
Put the clearance area on paper
Use a property survey, tape measure, tracing paper, and colored pencils. If you don't know where the legal property lines are, resolve that uncertainty before using the sidewalk or curb as a measuring reference.
- Confirm the governing measurement: Ask planning or public works for the applicable corner diagram, starting points, distances, and height limits. Request clarification if the diagram references road edges rather than property lines.
- Measure the required distances: Mark the prescribed points along both boundaries using the municipality's method. Join those points to outline the triangle.
- Record existing objects: Include shrubs, trunks, fences, utility cabinets, mailboxes, walls, and changes in grade.
- Check the whole obstruction: Consider foliage, flower stalks, raised soil, planter walls, and decorative features together, not just the plant's nursery label.
This diagram illustrates the mapping process. Treat any example dimensions or height labels in it as illustrative only; your local code supplies the actual measurements.
Design for the mature condition
A small shrub can pass an installation-day inspection and become an obstruction later. Draw its mature footprint, identify its tallest seasonal growth, and make sure you can reach it for maintenance.
Inside the mapped area, favor a visibly low planting surface rather than a collection of objects that each seems harmless in isolation. A low plant on a raised bed, for example, still creates a raised obstruction. Before digging, take the annotated plan back to the department that supplied the rule and resolve any ambiguous placements.
A Pre-Design Compliance Workflow That Prevents Costly Rework
A height limit alone doesn't establish compliance. Clearance dimensions, measurement methods, tree provisions, and right-of-way boundaries all affect what can go where.
The variation is substantial: available clearance examples include a 15-foot corner cutoff with a 2.5–10-foot obstruction band, alongside a 35-foot sight triangle limiting vegetation to 36 inches, as described in the traffic visibility and access provisions. A planting arrangement that fits one interpretation could fail another even if the homeowner carefully follows generic advice about keeping shrubs low.
Separate the permissions
Build a small project file before asking a contractor for an installation price. Keep the survey, applicable code diagram, departmental responses, and proposed layout together.
| Planning question | What to obtain | Design consequence |
|---|---|---|
| Who governs the street edge? | Confirmation of the responsible jurisdiction or road authority | Establishes which requirements apply |
| Where does private land begin? | Verified property and right-of-way boundaries | Prevents misplaced beds and structures |
| Which setbacks apply? | Rules for each proposed element | Defines the usable installation area |
| How are existing trees treated? | Tree-specific clearance or protection guidance | Determines retention, pruning, or relocation options |
| What needs approval? | Permit requirements and submission instructions | Establishes the sequence before construction |
Ask about features individually. A fence, pergola, light post, mailbox, and decorative wall shouldn't be assumed to share the same placement rules.
Preserve what's compatible
Some clearance provisions focus on making vehicles visible across the triangle rather than requiring every tree to be removed. That distinction matters: a permitted tree with an appropriately managed canopy may be compatible, while a dense cluster of low branches isn't.
Don't interpret that nuance as permission to prune first and ask later. Have the authority confirm how the rule applies to the particular tree and proposed treatment.
Keep a written record of the approved assumptions. A contractor shouldn't have to guess which line on the sketch represents a legal boundary.
Sequence work so that earthmoving and approved structural placements precede finish planting. The phased build-out planning tips offer a useful companion for organizing that order. Buying the plants last gives you flexibility if an approval changes the layout.
Privacy and Screening Options That Survive the Corner Rule
Screen the activity, not necessarily the entire property. A short, well-positioned screen beside a dining terrace can be more useful than a continuous boundary hedge that still leaves the seating area visible from an oblique angle.
Start by sitting where you'll spend time. Have someone walk the public approaches while you identify the views that need interruption. Place temporary stakes or lightweight fabric at proposed screen locations within the approved installation area.
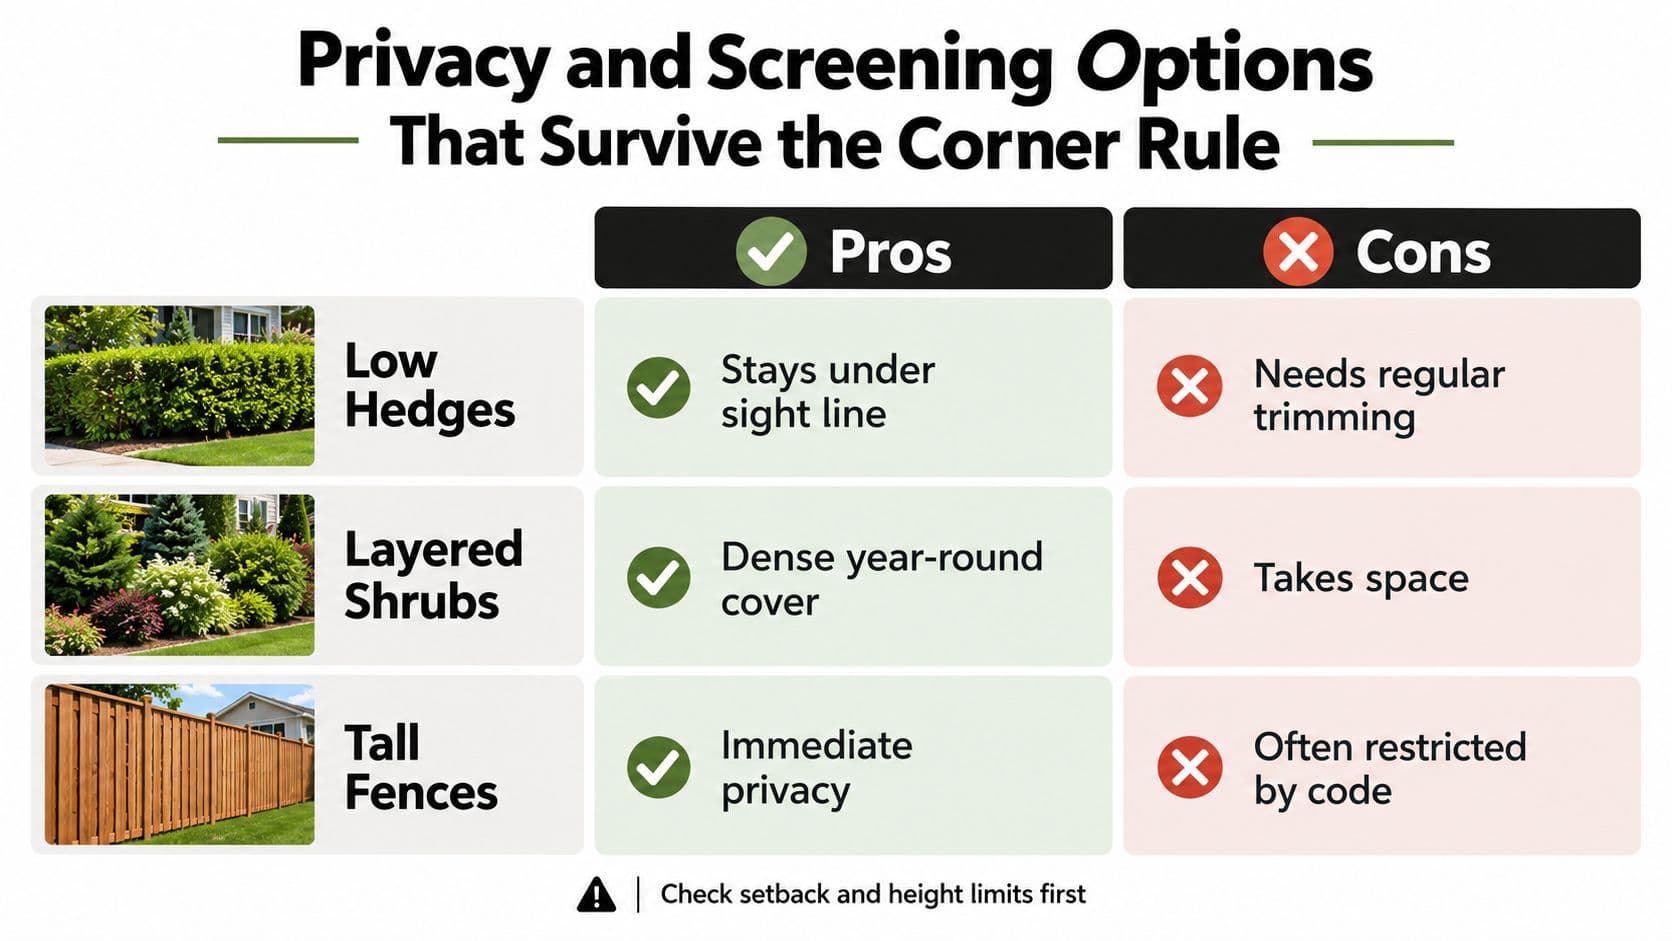
The comparison below summarizes the basic trade-offs, but each option still needs to fit your mapped constraints.
Match the screen to its location
The FHWA's intersection landscaping guidance recommends plants within the sight triangle stay at or below approximately 0.6 m (2 ft), avoiding foliage in the roughly 0.6–2.4 m (2–8 ft) zone, with taller trees outside the triangle and branches lifted to preserve visibility. This is safety guidance, not a substitute for the governing local ordinance.
- Low hedges: Use them to define an edge, not to promise seated privacy. Choose plants whose natural habit suits the approved height.
- Layered shrubs: Place taller material in the permitted interior buffer, with lower planting toward the public edge. Reserve enough depth for mature branches and maintenance.
- Offset fence panels: Test them beside the occupied space rather than automatically following the boundary. Angled views may require a different position than the initial sketch suggests.
- Open lattice or pergolas: Consider them where structures are allowed. Openness doesn't automatically make them exempt from clearance rules, especially once climbers cover them.
- Berms with planting: Evaluate the combined soil and vegetation height. Don't use a berm to disguise a screen that would otherwise be too tall.
Test the enclosure before committing
Compare privacy arrangements with a paper plan, temporary mockup, or visual design tool, and browse OutdoorBrite landscape plans for layout ideas rather than assumed code compliance.
For another visual reference when considering screening arrangements, use the video below.
The strongest arrangement often leaves the intersection frontage open and concentrates enclosure around a rear-yard retreat. That's a deliberate allocation of space, not a compromise to conceal.
Drainage, Setbacks, and the Water Problem Across Two Streets
A corner lot has multiple sidewalk, driveway, curb, and planting interfaces to coordinate. Don't assume water arrives equally from both streets, or that the intersection is automatically the best place for a rain garden. Observe the site during rainfall and mark actual flow directions.
Look for downspout discharge, sediment trails, ponding beside paving, and water moving toward the foundation. Sketch an overflow route as carefully as the area intended to collect water. A planted depression isn't a complete drainage design if excess water has nowhere appropriate to go.
Choose a treatment that fits the ground
Minnesota's better site design guidance explains that native vegetation stabilizes soil, filters sediment and pollutants, and supports nutrient uptake. It also identifies disconnecting impervious surfaces as a way to reduce runoff volume and rate. The practical application is to direct suitable paved-area runoff through pervious planted areas before it reaches the storm-drain system, where site conditions and local rules allow.
| Treatment | Consider it when | Resolve before installation |
|---|---|---|
| Depressed planting bed or rain garden | Runoff can enter an appropriate infiltration area | Soil infiltration, overflow, and foundation separation |
| Vegetated filter strip | Sheet flow can spread across a planted surface | Slope, erosion, and pedestrian clearance |
| Bioswale | Water needs a defined planted route | Outlet, seasonal growth, and maintenance access |
| French drain or underdrained system | Site conditions call for subsurface conveyance | Legal discharge location and professional sizing |
Avoid selecting a treatment solely because it looks attractive in a photograph. Request soil infiltration testing where infiltration is part of the design, and get professional grading advice when water threatens buildings or neighboring property.
Keep the sidewalk out of the drainage system
Before changing grades, use Aureli Construction's Aureli's homeowner drainage checklist to organize the conditions you need to discuss with a contractor. For layout terminology, slopes and swales explained for homeowners can help you read the proposed plan.
- Cold-climate review: Check where overflow or discharge could create ice on a walkway.
- Standing-water review: Ask how the design drains and how persistent ponding or mosquito concerns will be addressed.
- Maintenance review: Preserve access for clearing sediment and repairing eroded surfaces.
Water-management test: The design needs a suitable place for ordinary runoff and an acceptable route for overflow.
Dense planting can't compensate for an incorrectly graded bed. Keep the drainage function workable even when vegetation is dormant or awaiting maintenance.
Plant Selection by Zone Instead of by Style
A plant can suit the architecture perfectly and still be wrong for its position. Evaluate the location first, then the plant's mature behavior, then its appearance. That order gives you a practical filter for nursery purchases without prescribing species that may be unsuitable for your climate or soil.
Keep a plant schedule beside the site plan. Record mature height and spread, seasonal flower-stalk height, expected density, moisture needs, and the maintenance needed to hold the intended form. Don't accept a smaller cultivar substitution without checking its full-grown dimensions.
Use a different brief for each zone
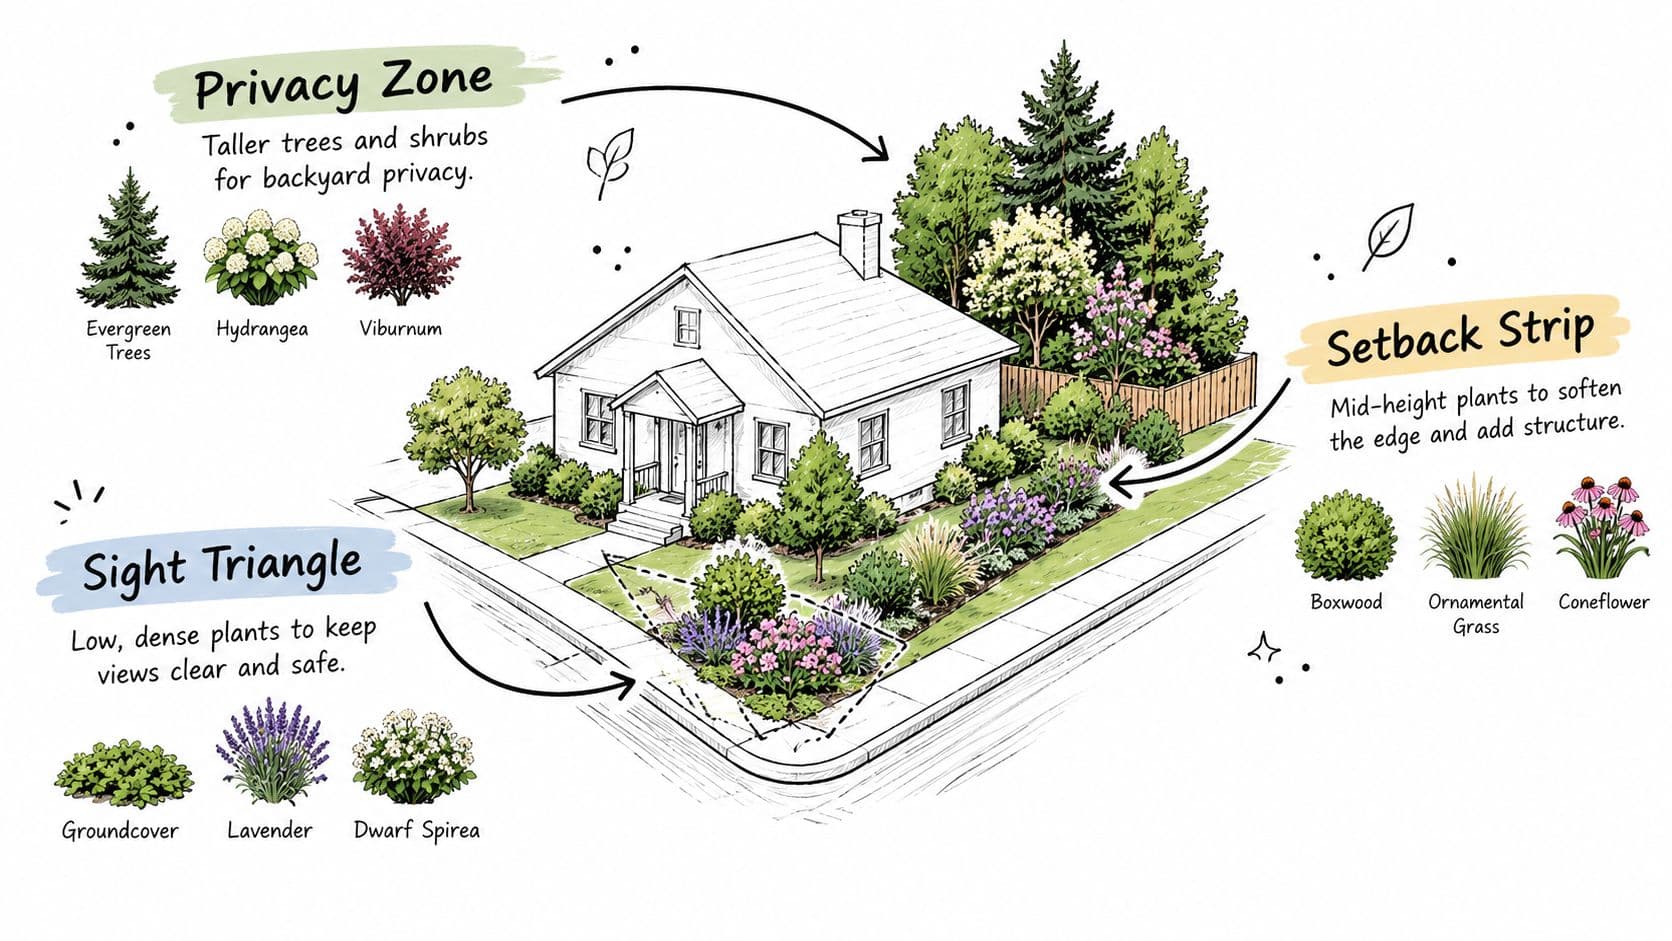
- Inside the sight triangle: Choose low groundcovers or compact perennial masses that remain compatible with the approved clearance envelope. Evaluate the plant at its tallest seasonal stage, not just after cutting back.
- Along setback strips: Favor planting that fits the available width without leaning into paths. Pollinator-oriented planting is an option, but select its height and habit as carefully as any ornamental scheme.
- Within the side-yard buffer: Choose screening material according to the required view blockage. Compare winter openness with summer density if privacy is needed throughout the year.
- In the street-facing display bed: Use repetition, foliage contrast, and seasonal color to connect the street views. Put the strongest upright accents in locations already cleared for them.
This illustration shows how those planting roles can be arranged around the property.
Reject plants that depend on constant correction
Ask the nursery for the specific cultivar name and locally appropriate growing information. A broad label such as dwarf shrub isn't enough to establish whether the plant fits the bed.
| Evaluation | Accept when | Reconsider when |
|---|---|---|
| Mature footprint | Branches fit within the intended zone | Routine pruning is needed simply to preserve access |
| Seasonal height | Flowers and stems remain suitable for the location | The plant fits only immediately after cutting |
| Moisture requirements | They match the drainage conditions | Survival depends on changing the site's water behavior |
| Maintenance access | You can reach the plant from your property | Work would require repeated sidewalk obstruction |
Draw mature plants as full footprints rather than tiny installation symbols. Include the space needed to work between a hedge and a fence, and avoid filling every gap with another shrub. An open section of groundcover can be a useful part of the composition, especially where access and visibility are priorities.
Two Corner-Lot Design Examples Compared Side by Side
The following are illustrative design concepts, not completed projects or claims about measured results. Both assume that the same property has established its required clearance area, approved structure locations, and workable drainage route.
In the visibility-first concept, the homeowner prefers a broad, open street view. A lawn panel meets a sweeping bed of low perennials, with the planting palette repeated along the other frontage. A shade tree stands outside the restricted area, positioned so its managed canopy contributes overhead interest without turning the corner into a dense planting cluster.
In the privacy-first concept, the homeowner gives the sheltered sitting area priority. Taller planting moves toward the permitted rear-yard buffer, and an approved screen sits close to the terrace. The frontage remains decorative rather than trying to provide enclosure from every possible angle.
Visibility-First vs Privacy-First Corner Lot Design
| Design Element | Visibility-First Corner | Privacy-First Corner |
|---|---|---|
| Main priority | Open views and a clear approach | A protected outdoor sitting area |
| Corner treatment | Lawn and low perennial planting | Low planting with the enclosure farther inward |
| Shade tree | Outside the clearance zone, with managed canopy | Positioned to complement the rear retreat |
| Screening | Limited to specific exposed views | Concentrated around occupied space |
| Street-facing beds | Broad, visually continuous composition | Lower display planting in front of interior screening |
| Drainage layout | Open planted route integrated into the frontage | Route kept accessible beside the privacy planting |
| Maintenance emphasis | Lawn edges and perennial growth | Screening density and access behind planting |
Choose according to how you use the yard
The open scheme won't suit someone who wants to read outside without feeling observed. The enclosed scheme may be unnecessary for someone who mostly uses the porch and values an expansive view from the house.
Neither concept needs a tall focal point at the intersection itself. In both, interest can come from a bed's outline, repeated foliage, or a stronger feature placed farther inward.
Choose privacy from the seat you use and curb appeal from the approaches people actually see.
Before choosing, place chairs in the proposed outdoor room and walk the site again. That simple test can reveal whether you're solving a real exposure problem or installing screening where it merely looks conventional.
Lighting, Hardscape, and Ongoing Maintenance That Protects the Plan
The planting plan isn't finished until its lighting, paved edges, and maintenance access work together. Place proposed fixtures, mailbox supports, address markers, and hardscape features on the same drawing as the planting design, rather than fitting them into leftover spaces after installation.
Aim walkway and driveway lighting toward the intended surface. Check the view from the street after dark, and adjust fixtures that shine toward approaching drivers. Keep address information legible from the relevant approach without relying on an oversized corner feature.
Detail the permanent elements first
When considering patio or path finishes, Atlanta Concrete Solutions' examples of decorative concrete for Atlanta homes provide a material reference to discuss with an installer. Establish placement, surface drainage, and transitions before choosing the decorative treatment.
Municipal guidance summarized in the corner-lot rules and design overview notes that owners may be responsible for trimming vegetation to keep road users visible and sidewalks unobstructed. It also warns that right-of-way work, including planting, pruning, drainage, and sidewalk work, may require an encroachment permit.
Maintain the conditions you designed for
- During active growth: Check shoots, flower stalks, and leaning branches against the approved clearance area. Prune before access becomes difficult.
- After heavy rain: Inspect overflow routes, displaced mulch, sediment, and downspout discharge. Address new flow toward paths or buildings.
- During leaf fall: Keep drainage openings clear where you can safely and lawfully maintain them.
- After seasonal changes: Review nighttime glare, address visibility, and the privacy provided by dormant planting.
Recheck the corner from a driver's viewpoint using a safe observation method, with another person handling any inspection while the driver concentrates on traffic. Keep the approved plan and plant schedule available so replacement plants preserve the original constraints rather than gradually changing the design.
OutdoorBrite turns photos of your yard into realistic yard redesign concepts, with options to refine planting beds, paving, and features such as pergolas. Once you've mapped your corner's clearance and drainage constraints, visit OutdoorBrite to compare an open frontage with a more private interior layout before buying materials, then have the chosen concept checked against your local requirements.
See your yard reimagined
Start creating