Landscape Site Planning: From Analysis to Build
Learn landscape site planning with a practical guide to site analysis, zoning, grading, drainage, microclimates, circulation, and phased build-out.
You're standing at the kitchen window with a sketch of the yard in your hand. The pergola looks perfect beside the patio, the fire pit belongs beneath the old tree, and a deep border of lush plants would soften the fence. Then you walk outside and notice the ground slopes toward the house, water collects near the back door, the afternoon sun disappears behind the neighboring roof, and a utility line crosses the one place you wanted to build.
That moment captures why site planning must happen before style selection. A successful plan starts by recording what the property can support, then places activities, structures, plants, and circulation where they'll continue to work. Style comes later, as a visual language applied to a site that has already been understood.
Table of Contents
- Why Site Planning Comes Before Style
- Reading Your Site Before You Design It
- Mapping Use Zones and Activity Areas
- Grading, Drainage, and Microclimate Forces
- Circulation, Access, and Utility Conflicts
- Soil, Water, and Existing Trees as Design Constraints
- Phasing Your Landscape From Paper to Build
- The Case for Constraints-First Planning
Why Site Planning Comes Before Style
A homeowner usually begins with a picture. You might want a modern courtyard, a cottage garden, or a low-maintenance xeriscape yard. Those ideas are useful, but they're not yet a plan. A plan has to answer harder questions first: Where does water go after rain? Which areas receive reliable sunlight? Can equipment reach the work zone? Will a mature tree tolerate excavation nearby? Does a setback or easement remove part of the property from consideration?
Consider the pergola from the opening scene. It may need stable footings, clear access for construction, and a location that doesn't interfere with drainage or underground services. The fire pit has its own demands, including safe separation from combustible materials and a surface that won't become a runoff channel. The lush border needs suitable light, soil, and irrigation. The homeowner hasn't lost those dreams. The site analysis reveals where each one can survive.
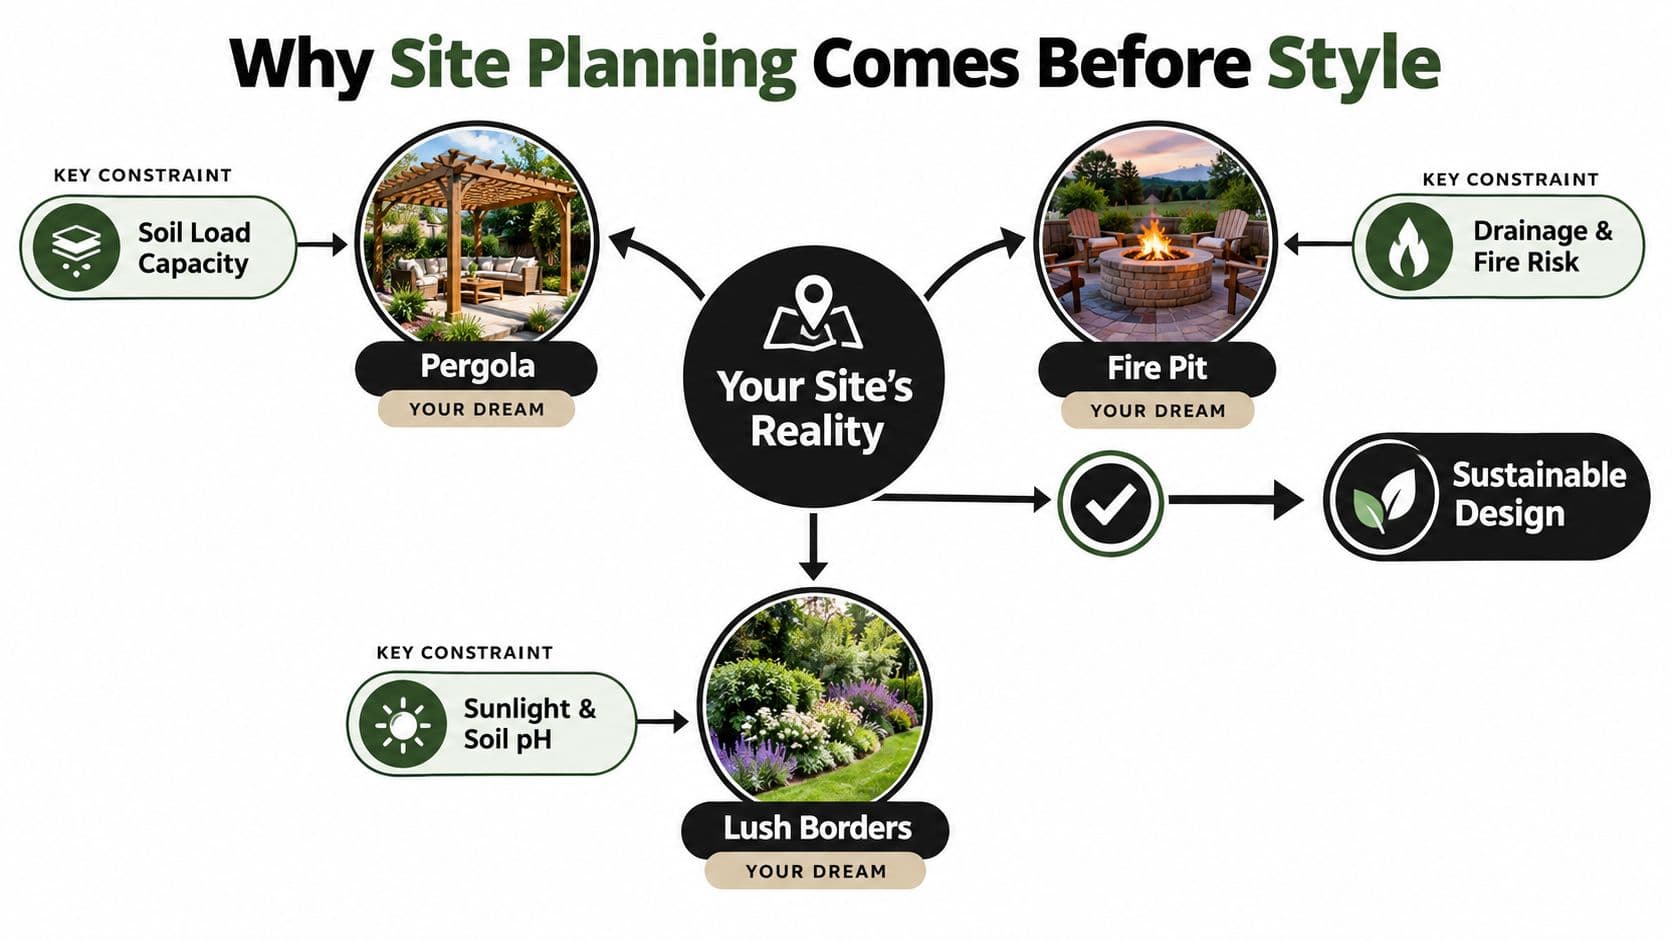
A site plan is a promise to the property
The best way to think about a site plan is as a working agreement between your wishes and the land's behavior. It records constraints before they become construction surprises, and it gives each later decision a reason.
That approach matters because outdoor water use can dominate residential demand in some settings. Historical research summarized by Western Resource Advocates found that outdoor use accounted for about 83% of total water use in sampled homes, with variation driven mainly by irrigated area and irrigation method. In the same review, homes built before site design regulations averaged 226 gallons per capita per day, compared with 141 gallons per capita per day for homes built after regulation, a 38% reduction. Those figures show why layout, planting, and irrigation belong in the planning conversation, not as repairs after installation.
Practical rule: Let the site eliminate unsuitable options before you spend time choosing finishes, colors, or plant combinations.
Skipping analysis doesn't make a project simpler. It moves the analysis into construction, where a drainage correction, relocated footing, failed plant bed, or damaged tree costs more and disrupts work already completed. Your style should express the property you have, not force the property to imitate a photograph from somewhere else.
Reading Your Site Before You Design It
Start with a base map. It doesn't need to look polished. A scaled survey is ideal, but a measured sketch can work for early thinking if you label every assumption and verify it later. Mark the house, property lines, fences, driveways, decks, sheds, steps, downspouts, and visible utility features.
Then collect observations in the field rather than relying on memory. Walk the property during different conditions, especially after rainfall and during the parts of the day when you expect to use the yard.
Measure the physical limits
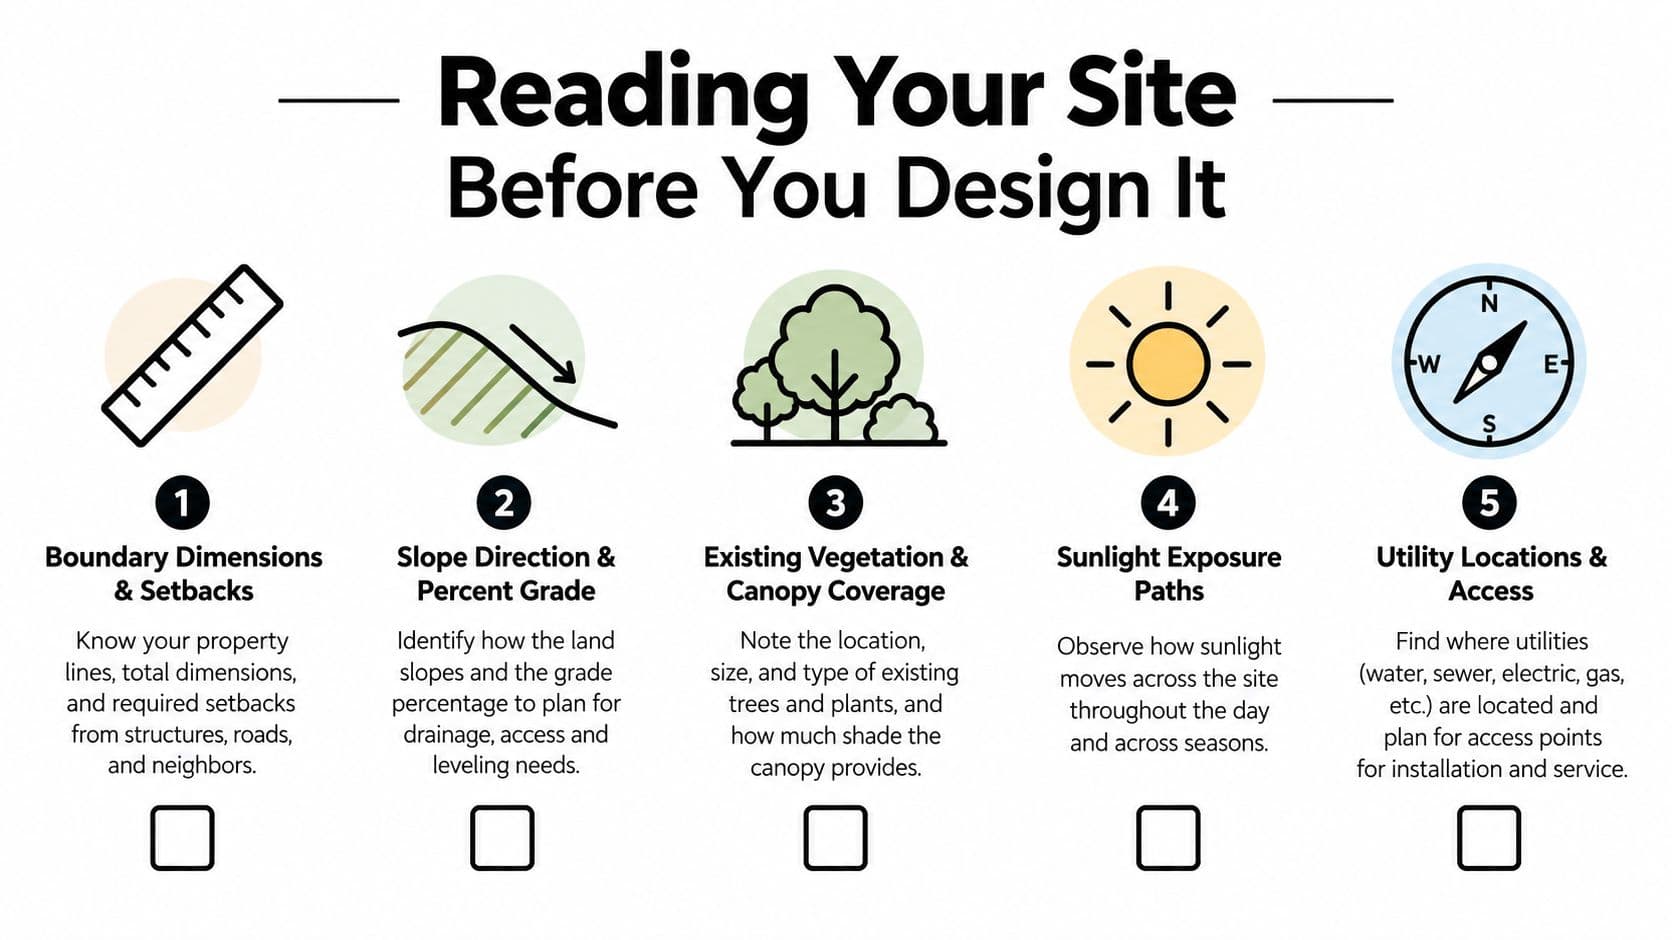
Record boundary dimensions, building setbacks, easements, and any restricted areas. A utility easement may look like open lawn, but it can prevent permanent structures or deep-rooted planting. Setback lines can change the location of a fence, shed, patio, or pergola before aesthetics enter the discussion.
Measure elevation changes too. You don't need a surveyor's precision for an initial diagnostic, but you do need to know whether the ground falls away from the house, toward a neighbor, or into a low pocket. Photograph every step, retaining edge, exposed root, and abrupt transition. A small grade change can determine whether a path stays comfortable, whether a patio needs retaining work, and whether soil will wash toward a foundation.
Follow the sun, wind, and water
Observe sunlight in the morning, midday, and late afternoon. Note which rooms receive reflected heat from walls and which corners remain cool beneath canopy. A southern exposure usually supports a different planting palette from a shaded northern edge, but the house, fences, neighboring buildings, and seasonal tree canopy can alter that pattern.
Watch wind direction around corners and through gaps between buildings. Strong exposure may affect seating, screens, young trees, and delicate plants. After rain, mark where water sheets across the surface, where it ponds, and where it disappears. Downspouts deserve special attention because concentrated roof runoff can overwhelm an otherwise stable bed.
Record facts on the map
Use a phone camera, measuring tape, compass, hose, soil probe, and simple note sheet. Write observations directly on the base map with dates and conditions.
- Boundary information: Verify dimensions, access points, fences, setbacks, and easements.
- Slope information: Mark the direction of fall and every noticeable elevation change.
- Vegetation information: Identify mature trees, canopy spread, invasive growth, and plants already thriving.
- Light information: Record sun and shade patterns by time of day.
- Infrastructure information: Locate overhead lines, visible utility covers, hose bibs, downspouts, and service routes.
The field record becomes more valuable than a memory-based sketch because it connects each design choice to a physical observation.
Mapping Use Zones and Activity Areas
Most residential yards contain four overlapping zones. They aren't always separate spaces, and that overlap creates the conflicts a good site plan should expose early.
| Zone | Typical Uses | Key Constraints | Common Conflicts |
|---|---|---|---|
| Private | Seating, dining, relaxing, entertaining | Privacy, shade, drainage, relationship to the house | Patio competes with tree roots or wet ground |
| Public | Entry walk, front planting, curb presence | Visibility, setbacks, sightlines, neighborhood rules | Screening blocks views or interferes with access |
| Service | Trash, storage, utilities, deliveries, maintenance | Equipment access, utility easements, odor, screening | Shed or planting bed occupies a service route |
| Circulation | Walks, driveway, side-yard passage, vehicle movement | Comfortable grades, turning space, clear width, emergency access | Path crosses a utility corridor or drainage route |
Start with use, not objects
Instead of placing a fire pit first, identify where people naturally leave the house, where they pause, and how they'll carry food, tools, or firewood. A private zone near the kitchen may be more valuable than a visually central patio that forces traffic through a planting bed.
Public areas need a different type of discipline. Front-yard planting should support arrival and curb presence without blocking doors, sightlines, utility access, or address visibility. Service areas should remain usable even after screening plants mature. A beautiful enclosure that traps bins or prevents a maintenance vehicle from reaching the side yard has failed functionally.
Draw the conflicts on one plan
Trace each zone with a transparent color or separate layer. Add tree root zones, splash zones near walls, easements, setbacks, and drainage paths. The first combined drawing often reveals that a proposed play lawn occupies the only route for a utility repair, or that the preferred patio sits directly beneath a mature canopy where excavation could damage roots.
For homeowners who want to test arrangements before committing to a formal drawing, a DIY yard planner by OutdoorBrite can help organize spaces and compare broad layout ideas. Treat any digital concept as a communication tool, not a substitute for verifying grades, utilities, regulations, soil, and construction access.
A zone map gives style a place to work. Once the conflicts are visible, you can choose materials and planting character without pretending every part of the yard can do everything.
Grading, Drainage, and Microclimate Forces
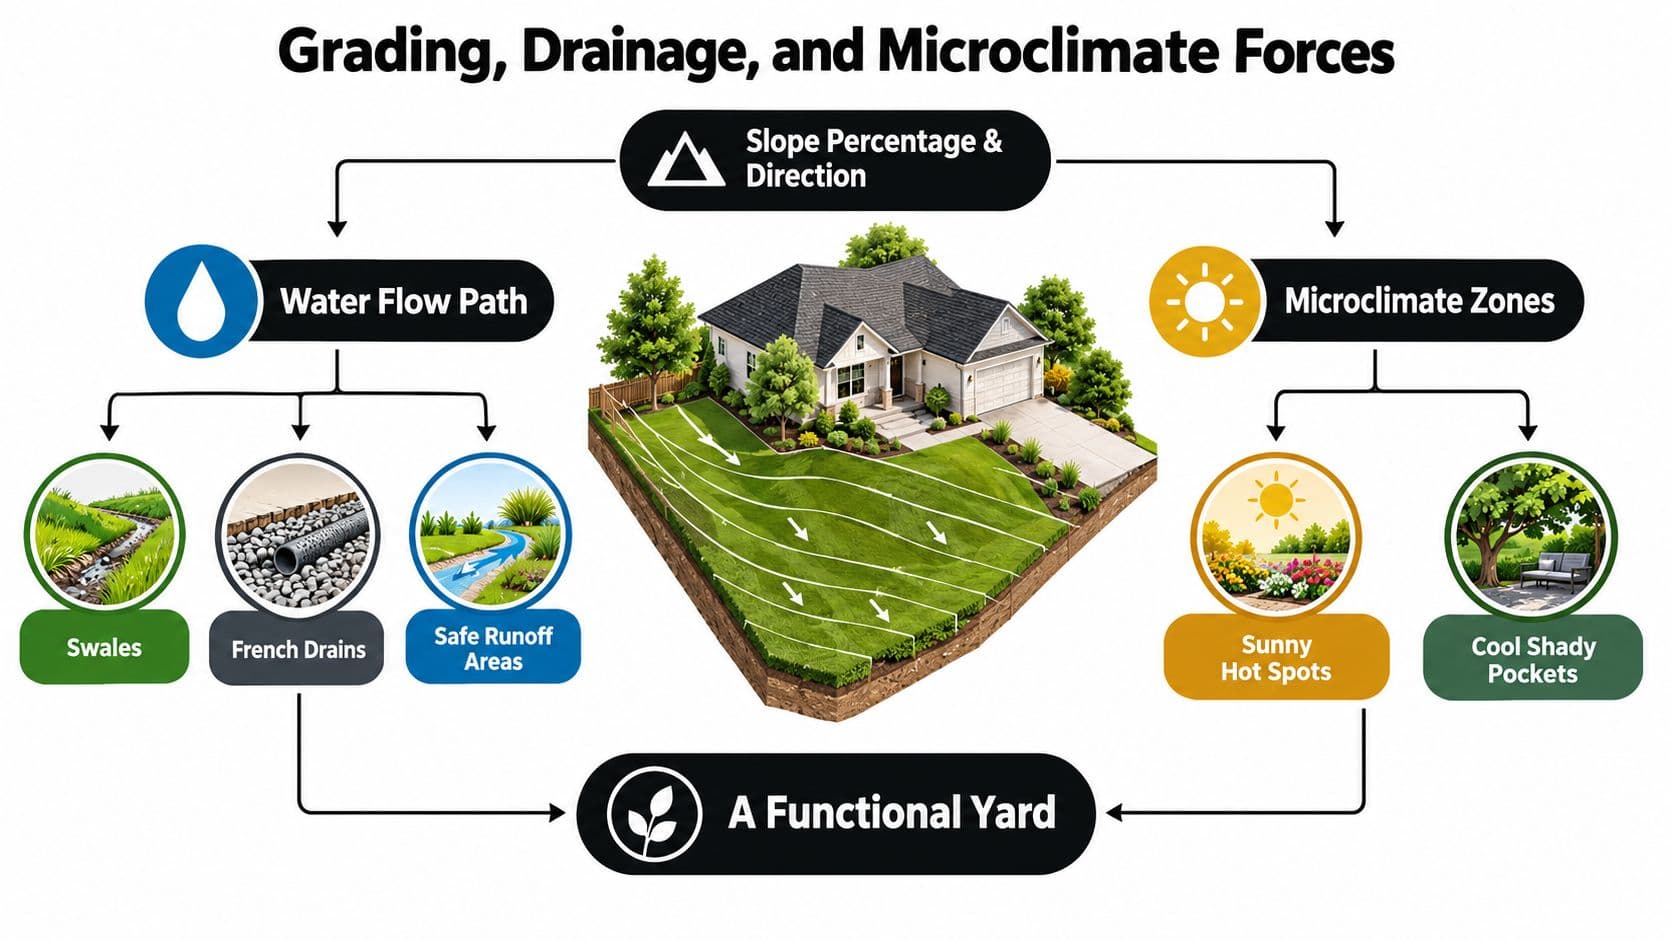
Before choosing a patio, lawn, or planting style, read how water and weather already behave on the property. Grading, drainage, and microclimate form one connected system. A slope directs water, water changes soil moisture and erosion risk, and those conditions create different planting and comfort zones within the same yard.
Start at the high points and low points. Mark roof outlets, uphill runoff, paved surfaces, visible channels, sediment lines, and places where water ponds beside structures. A shallow swale may guide sheet flow toward a safe outlet. A French drain or catch basin may collect water where surface grading cannot solve the problem. The appropriate response depends on the water source, volume, soil, outlet, and access for future maintenance.
For building-related conditions, consult a grading and drainage guide for residential additions. Treat general guidance as a starting point, then confirm site-specific solutions with the professionals handling excavation, drainage, structural work, or local approvals.
Treat water movement as a layout decision
A patio placed across a flow path may require extensive grading and collection infrastructure. A planting bed in that location may tolerate seasonal moisture, provided the soil and plant palette suit it. The safest runoff area may need to remain open instead of carrying structures or moisture-sensitive plants.
Use this sequence to test the site:
- Trace the source: Locate roof outlets, uphill runoff, paved surfaces, and irrigation overspray.
- Mark the path: Follow channels, sediment, bare soil, and ponding after rainfall.
- Identify the outlet: Confirm where water can leave without damaging a foundation, slope, neighboring property, or public drainage system.
- Choose the intervention: Compare grading, a swale, a drain, a rain garden, or controlled discharge.
- Plan maintenance: Leave room to inspect, clear, and repair the chosen system.
Homeowners who want a clearer drawing process can use this resource on how to create a drainage plan for a residential property. Draw the water paths before placing outdoor rooms. The plan should show where runoff starts, how it moves, and what will happen during heavy rain.
Locate the small climates inside the yard
A south-facing wall can reflect heat onto a patio and nearby plants. A shaded depression may remain cooler and wetter, while a gap between structures can funnel wind. Cold air may settle in low areas, creating frost pockets that behave differently from nearby slopes.
These differences affect plant survival, outdoor dining comfort, drying time after rain, and lawn health. They also guide material and planting choices. Grading decisions can fix drainage paths and soil depths for decades, so analyze them before decoration. Style becomes the final layer, after water, exposure, and performance constraints are understood.
Circulation, Access, and Utility Conflicts
A site plan has to show how people, vehicles, materials, maintenance equipment, and emergency services move through the property. Movement creates the bones of the yard. Planting and ornament fill the spaces that remain.
Start by separating circulation into three levels:
- Primary circulation: The main route from street to entry, driveway to garage, or house to a principal outdoor room.
- Secondary circulation: Paths between patio, garden, lawn, side yard, and recreation areas.
- Service circulation: Routes for bins, deliveries, fuel tanks, lawn equipment, construction materials, and utility repairs.
A path can look wide enough on paper and still fail when a person carries a tray, pushes a mower, or turns a large bin around a gate. Mark door swings, vehicle approaches, steps, ramps, turning areas, and places where a contractor may need to stage materials.
Put utilities on the base map early
Locate visible utility covers, meters, cleanouts, overhead lines, downspouts, hose connections, and known service routes. Before digging, contact the relevant local utility-marking service and confirm the location of buried infrastructure. A tree planted above a gas line, a footing placed over a sewer lateral, or a retaining wall built across an easement can turn a clean design into a repair problem.
| Circulation Type | Minimum Width | Key Clearance |
|---|---|---|
| Primary pedestrian route | Confirm locally for accessibility and site use | Keep doors, steps, handrails, and planting from narrowing the route |
| Secondary garden path | Set by expected users and materials | Allow comfortable passing where two-way movement is likely |
| Service route | Set by the largest item or vehicle using it | Protect turning space, gates, utility access, and overhead clearance |
The table is a planning prompt, not a universal code schedule. Widths, turning requirements, fire access, and utility clearances vary by jurisdiction and use, so verify them with the applicable authority or design professional.
Before you draw a patio: Mark every route that must remain open, then mark every area where excavation, storage, or permanent planting may be restricted.
Utility conflicts often compress the design more than homeowners expect. A side yard may be the only legal service corridor, even if it's also the most attractive place for a garden. A clear plan preserves access first, then assigns compatible uses to the remaining ground.
Soil, Water, and Existing Trees as Design Constraints
A sunny foundation bed, a compacted side passage, and a low spot beside a downspout may all sit within one yard, yet support very different plants. Test each area before choosing a style. Soil conditions should set the limits for what you build and grow, rather than forcing the finished yard to compensate for an unrealistic first idea.
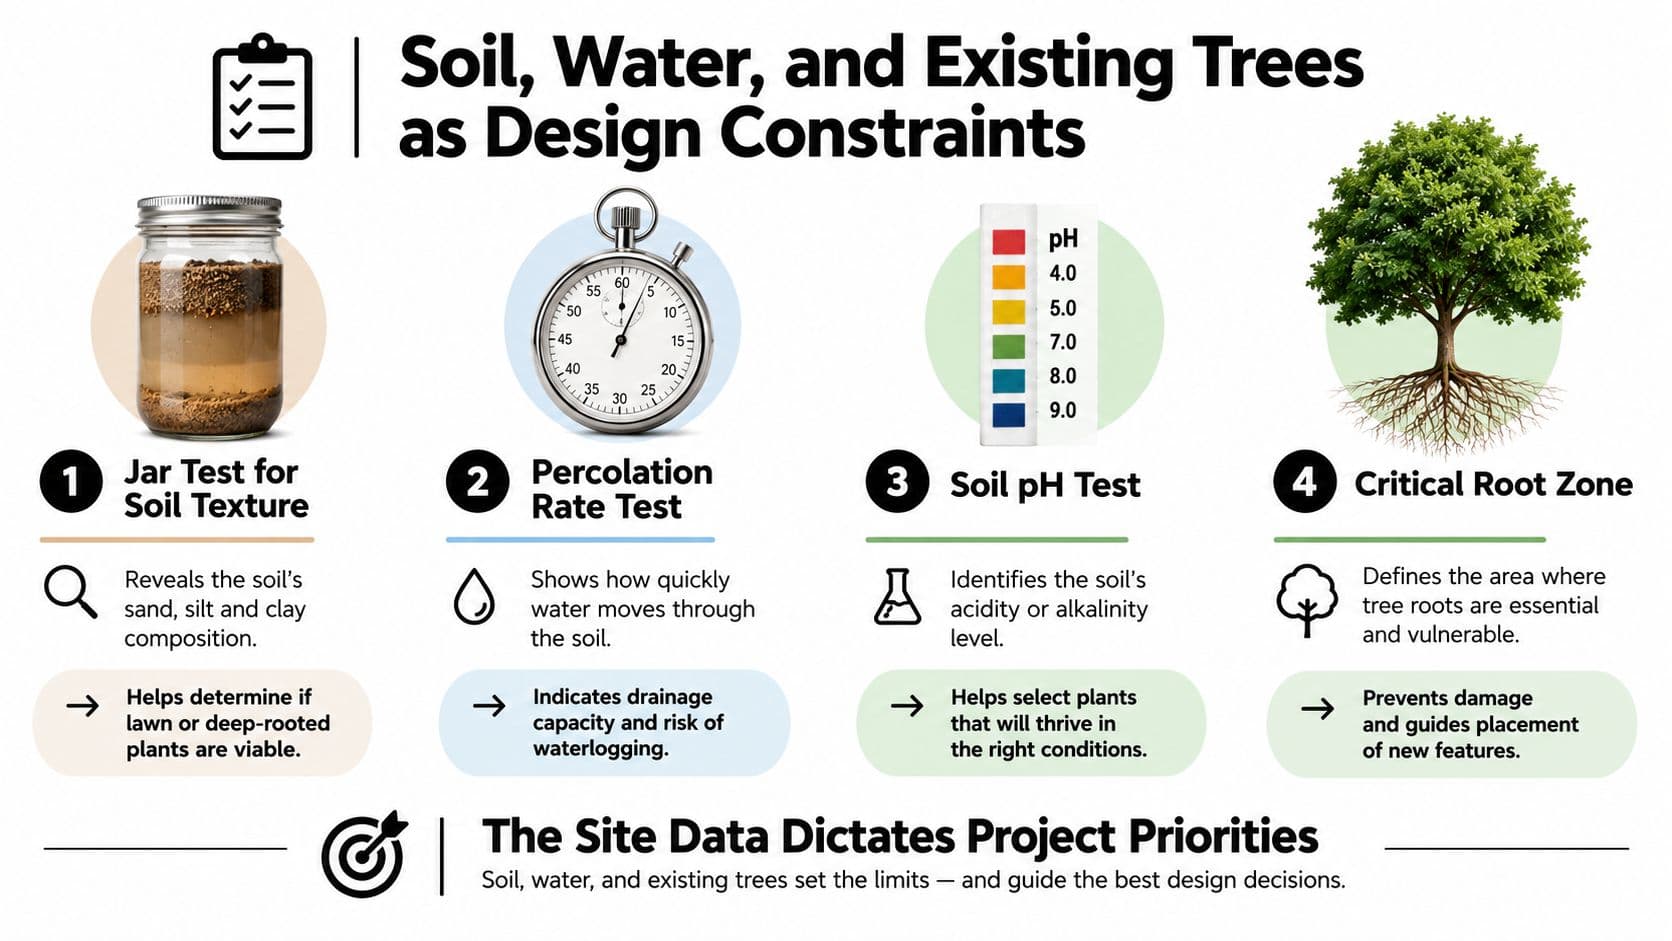
A jar test separates sand, silt, and clay into visible layers after the sample settles. A percolation test shows how quickly water moves through the ground, while a pH strip indicates whether the soil may suit acid-loving plants, lawn, vegetables, or a more tolerant palette. These simple checks do not replace professional investigation for drainage, contamination, construction, or structural planting, but they can expose obvious mismatches early.
Match the planting ambition to the ground
A lawn needs different soil depth and drainage from a vegetable bed. A dry garden may tolerate leaner conditions, while a lush border may depend on steady moisture and prepared soil. Sample several locations before selecting plants. One corner may drain freely, while another holds water or has been compacted by construction traffic.
Water availability belongs on the same site map. Mark hose bibs, potential irrigation zones, rain capture opportunities, and areas affected by municipal watering restrictions. In California, dedicated outdoor water meters represented 7.3% of total urban water use, equal to 0.64 million acre-feet per year, according to the review summarized by Western Resource Advocates. New Mexico State University guidance reports that changes to residential outdoor design and watering management can produce 35% to 70% water savings, and that outdoor watering often represents more than half of residential use.
Protect the assets you can't quickly replace
Existing trees need a separate layer on the plan. Measure trunk diameter, map the canopy, and estimate the likely critical root zone before grading, trenching, paving, or storing materials. Multiple technical standards use a radius of about 1 foot per 1 inch of trunk diameter, with minimum protection radii around 5 to 8 feet, as described in Colorado State University Extension guidance.
The protected area is larger underground than the visible trunk suggests. Roughly 50% of tree roots occupy the top 1 foot of soil, and more than 90% occupy the top 3 feet, according to the same guidance. Keep vehicles, foot traffic, and stored materials outside that zone. Avoid changing its grade unless a qualified arborist and designer specify a method that protects the roots.
When soil, water, and tree evidence conflict with the wish list, revise the wish list. A constraints-first plan works with the yard's existing conditions, reducing the need for repeated corrections after construction.
Phasing Your Landscape From Paper to Build
A complete plan shouldn't send every trade onto the property at once. It should establish an order in which each phase protects the next one.
Phase one handles conditions that can't wait
Begin with drainage failures, grading corrections, legal setbacks, utility verification, construction access, and tree protection. Install or establish the infrastructure that would be expensive to undo after patios, irrigation, and planting are in place.
Before moving forward, check:
- Drainage: Confirm that water no longer collects where it threatens the house, paths, or intended planting.
- Utilities: Verify marked service routes and keep restricted corridors clear.
- Trees: Confirm fencing and protection around retained trees before equipment arrives.
- Access: Make sure machinery, materials, bins, and future maintenance can reach their destinations.
- Approvals: Resolve permits, HOA requirements, and local regulations that affect structures or grading.
Phase two establishes the framework
Install patios, primary paths, retaining structures, key planting beds, and the hardscape that defines each mapped activity zone. Coordinate elevations carefully. A path that meets the patio at the wrong height can create a trip hazard, redirect water, or make later planting adjustments difficult.
Set a cost ceiling for each phase and define what would cause a pause. Standing water after a 1-inch rain should trigger a drainage review rather than an automatic move to planting. Root encroachment on a proposed footing should trigger a layout revision or professional assessment.
Phase three adds performance and character
Add lighting, irrigation refinements, ornamental planting, screens, furniture, and lifestyle features after the framework proves usable. Seasonal timing matters, especially for planting and soil work, but don't let a preferred installation date override unresolved water or access problems.
A digital planning tool such as landscape software for homeowners can help compare layouts, document decisions, and communicate concepts. OutdoorBrite lets users upload a yard photo and generate redesign concepts that can be compared before purchasing materials or hiring a contractor. Use those visuals to test the feel of a direction, while relying on measured site data for construction decisions.
Phasing isn't a delay tactic. It's a control system that protects money, soil, trees, and future usability. The zone map and grading notes should determine which trade works first and which features must wait.
The Case for Constraints-First Planning
A mood board can show you what you like. It can't tell you whether the soil drains, whether the tree will survive excavation, whether a path crosses an easement, or where water travels after a storm.
That's why the most expensive shortcut in site planning is skipping the site analysis. Measure the property, map the forces, test the soil, protect the existing trees, and define how every zone will be used before choosing a visual style. The resulting plan may change your original wish list, but it will give each surviving idea a better chance of working.
Performance-based planning also protects long-term resources. The California program described in Valley Water's 2024 annual report covered 4,716 sites and 7,454 irrigated acres. It recorded an average applied depth of 3.1 feet, totaling 23,388 acre-feet, while overwatering accounted for 7,925 acre-feet, or 34% of irrigation by participating sites. The report also found that non-public accounts made up 83% of sites and represented 66% of water use, reinforcing why commercial and institutional outdoor spaces receive serious conservation attention.
Your yard may be smaller, but the principle is the same. Let slope, soil, sunlight, water, access, utilities, and trees set priorities. Style should make those decisions feel coherent, not conceal them.
Start your own analysis by photographing the yard, marking drainage and utilities, and listing the activities you need the space to support. Then visit OutdoorBrite to turn your real yard photo into design concepts you can compare against the constraints you've documented, before you spend on plants, paving, or construction.
See your yard reimagined
Start creating