Grading and Drainage Plan: A Complete Residential Guide
Learn how to create a grading and drainage plan that protects your home from water damage. Covers slopes, swales, permits, and common mistakes to avoid.
You notice the problem after a hard rain. Water sits against the foundation, the mulch on one side of the yard washes downhill, and the “easy” update starts looking a lot more expensive. A solid grading and drainage plan is what keeps that from turning into a basement issue, a soggy patio, or a yard that never dries out. It's the difference between shaping soil for looks and shaping it so water leaves the property the way it should.
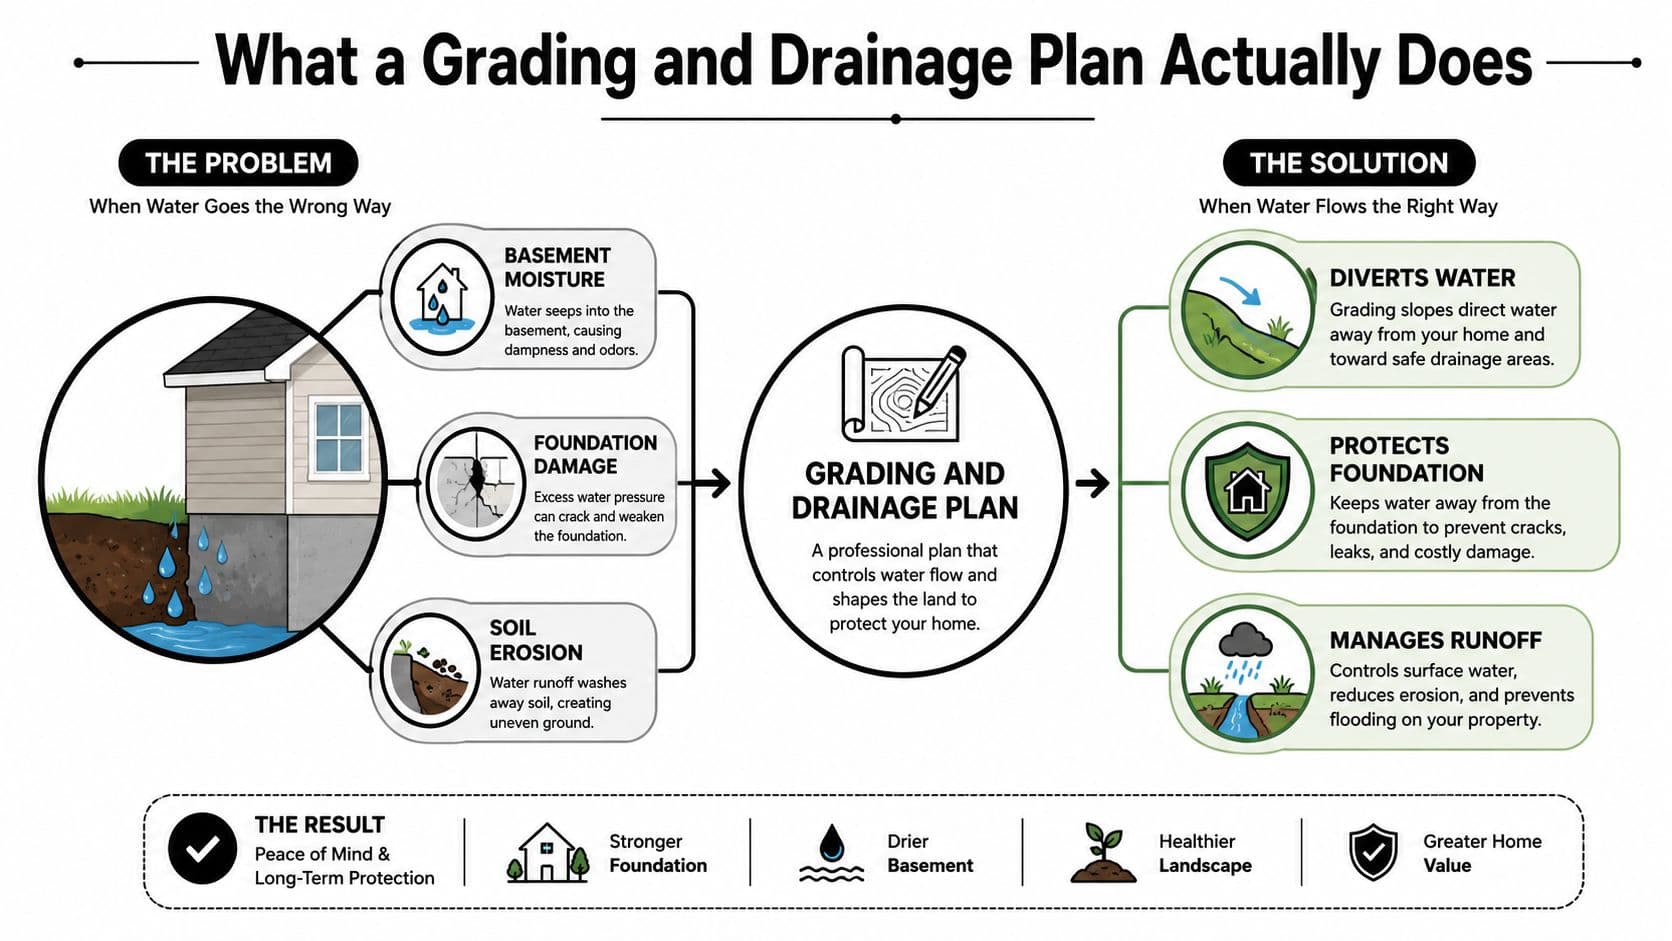
A good plan isn't just a sketch. It's a system for moving water away from structures, controlling runoff, and keeping the site buildable and maintainable. If you want a quick homeowner-level example of how water management gets tied to outdoor design choices, protect your garden from flooding is a useful reference point for thinking about drainage before plants and finishes go in.
Table of Contents
- What a Grading and Drainage Plan Actually Does
- Assessing Your Site Before Designing Anything
- Design Elements That Move Water Where It Should Go
- Navigating Permits and Code Requirements
- When Surface Grading Is Not Enough
- Common Mistakes and Long-Term Maintenance Practices
What a Grading and Drainage Plan Actually Does
A lot of homeowners think grading is just “adding dirt near the house.” That's too narrow. A real grading and drainage plan tells you where water starts, where it travels, where it slows down, and where it leaves the property without causing damage. The core job is simple, even if the drawing is technical, keep runoff moving away from the structure and prevent ponding, erosion, or unintended discharge.
That's why the basic drainage principle matters so much. A minimum 2% slope across non-paved areas is a practical benchmark because it keeps runoff moving, and it translates to a 2-unit drop over 100 units of horizontal distance (Matusik 2004). In residential work, that's enough to shed water without turning the yard into a slide or making planting beds impossible to maintain.
Practical rule: if water can collect in a low spot, it will collect there during the first hard rain.
A full plan goes beyond regrading the soil near the foundation. It may include swales, catch basins, French drains, dry wells, and a defined outlet, because a site usually needs more than one strategy. That's especially true when the property has flat areas, tight setbacks, or hardscape elements that change how runoff behaves.
For a homeowner, the key question is whether the project needs a simple slope correction or a coordinated drainage system. If the issue is a small reverse pitch near a wall, surface regrading may solve it. If the site collects water from multiple directions or has nowhere safe for runoff to go, the plan needs to be broader and often more formal.
Assessing Your Site Before Designing Anything
The best drainage decisions come from watching the property in real conditions, not guessing from a flat yard sketch. Walk it during rain if you can, or right after. Look for where water sheets, where it slows down, and where it disappears into the soil versus where it sits on top.
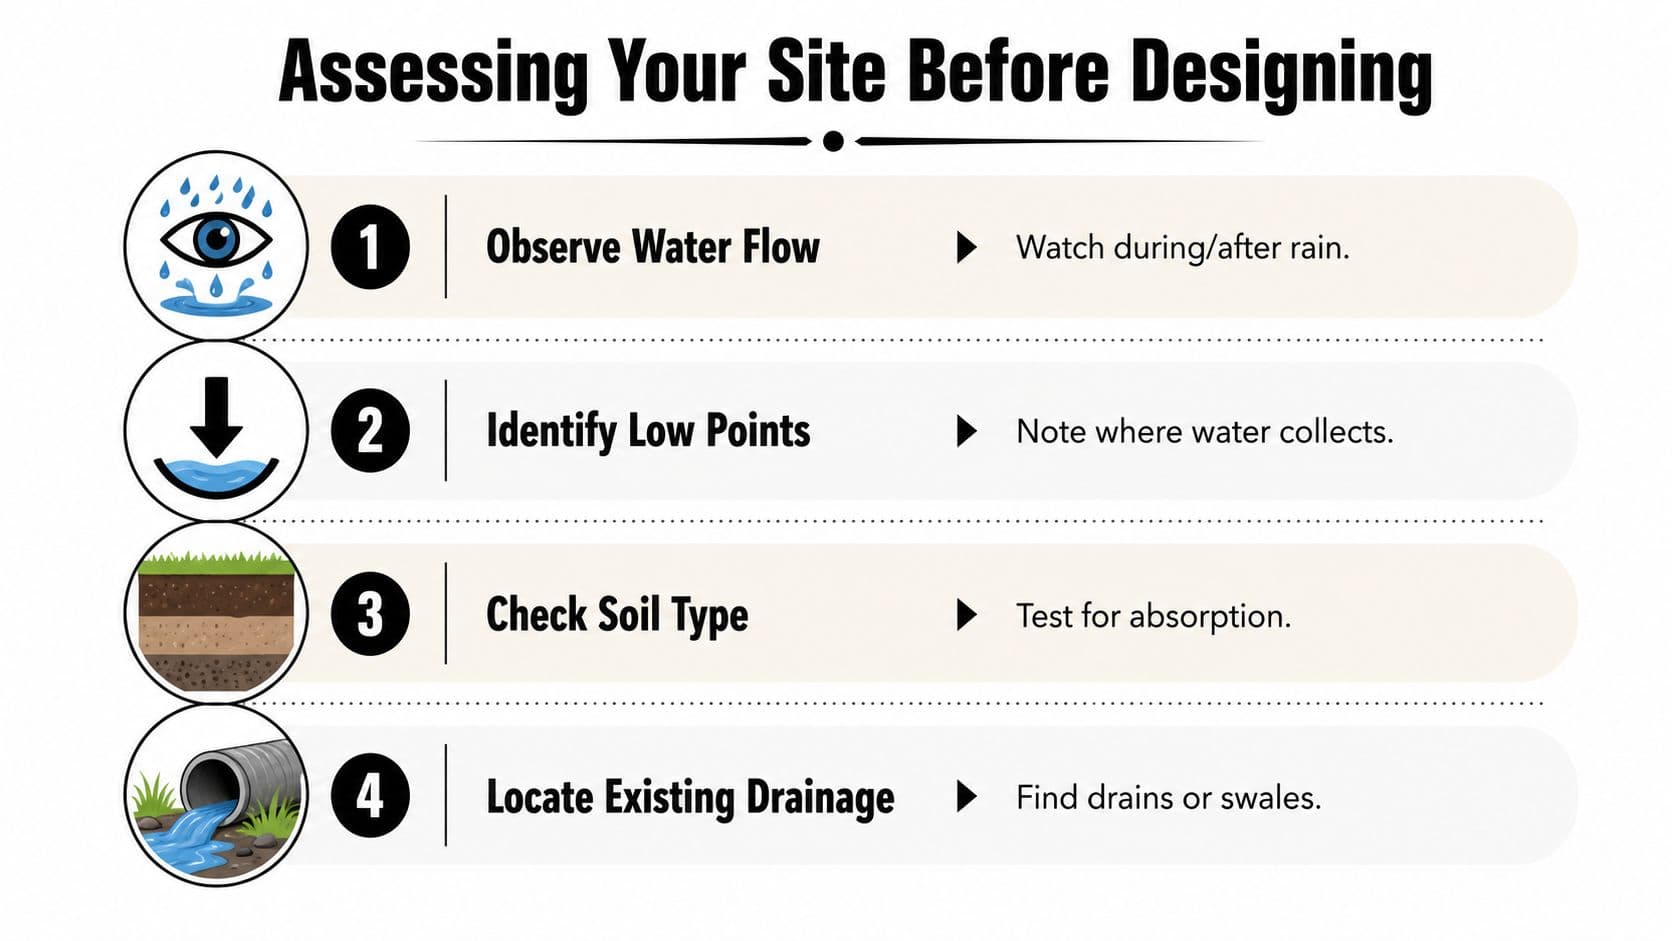
A simple field check can tell you a lot before anyone starts drawing contours. A string line and line level, or a laser level, will show whether the grade falls away from the building or back toward it. Measure from the foundation to property lines, note any visible swales or depressions, and identify utilities and easements early so you don't design a drainage path where digging isn't allowed.
If you're still in the idea stage, it helps to visualize your yard layout before committing to excavation. A layout view won't replace measurements, but it does help you see how patios, beds, walkways, and grade changes compete for space.
A benchmark matters too. Once you set a reference elevation, every other number has context. That's the difference between “this area feels low” and “this corner is lower than the outlet by enough that water has nowhere to go.”
Field note: photos taken from the same spot after different storms are often more useful than a dozen opinions about what the yard “should” do.
For projects where the terrain is complex, or where you're changing the building pad, a professional topographic survey is worth it. It gives you reliable existing elevations and a clean base for proposed grades. If the site is simple and the fix is minor, a careful DIY assessment can still get you started, but only if you're honest about what you can measure accurately.
The document set should include more than rough notes. Take photos of low spots, wall lines, downspouts, and anything that already concentrates runoff. Sketch the flow path on paper if needed. Those records help a contractor, engineer, or designer avoid repeating the same drainage mistake twice.
For a broader outside-eye approach, building services consultants site inspection is a useful reminder that good site work starts with what's physically there, not just what software assumes is there.
Design Elements That Move Water Where It Should Go
A drainage design works when every part of the site has a clear path to an outlet. The first rule is still the same, keep the ground falling away from the structure with a minimum 2% slope across non-paved areas (Matusik 2004). That gives runoff a direction without forcing the whole yard into a steep, hard-to-use shape.
The main tools and where they fit
Swales are shallow, vegetated channels that guide surface water. They're useful when you need to carry runoff across a yard without turning the area into a ditch. A swale works best where the grade is gentle and you want water to move slowly enough to soak in a bit before it reaches a discharge point.
Berms do the opposite. They're raised soil features that block or redirect water, often used to protect a low area or steer runoff toward a safer route. They can help, but only if they're shaped well enough that they don't create a new ponding problem on the uphill side.
Catch basins and inlet structures belong at low points where surface water naturally gathers. They collect runoff before it spreads into hardscape or creeps toward a foundation, then connect to piping or another discharge route. If you place one without a real outlet, you've only created a temporary holding spot.
French drains and dry wells make sense when surface grading alone can't move the water far enough. They're especially helpful in tight yards, along retaining walls, or near areas where you can't keep pushing grade outward. These are not decorative features. They're subsurface drainage tools, and they need a path to daylight, storage, or infiltration that works.
Rain gardens or infiltration areas are the right choice when you want runoff volume to spread out and soak into amended soil instead of rushing off the site. They're a good fit for larger, looser spaces where the yard can afford to hold and filter water.
| Site Condition | Primary Solution | Secondary Option | Avoid |
|---|---|---|---|
| Flat lots | Swales | Catch basins | Leaving water to find its own path |
| Sloped lots | Berms | Swales | Long unbroken downhill flow |
| Tight urban yards | French drains | Dry wells | Overreliance on surface pitch alone |
| Large properties | Rain gardens | Swales | Concentrating runoff in one low point |
For a concept-driven layout, you can also design a rainwater garden with OutdoorBrite before you decide whether the runoff area should be planted, piped, or both.
The right choice depends on space, soil behavior, and where the water has to go. On a decent lot, surface grading may carry most of the load. On a cramped site, subsurface drainage often becomes the practical answer because the surface doesn't have enough room to do all the work.
Navigating Permits and Code Requirements
Permits tend to enter the picture right when a homeowner would rather keep the project simple. They usually come into play when grading changes are close to property lines, when existing drainage paths are being altered, or when enough soil is being moved that the site no longer matches the approved condition. If the work changes where runoff leaves the lot, or affects how water reaches a neighbor, reviewers usually pay close attention.
A permit package has to show that the plan can be built. That usually means property limits, existing and proposed contours, spot elevations at key points, drainage-area mapping, and details for any surface or subsurface drainage devices. In some jurisdictions, a soils report is also part of the submittal, as noted in California HCD drainage and grading guidance.
Reviewers focus on a few practical points. They want positive drainage to a legal outlet, no reverse grades, and clear cut-and-fill limits so the site can be staked without guesswork. Ottawa's grading criteria also show how specific some jurisdictions can be about proposed spot elevations and slope gradients at boundaries, road centerlines, retaining walls, and other control points (Ottawa grading and drainage TOR).
A permit reviewer does not need a polished presentation. They need a plan that shows water will move safely and the site can still be built as drawn.
A licensed civil engineer earns their fee here. If the site has complex drainage, retaining walls, tight setbacks, or any chance of affecting adjacent property, engineering help is the safer path. On simpler residential regrades, a homeowner may handle some of the early prep, but once the design depends on linked slopes and outlets, the margin for error gets thin.
The best habit is to read the local grading criteria before choosing a design. That keeps you from building around a slope, wall, or hardscape detail that the permit office will reject later. It also helps avoid the expensive mistake of designing first and finding the code conflict after excavation has started. For homeowners comparing approval steps across jurisdictions, an overview of London planning permission checks is a useful reminder that permit logic is often more specific than people expect.
When Surface Grading Is Not Enough
Surface grading works only when the site can move water somewhere useful. If the lot sits low relative to surrounding land, receives upstream runoff, or has soil that resists infiltration, a slope adjustment alone may not solve the problem. In those cases, drainage has to be treated as a system, not a cosmetic fix.
Some sites need subsurface drainage because the surface can't do enough on its own. Others need detention or storage because there's nowhere safe to send the extra water during heavy storms. And on lots where code-minimum slopes are physically impossible without major cut-and-fill or retaining walls, the design decision becomes a trade-off, not a yes-or-no question.
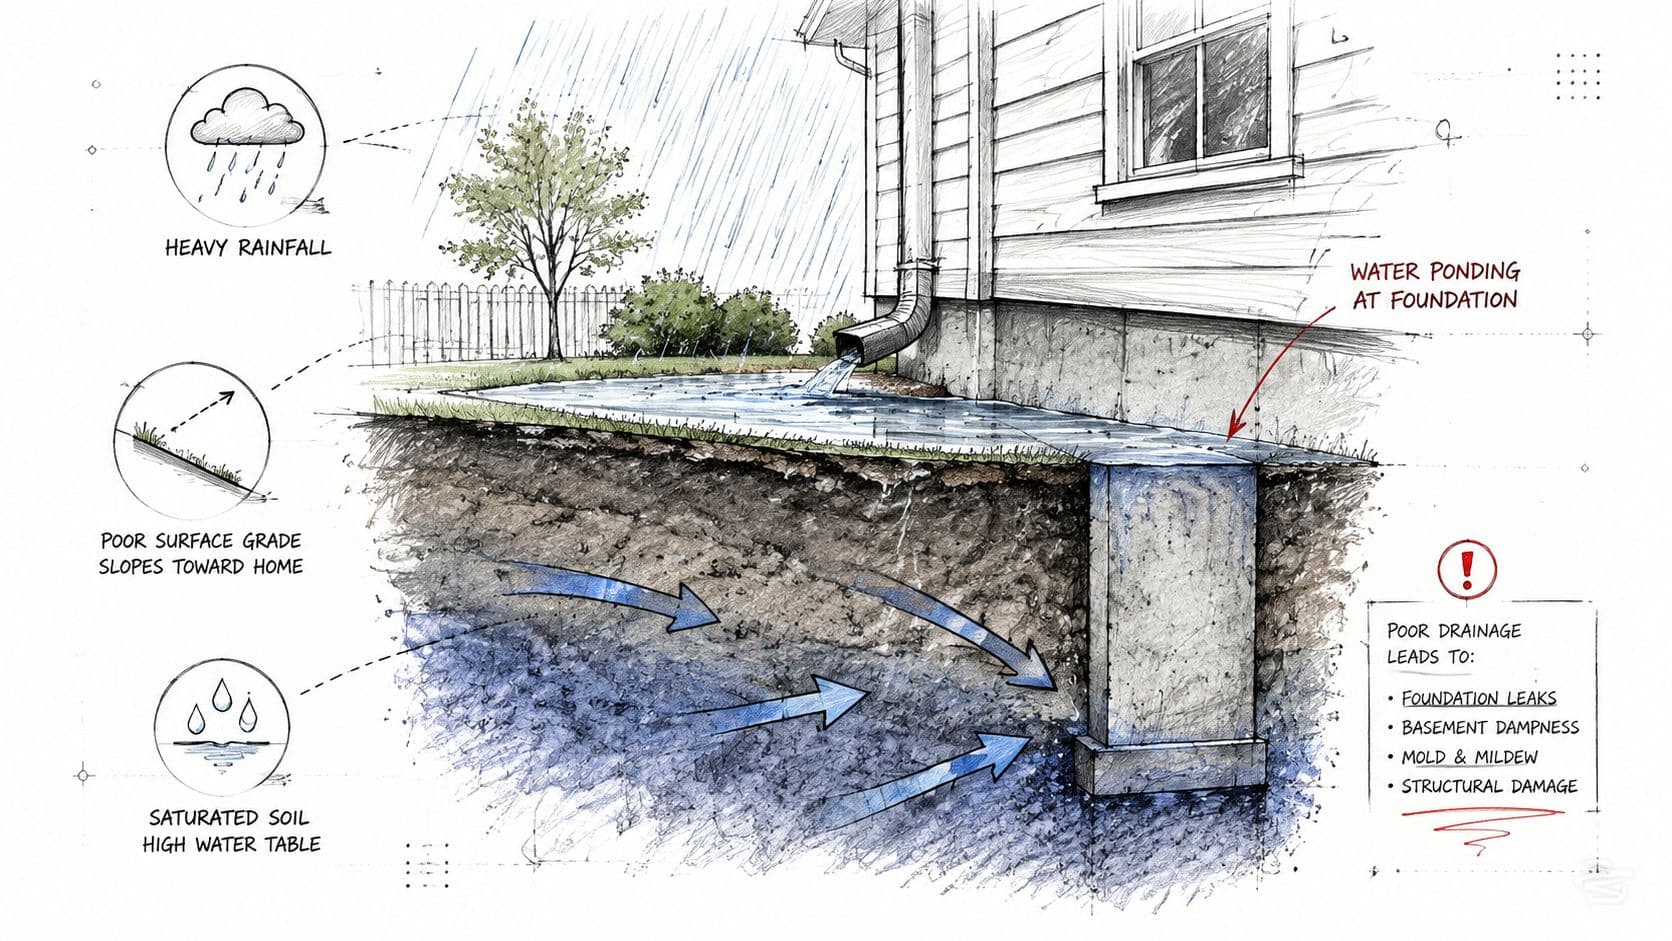
A tight lot is where this gets tricky. You may be able to make the first few feet fall away from the house, but still have nowhere to carry the runoff after that. If the design depends on lifting patios, reshaping beds, and adding walls just to create drainage, a licensed civil engineer should be part of the conversation early.
AI-generated redesigns add another layer of risk. A rendering can look balanced while creating new low points under a patio, beside a planter, or behind a wall. If you're reviewing a concept generated with a tool like OutdoorBrite, the right questions are simple, where does the water leave, which surfaces now hold runoff, and did the new layout block an existing swale or flow path?
That's especially important when a design adds more hardscape. A broader terrace, a new planting bed, or a seating area can be beautiful and still be wrong if it interrupts drainage. plants for sloped hillsides is a good reminder that planting choices on grades need to work with water movement, not against it.
The safest mindset is to treat AI concepts as a visual starting point, not a hydraulic answer. If the design doesn't show obvious drainage logic, it needs another pass before anyone starts digging. Pretty images don't tell you where runoff will collect.
Common Mistakes and Long-Term Maintenance Practices
Most drainage failures start with a small omission. Someone assumes one slope value solves the whole site, leaves out a low point, or draws drainage arrows that never reach an actual outlet. Those mistakes don't always show up on day one, but they show up fast after the first real storm.
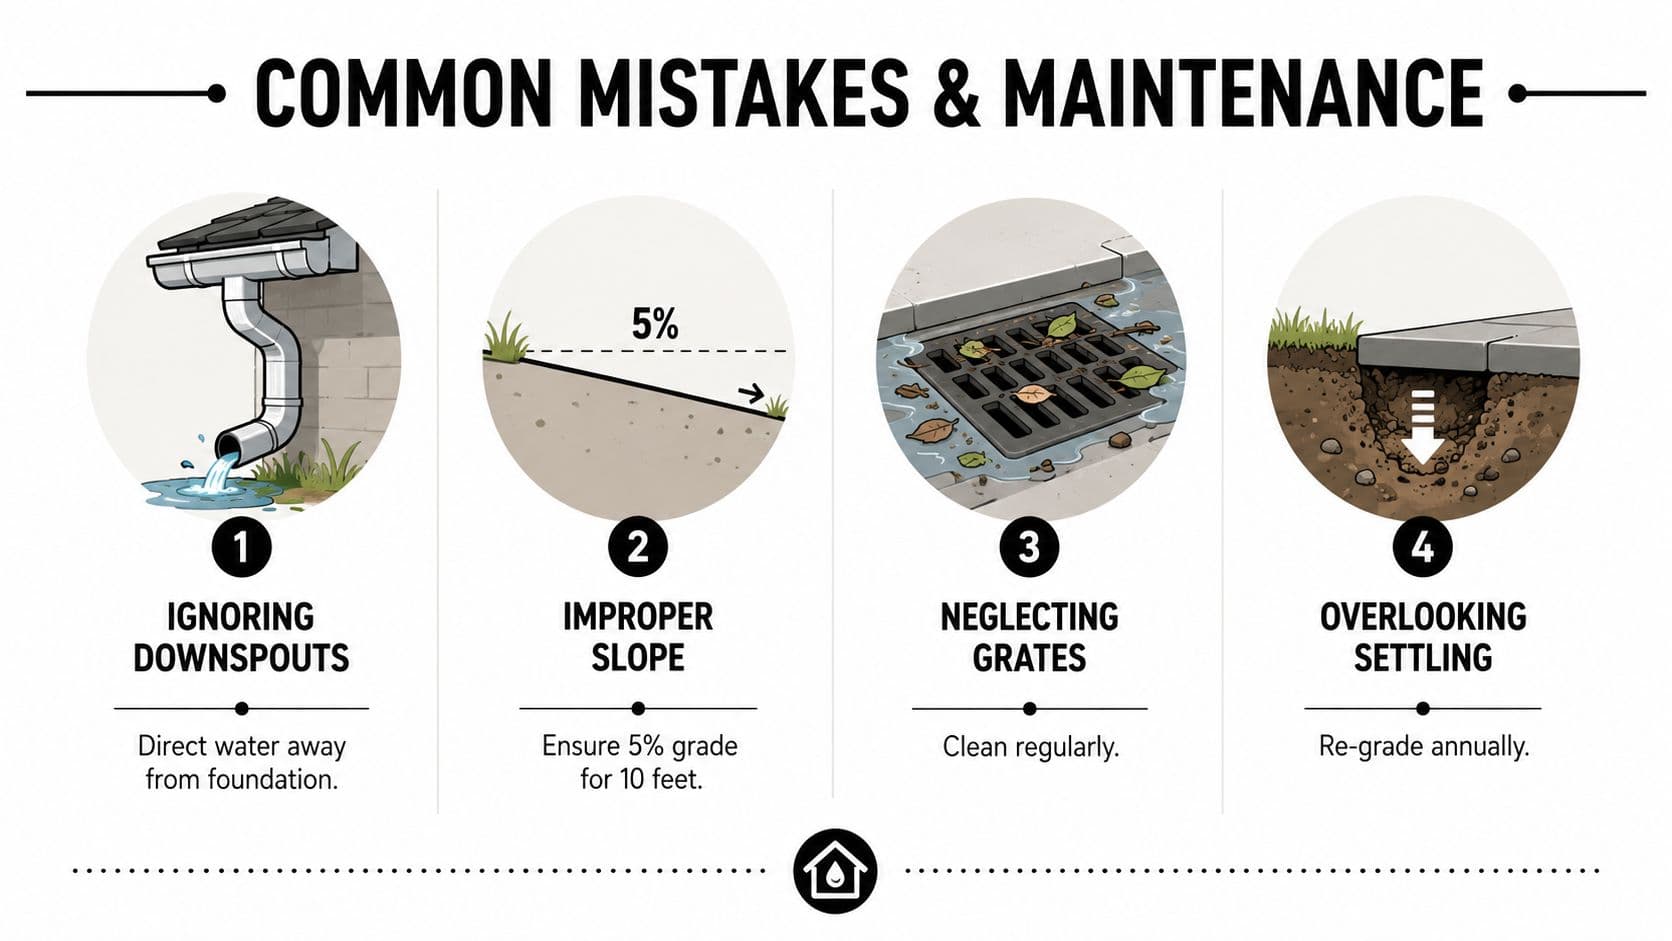
Settlement is another quiet problem. Soil moves, fills compress, and hardscape settles unevenly, which can create new low spots months after the work looked finished. A patio edge that was fine at installation can start holding water later if the surrounding grade drops even slightly.
The plan is only as good as the site after it settles.
Maintenance is straightforward if you look for the right things. Check swales, grates, and inlets after major storms, and clear debris before it blocks the flow path. Watch for fresh erosion channels, new puddles near walls, or dampness in crawl spaces and basements. Those are early signs that the system is losing capacity or the grade has shifted.
A practical routine usually includes a seasonal walk-through, a post-storm inspection, and a re-grade of settled areas when needed. Keep downspouts, surface inlets, and open channels tied together in your own maintenance notes so the drainage system doesn't become invisible once the planting work is done. If landscaping crews are already on site, have them treat swale cleanup and grade checks as part of routine care, not a separate emergency task.
The mental framework is simple. Every point must drain somewhere, every outlet must be real, and every slope must still work after settlement. If one of those three breaks, the plan needs attention before water does the damage for you.
If you're planning a yard update and want the design side of the project to respect drainage from the start, OutdoorBrite can help you test layout ideas from a photo before you commit to construction. Upload your space, review the concept, and then visit OutdoorBrite to explore how a redesign might fit the grades, flow paths, and hardscape changes on your property.
See your yard reimagined
Start creating