Raised Garden Planning from Site to Soil
Raised Garden Planning. Plan raised garden beds that actually thrive. Site, size, soil, layout, and planting plans explained step by step
You're standing in the yard, pointing at the patch where a raised bed would look right. You can already see the frame, the tomatoes, and a clear strip of lawn around it. What's harder to picture is carrying compost through the gate, reaching past mature plants, or keeping the bed watered when summer gets demanding.
Good raised garden planning starts with those less photogenic details. Before choosing lumber or ordering soil, work out who will tend the bed, what lies underneath it, and how you'll manage it through the season.
Table of Contents
- Picking the Right Spot in Your Yard
- Sizing Beds Around the Person Using Them
- Choosing Frame Materials That Survive the Seasons
- Building the Soil Mix That Drains and Holds
- Sketching a Planting Plan That Actually Works
- Planning for Contaminated or Uncertain Ground
- A Simple Year-One Maintenance Rhythm
Picking the Right Spot in Your Yard
Start at the place you've already chosen, but don't commit to it yet. Mark its outline with stakes and string, then return at different points during the day. For vegetables, prioritize full sun rather than judging the location from a bright moment between passing shadows.
Watch the fence, house, and neighboring vegetation, not just the open sky. A spot that looks sunny from the kitchen window might spend much of your gardening time in shade. Take dated photographs so you're comparing observations rather than remembering the most flattering view.
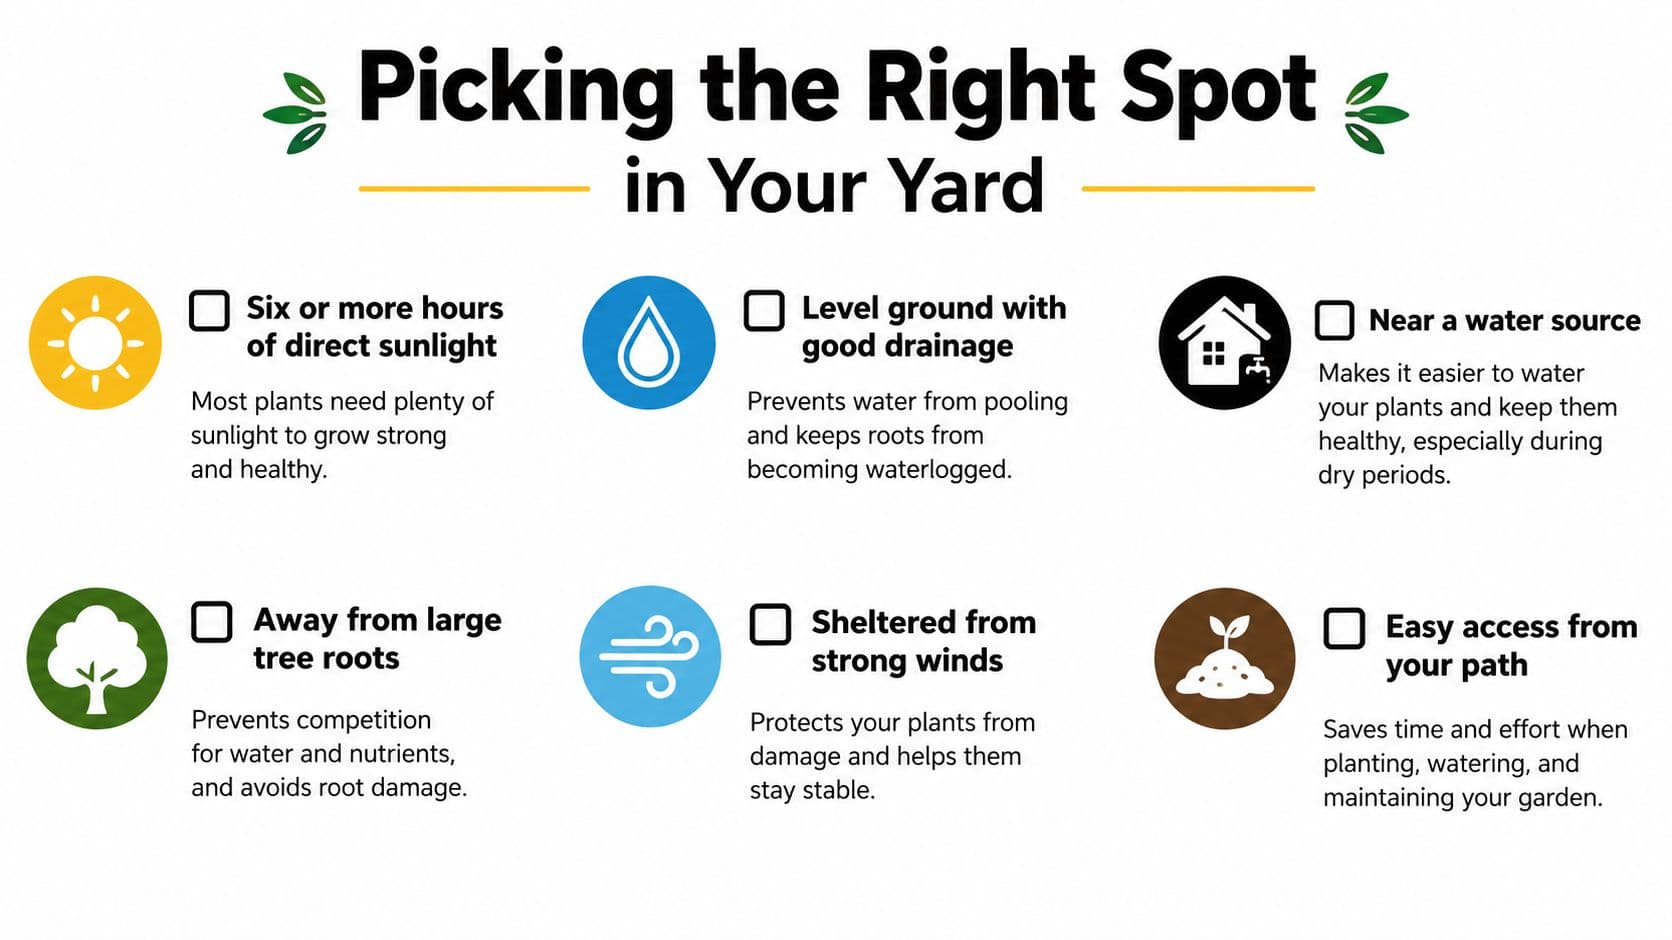
Use this location checklist as a starting point, then check each item against your actual yard.
Walk the route in working conditions
Visit after rain. Note where water stands, where runoff crosses the proposed footprint, and whether you'd have to stand in mud to harvest. Don't assume that raising the planting surface also fixes the surrounding drainage.
The method's history is instructive: Cornell's account of raised-field agriculture documents its use across Indigenous Americas, ancient China by the fifth century B.C., and prehistoric European field systems, including applications for drainage and reduced night-frost damage. Elevation is a functional response to a site, not a garden style.
Compare candidate locations using a short field checklist:
- Sun exposure: Record the actual shadow pattern rather than labeling the whole yard sunny.
- Ground conditions: Favor a workable, level footprint without persistent pooling.
- Water access: Lay out the hose and check whether it crosses steps, gates, or busy paths.
- Daily convenience: Walk from the kitchen with a harvest basket, then repeat the route with a wheelbarrow.
- Construction access: Check where delivered materials can land and how they'll reach the bed.
Choose the location with the fewest ongoing compromises. A slightly less prominent bed that you can comfortably tend is a better starting point than a centerpiece you'll avoid whenever the ground is wet.
Sizing Beds Around the Person Using Them
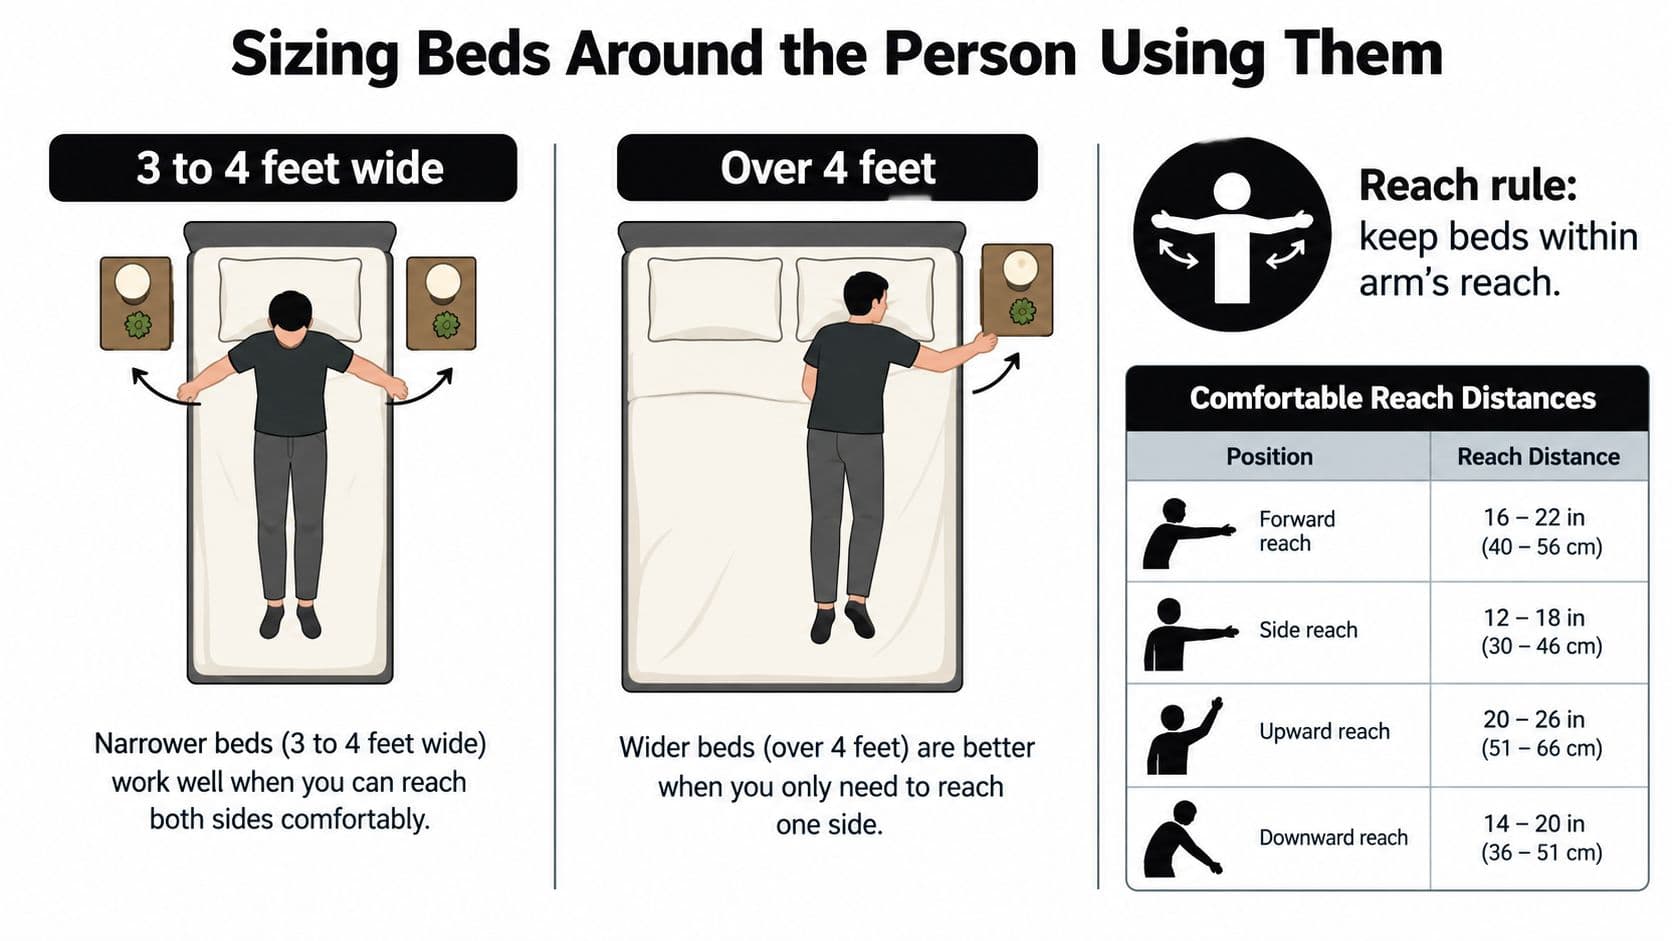
Measure comfortable reach before choosing board lengths. Set a tape measure on the ground, stand or sit where the path will be, and reach toward the proposed center. Repeat the movement as though you're thinning seedlings, not merely touching the soil with your fingertips.
The distinction matters. Harvesting and weeding require control, and you shouldn't have to brace against plants or lean your weight onto the growing medium.
Use the reach diagram to visualize the difference between accessible planting space and soil you can't comfortably work.
Establish the usable footprint
Utah State University's raised-bed guidance recommends approximately 3–4 feet of width with access from both sides, about 2 feet with access from one side, and a general rooting zone of 6–12 inches, with approximately 12 inches a safer planning benchmark. Its guidance also emphasizes planning permanent walkways before construction.
Treat those dimensions as limits to test, not targets everyone must reach. A gardener working from a seated position may prefer a narrower bed. Someone who can reach an empty bed comfortably may still struggle once foliage fills the edge.
- Mark both long sides: Include the frame thickness when checking the finished footprint.
- Test real tasks: Reach with a hand fork and pretend to lift a harvest basket from the center.
- Check the shortest reach: If several people will garden, design around the person with the least comfortable reach.
- Reserve the paths: Roll the actual cart through the layout and test turns before fixing the bed length.
Practical rule: If routine maintenance requires a foot inside the bed, change the layout before filling it.
Separate working height from root depth
A comfortable rim height doesn't automatically provide the right rooting environment. Decide whether roots will continue into healthy ground or remain confined above a hard surface. Those are different designs, even when the frames look identical.
For an additional visual reference, watch this bed-building video before finalizing your sketch.
Write inside dimensions, outside dimensions, path clearances, and working height separately on the drawing. That prevents a common purchasing mistake: ordering a frame by its advertised size without checking the space left for soil or people.
Choosing Frame Materials That Survive the Seasons
Choose a frame as a piece of outdoor infrastructure, not as matching trim for the fence. Ask what holds the sides together, how you'll repair a damaged section, and whether the finished rim is comfortable to work against.
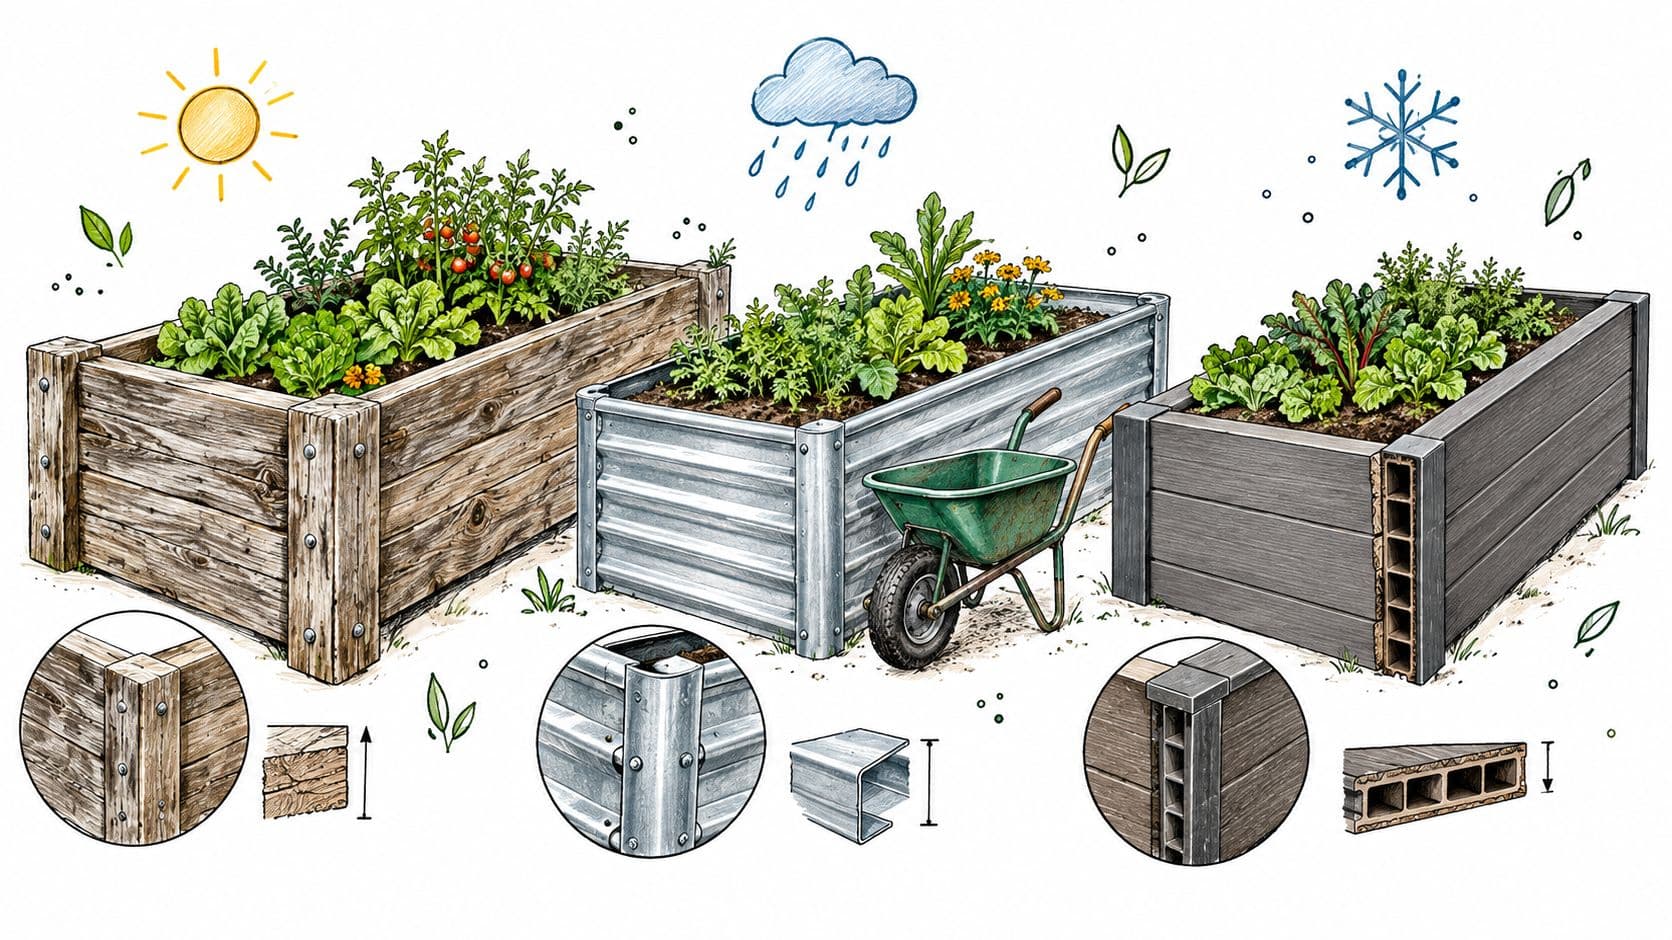
Don't assign a guaranteed lifespan to a material name. Cedar, composite, concrete block, and corrugated metal are broad categories, and the details of a particular product matter. Compare actual specifications, including suitability for the intended use, fastening requirements, and any restrictions on installation.
These examples show how different frame styles change both appearance and access around the planting area.
Compare the whole assembly
| Material | What to check before buying | Design question to resolve |
|---|---|---|
| Cedar | Board condition, treatment history, corner connections, replacement availability | Can you replace a side without dismantling the entire bed? |
| Composite | Manufacturer's span, support, and fastening instructions | Does the proposed wall need additional bracing? |
| Concrete block | Footprint, foundation preparation, joint arrangement | Will the wall leave enough clear path and reachable growing space? |
| Corrugated metal | Edge protection, coating information, connectors, assembly instructions | Is the rim safe and comfortable for the intended gardener? |
Calculate cost against the usable interior growing area, not the frame's outside footprint. Include connectors, supports, delivery, and any finishing materials in the comparison. A low purchase price isn't especially useful if essential components are missing.
For wood finishes, review the product label before applying anything beside edible crops. The outdoor-wood maintenance questions in these tips from I PAINT STUFF can help frame your maintenance checklist, but they don't replace a finish manufacturer's instructions for your particular use.
Choose the frame you can inspect and repair, not just the one you like before it's filled.
For a tall bed, ask the supplier how the walls resist outward pressure and what anchoring the assembly requires. Don't improvise a taller version of a shallow design without checking its structural requirements. Similarly, treat a wall liner as a product-specific decision, not an automatic upgrade, and keep it distinct from any barrier required beneath the bed.
Building the Soil Mix That Drains and Holds
Design the fill around water behavior, not a universal recipe. A bed that sits above healthy soil in a wet yard presents a different problem from a contained bed on a sunny patio. Start by identifying where water can leave and how roots can use the space below.
The research shows why that distinction deserves attention. A 2019 garden-bed study found that raised treatments increased early-season soil temperatures by 0.5–2.5°C and reduced soil moisture by 41–53% compared with ground-level plots; aboveground kale mass was 44–58% greater, but the growth differences weren't statistically significant because of substantial variation and a small sample.
That's evidence of a changed growing environment, not a guaranteed harvest increase. Earlier warming may suit your spring plans, while the moisture difference makes your irrigation arrangements equally important.
Soil Mix Layers by Function
Think in functional zones rather than automatically stacking sharply different materials.
| Layer | Depth | Materials | Purpose |
|---|---|---|---|
| Ground interface | Determined by the underlying site | Prepared healthy native soil, or a site-appropriate separation system | Establish the connection or separation between the bed and its base |
| Main rooting zone | Determined by crops and available root access | Documented topsoil and finished compost blend, or suitable prepared growing medium | Provide the principal growing volume |
| Surface dressing | Adjusted to the planting and maintenance plan | Finished compost or appropriate surface cover | Make surface care and seasonal replenishment manageable |
Don't treat a coarse bottom layer as a substitute for resolving drainage. On compacted ground, establish how the underlying site will function before ordering fill. On hardscape, confirm that the bed assembly provides an outlet rather than creating an enclosed basin.
Order volume, not an abstract ratio
Calculate the main fill requirement as interior length × interior width × intended fill depth, using the same unit throughout. Convert that result into the supplier's selling unit, and ask how the delivered material is measured. Keep the frame's exterior dimensions out of the calculation.
Your shopping list should identify:
- Growing medium: Specify the intended use and request information about its ingredients and origin.
- Surface material: Order it separately if it isn't part of the main blend.
- Irrigation components: Decide where the supply enters before filling obscures access.
- Delivery arrangements: Confirm where the load can be placed without blocking the working route.
Use OutdoorBrite planting soil basics as a preparation checklist alongside your supplier's information. Avoid buying extra amendments because a recipe includes them; each addition should answer a problem you've identified.
Sketching a Planting Plan That Actually Works
Draw the bed as it will look with mature plants, not newly planted seedlings. Mark the places where you'll stand, where a trellis would go, and which edges must remain available for harvesting. An attractive planting pattern isn't useful if you can't reach the crops behind it.
Make the drawing answer practical questions: what occupies each area, when it goes in, and what you intend to do after harvest. Keep the replacement plan beside the initial layout rather than on a separate note you might lose.
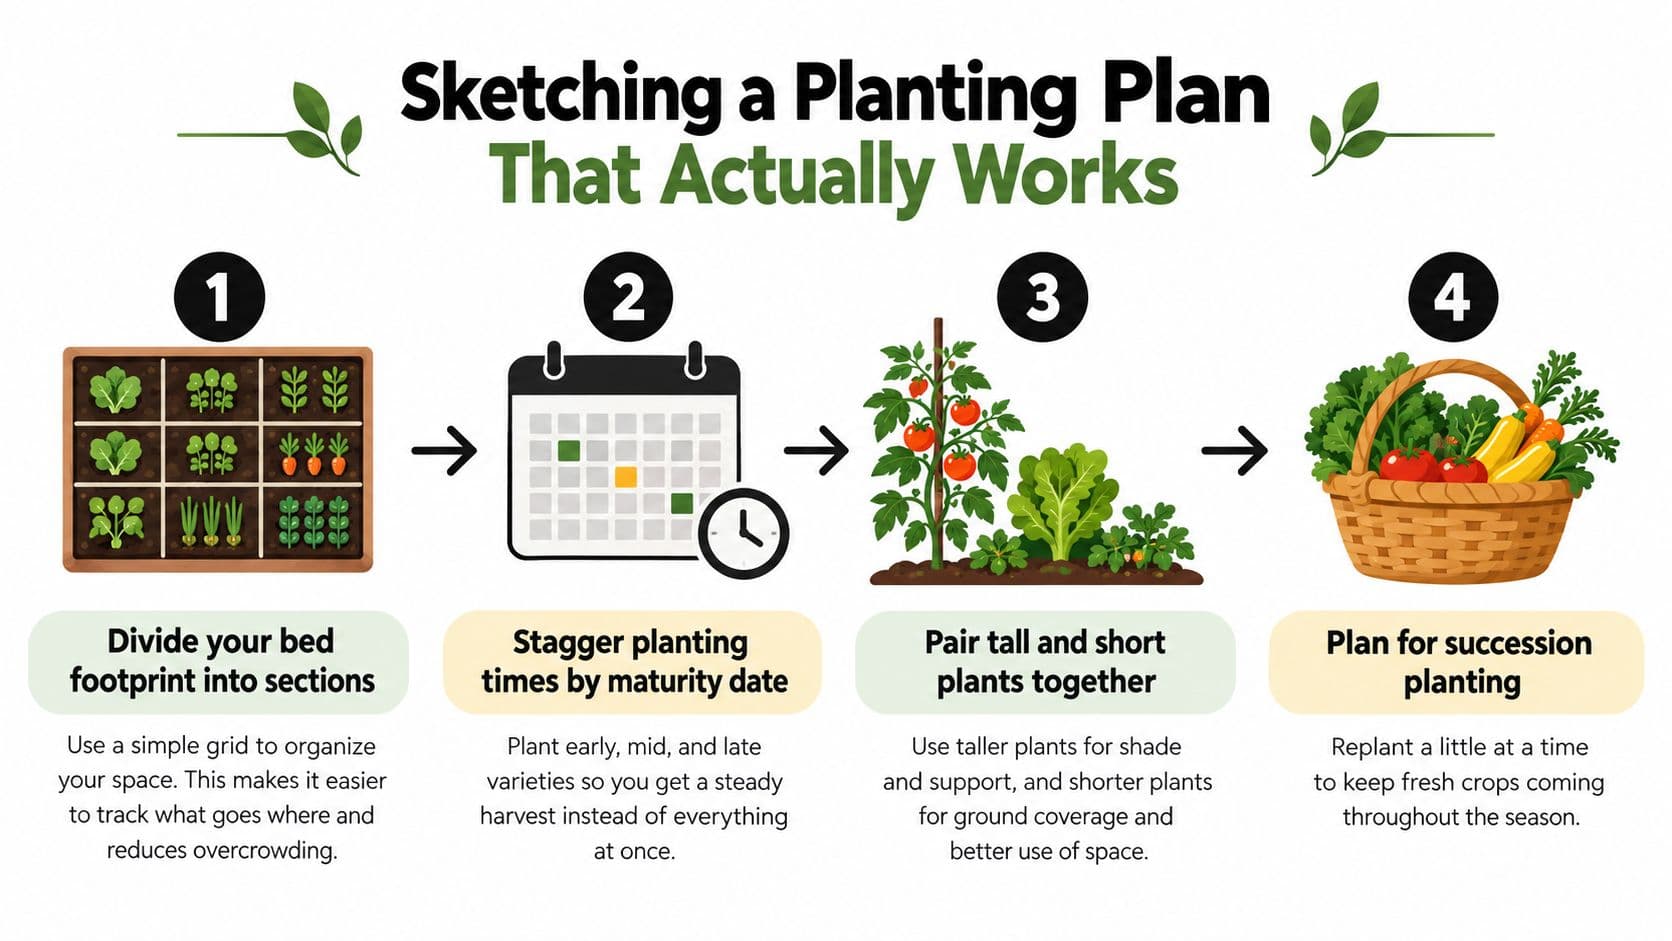
This planning sequence is a useful way to connect space allocation with planting time.
Draw a workable crop arrangement
For an illustrative rectangular bed, pencil in a tomato trellis along an edge, a salad strip beside the main harvesting path, an herb area near the entrance, and a root-crop section you can clear independently. This is a layout to test, not a promise that every variety will fit.
Check the proposed arrangement against the mature dimensions and growing instructions for the varieties you're buying. Place the trellis only after considering its shadow in your own location. A compass rule is less useful than understanding which plants would lose light.
| Planting area | Mark on the sketch | Decide before planting |
|---|---|---|
| Trellised crop | Support footprint and working access | How you'll tie, prune, and harvest |
| Salad strip | Separate sowing areas | Which areas you'll plant later |
| Herb area | Expected mature spread | Whether each herb belongs in the same watering zone |
| Root-crop section | Clear harvest boundary | What follows when the section becomes available |
Schedule replacement before removal
Use seed packets, local planting guidance, and your own calendar to assign planting windows. Don't set a universal sowing interval when varieties and seasons differ. Leave room in the plan for a replacement crop that suits the conditions expected at that time.
Companion grouping should begin with compatible care, not a promise that a neighboring plant will solve pests. Keep your notes focused on access, water requirements, support, and harvest timing.
Graph paper is enough for this exercise. If you'd rather revise digitally, compare the options in this guide to the best free garden design software, then verify the final drawing with measurements on the ground.
Planning for Contaminated or Uncertain Ground
A raised bed isn't a food-safety certificate. A new frame and fresh-looking fill don't establish whether the underlying ground, imported material, or surrounding exposure routes are suitable for growing food.
Start with the site's history. Former industrial use, old painted structures, road-adjacent ground, demolition debris, and urban fill all warrant closer investigation. If you don't know the history, record that uncertainty rather than treating it as evidence of clean soil.
Follow a risk-based decision path
- Known, suitable ground: Plan the bed as a root-connected growing area, while checking the quality of anything you import.
- Unknown history or warning signs: Arrange appropriate testing and local interpretation before committing to edible crops.
- Confirmed contamination: Seek site-specific guidance on location, separation, growing depth, and exposure control.
- Hardscape or imported fill: Treat the base as a distinct design condition, not as ordinary garden soil hidden beneath a box.
University of Maryland Extension's raised-bed guidance advises testing existing soil for lead and says vegetable crops shouldn't be planted in soil exceeding 400 ppm lead. That threshold should prompt a clear growing decision, not an attempt to dilute suspect soil with compost.
Safety check: Clean growing medium can reduce contact with the ground beneath it, but it doesn't resolve every possible exposure route.
Specify the whole separation strategy
Where a barrier is appropriate, obtain site-specific advice on the material and installation. A geotextile separation layer is not the same thing as a sealed, waterproof container, and neither label alone establishes that a design is suitable for the contamination present.
The clean rooting volume also needs deliberate specification. Don't assume that the shallow depth suitable over healthy native soil will work when roots must remain isolated from the ground.
Ask your adviser or testing service about the surrounding paths as well as the bed footprint. Dust, splashback, irrigation water, purchased soil, and compost remain relevant even after the frame is built. Keep supplier records and test results with the garden plan so future changes don't accidentally reconnect a separated bed to suspect material.
If you can't establish a suitable edible-growing arrangement, change the location or use of the space. A delayed vegetable bed is preferable to relying on an unverified workaround.
A Simple Year-One Maintenance Rhythm
A useful maintenance calendar records what to inspect and what action follows. It shouldn't demand the same watering routine regardless of weather, crops, or bed construction. Keep it beside the planting sketch so changes in the bed become changes in the plan.
University of Maryland Extension's soil-fill guidance notes that raised beds dry faster than in-ground gardens and need more frequent watering; it also identifies roughly 12–24 inches of soil for deep-rooted crops such as tomatoes and squash on hard surfaces, while isolated beds may need 15–18 inches or more. Use those site-dependent requirements when reviewing whether your original design remains manageable.
Put seasonal checks on the shed wall
| Season or stage | Inspect | Record or act |
|---|---|---|
| Before planting | Frame connections, soil condition, irrigation outlets | Repair access problems and test the watering system |
| Establishment | Moisture around new roots and performance across the bed | Adjust delivery where watering is uneven |
| Summer | Moisture below the surface, crop access, available planting spaces | Revise irrigation and follow the replacement plan |
| After harvest | Remaining crops, surface protection, structural condition | Choose mulch or a suitable cover crop and schedule repairs |
| Before restarting | Previous notes and recurring difficulties | Change the layout or crop selection where necessary |
Don't diagnose moisture from appearance alone. Check within the growing medium and compare conditions around plants, near edges, and where irrigation enters. Use that observation to adjust watering by plant type and soil, rather than preserving a schedule that no longer matches the bed.
Keep material handling proportional
For a household bed, plan replenishment around the access route you tested before construction. Don't order a bulk load merely because the unit price looks appealing if you have nowhere suitable to receive it.
For contractors maintaining larger groups of beds, loading and unloading deserve their own equipment review. ANTS Trailers provides a place to compare side dump trailers when evaluating bulk-material handling, with the final choice dependent on site access and equipment requirements.
End the season by noting the tasks you avoided. If reaching a corner, connecting a hose, or transporting material was consistently awkward, revise that detail before expanding. The successful plan is the one you can keep tending, not merely the one you can finish building.
OutdoorBrite turns a photo of your yard into realistic redesign concepts, with an elements editor for testing features such as planting beds. Visit OutdoorBrite to compare raised-bed placements in your own space, then verify reach, paths, and ground conditions before buying materials.
See your yard reimagined
Start creating