
Ai Design My Backyard
Ai design my backyard. Learn how to use AI to design your backyard in 2026 with practical steps, photo tips, style choices, and export-ready plans you can
You've got a backyard that's technically usable, but it isn't doing much for you. The patio feels too small, the lawn has no clear purpose, and every idea looks different once you try to picture it against the actual house. You want to know whether a fire pit, pergola, planting bed, or low-maintenance layout will work before you buy materials or call a contractor.
That's where AI design for your backyard earns its place. Used properly, it helps you test directions quickly, compare layouts, and turn a vague wish list into a visual working draft. Used carelessly, it produces a polished image with impossible dimensions, unsuitable plants, and features nobody can build.
The difference comes from your process. Treat the AI render as the beginning of design, not the finished plan.
Table of Contents
- Why Homeowners Are Turning to AI for Backyard Design
- Capturing a Photo That Gets You a Usable Design
- Uploading and Generating Your First Backyard Concepts
- Picking a Style Direction That Fits Your Home and Climate
- Refining the Design With the Elements Editor
- Spotting What AI Still Gets Wrong
- Exporting a Plan and Estimating Materials
Why Homeowners Are Turning to AI for Backyard Design
Backyard planning used to begin with guesswork. You'd save photos, sketch rough rectangles, move patio furniture around, and hope a professional drawing captured what you wanted before you had seen the space in context. AI shortens that feedback loop by putting several visual directions directly onto a photo of your yard.
Architecture professionals are already using AI at meaningful scale. In a 2026 survey reported by the American Society of Landscape Architects, 55% of respondents said they use AI in practice, teaching, or research. The most common uses included generative AI and knowledge generation, writing and editing, and plant or animal identification. The same survey found that professionals use AI heavily for early-stage activities such as reports, conceptual design, and RFP responses.
That matters because backyard visualization is also an early-stage problem. You may want to compare a modern courtyard with a cottage garden, or test whether a seating area belongs beside the house or at the far end of the yard. Tools such as realistic AI backyard designs make those comparisons easier because they work from your own site image rather than a generic stock garden.
What AI can and can't decide
AI is good at visual exploration. It can help you see relationships between your home exterior, paving, planting, furniture, shade structures, and outdoor living zones. It can also help you explain your taste to a designer or contractor when words like “warm modern” feel too vague.
It won't reliably determine:
- Property restrictions: Easements, setbacks, HOA rules, and utility corridors need real documents and local verification.
- Growing conditions: A photo doesn't reveal soil structure, drainage, or the full pattern of seasonal sunlight.
- Construction requirements: AI isn't a permit drawer, structural engineer, surveyor, or licensed architect.
- Final costs: A visual concept doesn't establish quantities, access conditions, labor, or local pricing.
Practical rule: Use AI to answer “Which direction feels right?” before asking a professional “How do we build it?”
The value is speed and clarity. You can reject a bad layout early, preserve the useful parts of a promising one, and arrive at a contractor conversation with something more concrete than a mood board.
Capturing a Photo That Gets You a Usable Design
The photo controls the quality of everything that follows. A dramatic image with deep shadows, a tilted horizon, and half the yard outside the frame gives the AI weak information. A plain, evenly lit photo usually produces a more useful starting point.
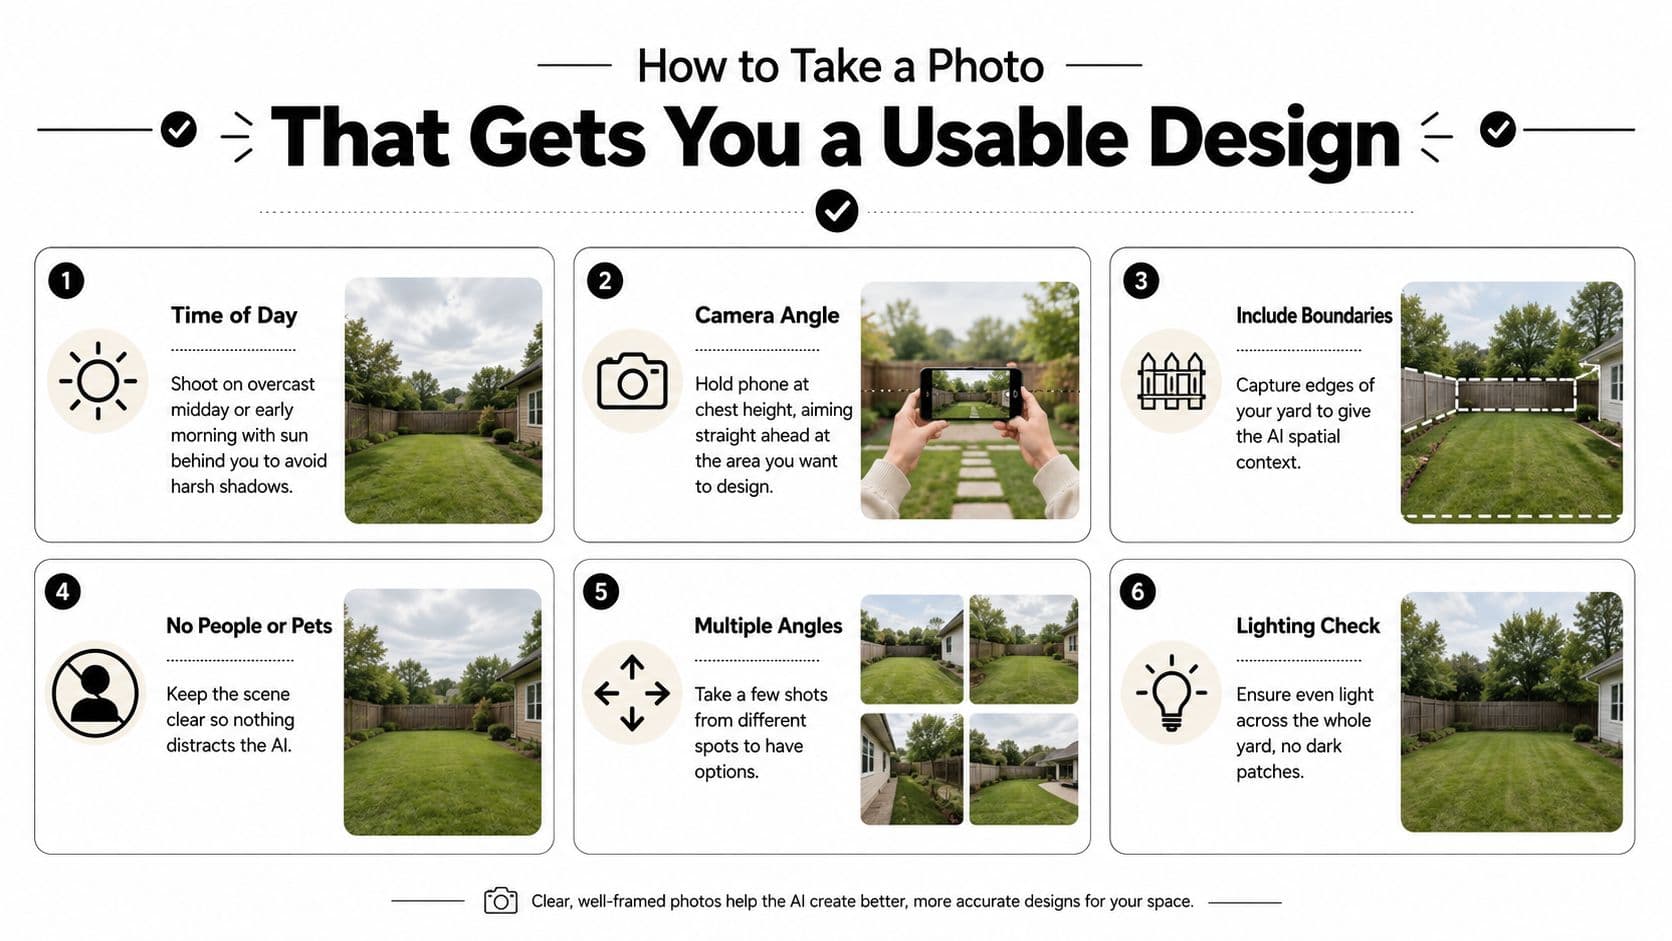
Shoot on an overcast midday or in the early morning with the sun behind you. Harsh side light creates dark patches and sharp boundaries that can make the model confuse a planting bed with a shadow or mistake the edge of a patio. Keep the camera at chest height and hold the phone level, aiming straight ahead instead of tilting upward.
Stand where someone might sit on the future patio, ideally far enough back to include the house wall, both side boundaries, and the far edge of the yard. The plan notes for this workflow recommend standing roughly 10 to 15 feet from the house, but the practical test is simple: the image should show the whole designable area without making the yard look unnaturally compressed.
Remove visual noise before you upload
Clear toys, hoses, tarps, bins, and movable furniture. You don't need to strip the yard bare, but temporary clutter can become permanent in the render or obscure the boundaries the tool needs to understand.
For a wide backyard, take several overlapping images from the same general position rather than forcing the entire space into one distorted frame. Keep the lens and camera height consistent. One clean, well-lit image is more useful than a gallery of blurry shots from random angles.
Before uploading, check four things:
- The boundaries are visible: Include fences, walls, gates, and the house edge.
- The horizon is level: Perspective errors make scale judgments worse.
- The light is even: Avoid a bright house wall beside a nearly black yard.
- The scene is empty enough: Keep people and pets out of the frame.
The AI can only preserve context that appears in the source image. If the side gate, retaining wall, or mature tree is cropped out, don't expect the first design to account for it.
Uploading and Generating Your First Backyard Concepts
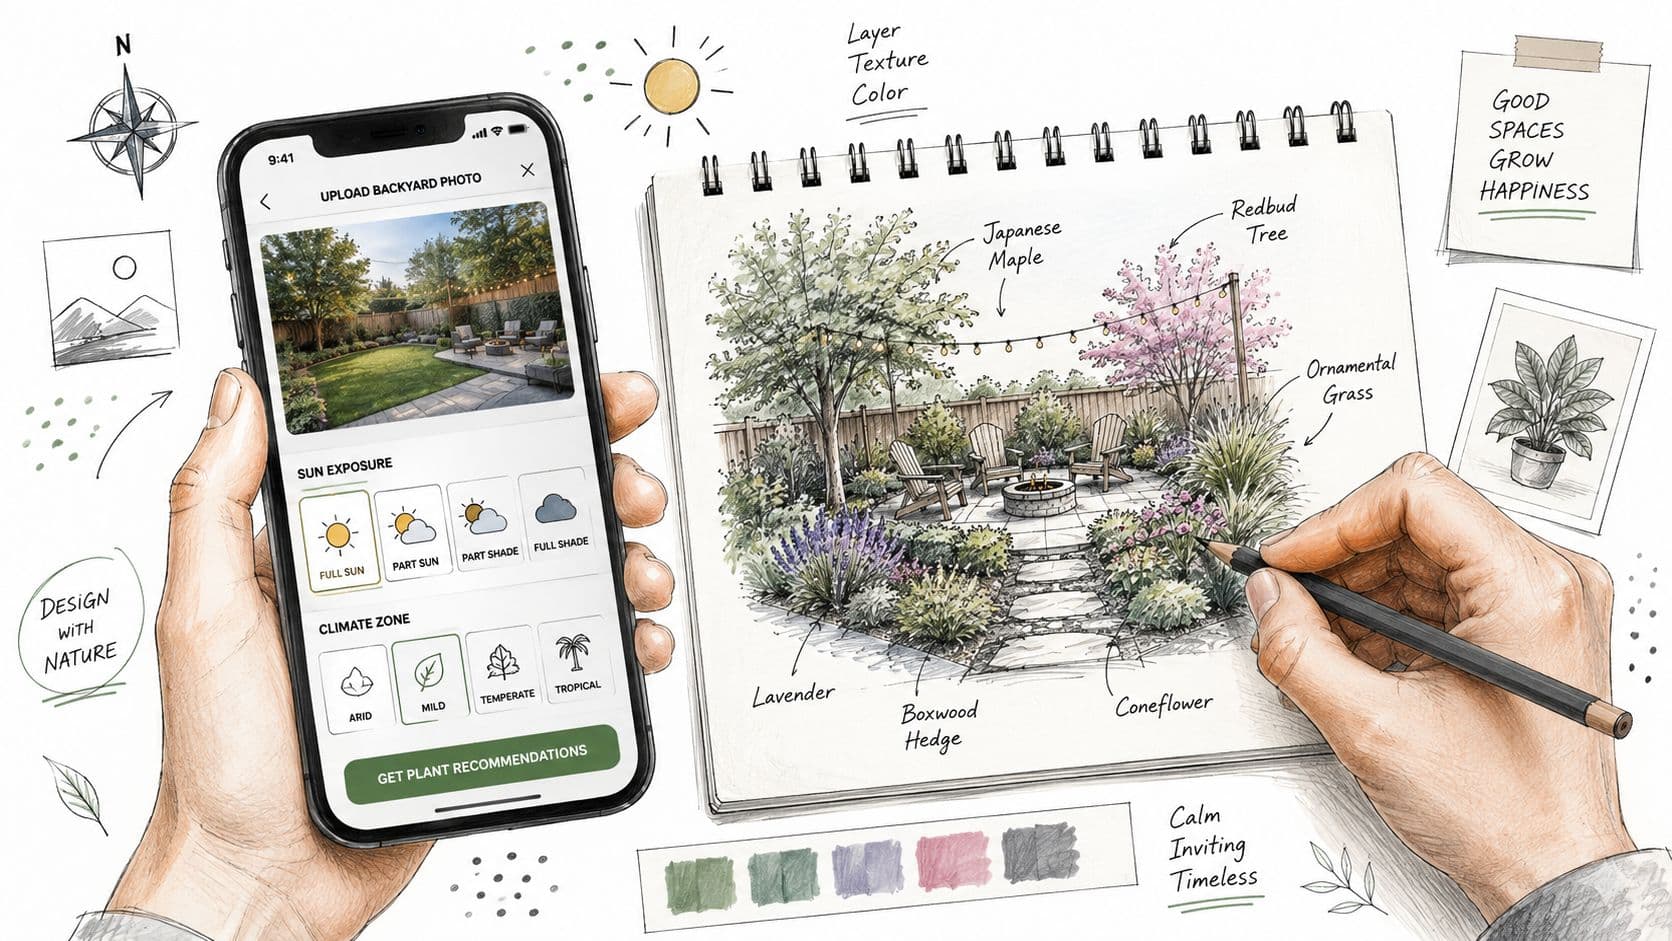
Start with the site settings, not the style button. Select the yard area, enter the climate region or hardiness information the tool requests, and identify whether the main space receives full sun, partial shade, or shade. These inputs won't replace a site assessment, but they give the generator a better starting point for plant and material suggestions.
Upload the cleanest photo you captured. Then write a prompt with three ingredients:
- Activity: Explain how you'll use the yard, such as family dining, dog play, entertaining, gardening, or quiet reading.
- Style: Use a compact visual direction, such as modern minimalist, Mediterranean, cottage, Japanese-inspired, or xeriscape.
- Constraint: State what must be avoided or protected, such as no lawn, preserve the existing tree, keep a clear path to the gate, or use low-maintenance planting.
A useful prompt might read: “Family seating and dining area with a dog, low-water modern courtyard, preserve the existing tree, no continuous lawn.” It gives the tool a purpose, a visual language, and a boundary.
Compare directions before editing details
Generate several concepts in parallel instead of endlessly revising the first image. Comparing layouts teaches you more quickly than polishing one weak direction. Save every result, including the awkward ones, because an unsuccessful render may contain a useful walkway, planting rhythm, or furniture arrangement.
Keep realism lower while you're exploring the overall composition. Once two or three layouts feel promising, increase realism and inspect them more closely. Don't start replacing individual plants or changing paver colors before you know which spatial arrangement you prefer.
Prompt wording matters, especially when you need the model to preserve an existing feature. For practical guidance on describing subjects, composition, and visual constraints, these AI prompts for image generation tips can help you make each revision more specific.
You can also design your backyard online free while you're comparing tools and deciding whether a photo-based workflow suits your project.
Judge the first set by layout, not realism
Ask:
- Does the seating area connect naturally to the house?
- Is there enough open space for the activities you named?
- Does the path lead somewhere useful?
- Does the planting frame the yard without swallowing it?
- Has the AI removed a fence, gate, tree, or drainage feature?
The first generation isn't a buying list. It's a conversation starter between you, the image, and the physical limits of the yard.
Picking a Style Direction That Fits Your Home and Climate
A style preset is useful only when it survives a climate and maintenance check. A lush cottage render may look wonderful on screen, but it can demand irrigation and upkeep that you don't want. A tropical palette can also be visually misleading in a cold region. Choose the look that fits the house, the site, and your available time.
| Style | Signature Materials | Plant Palette | Maintenance | Best Climate |
|---|---|---|---|---|
| Modern Minimalist | Large-format pavers, concrete, steel, clean timber | Ornamental grasses, structured shrubs, restrained planting | Low to moderate if planting stays simple | Broadly adaptable, with species chosen for local conditions |
| Mediterranean | Stucco, terracotta, gravel, warm stone | Drought-tolerant shrubs, herbs, silver foliage | Moderate, with irrigation planning in dry areas | Warm, sunny, well-drained regions |
| Cottage Garden | Brick, natural stone, timber, informal edging | Flowering perennials, climbers, mixed shrubs | Moderate to high | Temperate climates with suitable moisture |
| Xeriscape | Gravel, boulders, concrete, weathered steel | Succulents, native grasses, drought-tolerant plants | Low after establishment, if plants suit the site | Drought-prone and arid regions |
The home's architecture should guide the shortlist. Modern Minimalist usually complements flat-roofed or glass-heavy houses. Mediterranean makes sense beside stucco, arches, and terracotta. Cottage Garden fits craftsman and farmhouse façades, while Xeriscape naturally supports Southwestern or drought-zone homes.
Run a quick reality test
Before you lock the style, answer four questions:
- What is the soil like? Heavy clay, sandy soil, imported fill, and well-drained loam support different planting choices.
- Where is the sun? Note the light at the times you'll use the yard.
- What do local rules allow? Check HOA restrictions, fence rules, and accessory-structure requirements.
- How much maintenance will you do? Be honest about watering, pruning, weeding, and seasonal cleanup.
For the practical hardware side of a backyard renovation, you can also review shop XTREME EDEALS INC. for hardware as you turn the visual direction into a physical project.
Pick the style that passes those tests, not the one with the most impressive render. A coherent, climate-appropriate yard will look better over time than a fantasy garden that needs constant rescue.
Refining the Design With the Elements Editor
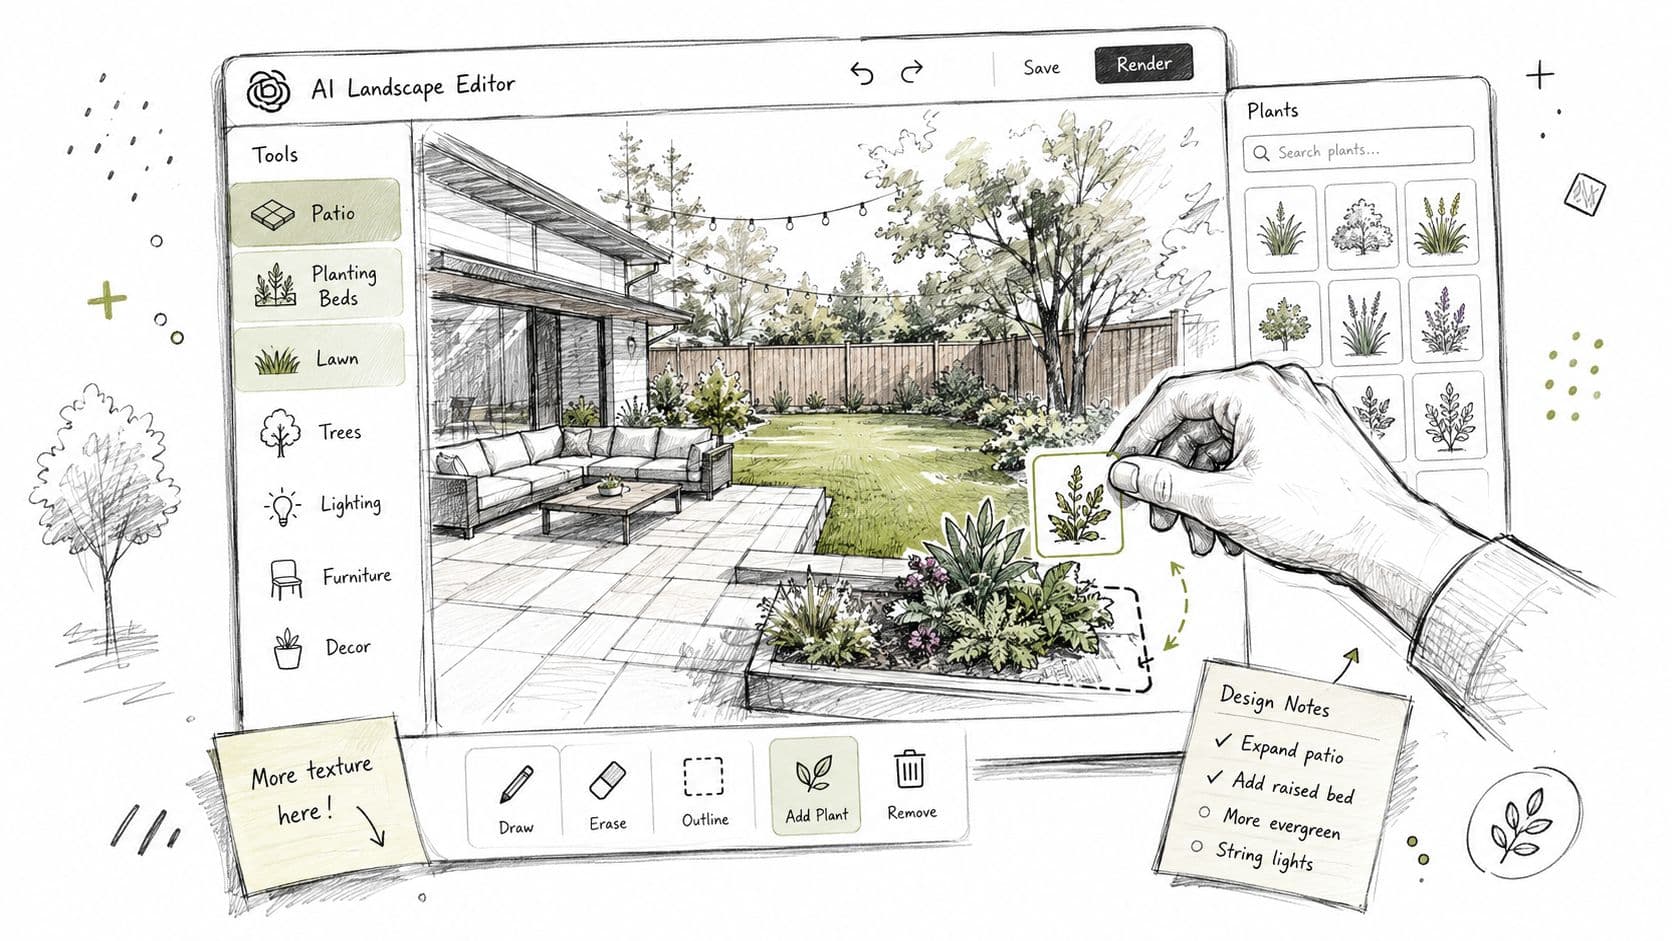
Once you have a layout worth keeping, open the elements or object editor. Don't begin by asking the AI to “make everything better.” First, inventory what it placed and decide which zone deserves attention.
Look for the patio surface, planting beds, lawn area, walkway, focal tree, furniture, lighting, fire feature, pergola, and any retaining edges. The editor works best when you treat each item as a separate design decision.
Make one targeted change at a time
A prompt like “replace the lawn with native buffalo grass, use warm gray porcelain pavers, add a cedar pergola, improve drainage, and make the plants realistic” asks the tool to solve too much at once. You'll have no idea which instruction it followed, and one correction may undo another.
Use tight loops instead:
- Patio: Ask for large-format warm-gray porcelain pavers, then inspect the edges and transition to the lawn or planting bed.
- Planting: Replace generic greenery with a named regional direction, such as native grasses and drought-tolerant shrubs, then verify the actual species separately.
- Walkway: Request a clear, level route from the back door to the gate, keeping its width visually consistent.
- Furniture: Add pieces that match the intended use, not just attractive objects that fill space.
- Lighting: Place fixtures along circulation routes and gathering areas, rather than scattering glowing dots across the render.
Anchor important changes to real references. If you want a pergola with a particular roof profile or a fire bowl made from a specific material, upload or reference that product image where the tool allows it. “Use this style of pergola” is more reliable than asking the AI to invent a structure from a vague adjective.
After every meaningful change, regenerate, screenshot the result, and save it under a clear name such as Patio A-1, Patio A-2, or Planting B-1. Version tracking prevents you from losing a strong idea while experimenting.
A focused pass on the patio, followed by a planting pass and then a circulation pass, will usually produce a more coherent working draft than one giant rewrite.
Use the video below as a visual reference for how an editor-based workflow can separate broad layout decisions from individual object changes.
The goal isn't photorealism for its own sake. The goal is a design you can explain: where people sit, where water goes, what gets planted, what gets paved, and how someone reaches every part of the yard.
Spotting What AI Still Gets Wrong
A beautiful render can still fail the buildability test. Comparative design research found that AI-generated concepts can align well with broad composition, but reviewers continued to identify material inconsistencies, hallucinated details, and weak technical precision. In one comparison, AI and conventional workflows scored closely, with AI at 18.48 out of 25 and the conventional workflow at 19.15 out of 25, a difference of 0.10 points on average according to the comparative landscape study. The useful conclusion isn't that AI is worthless. It's that expert refinement still matters.
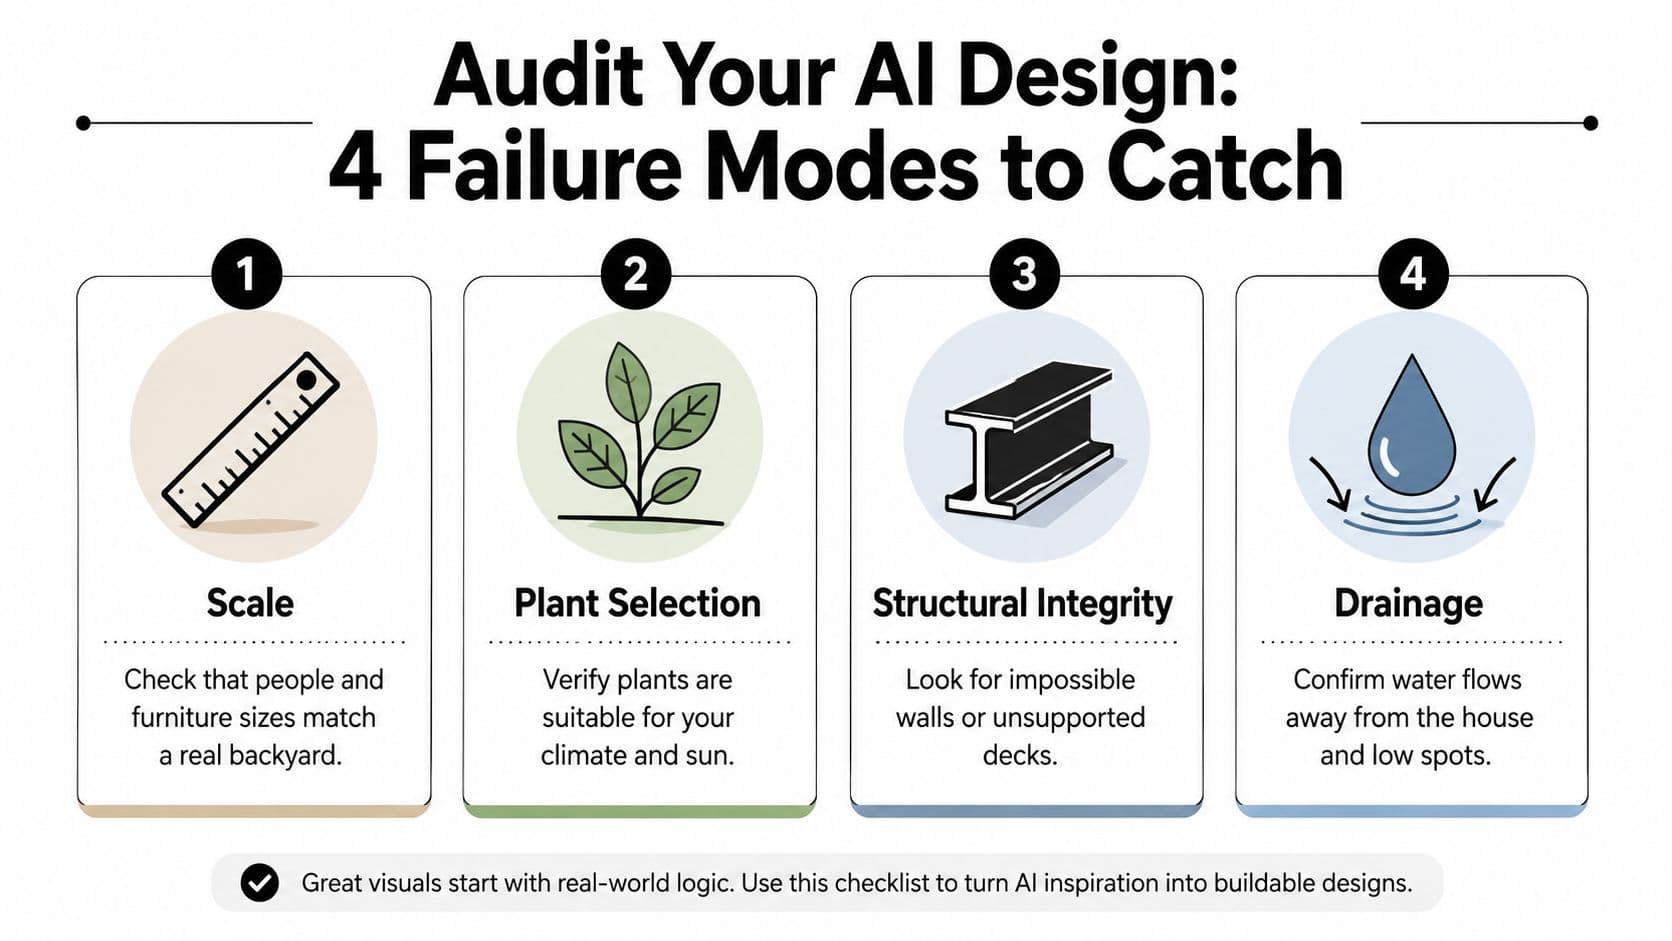
The four failure modes to catch
Scale errors appear everywhere. A patio may look generous because the furniture is undersized, while the actual footprint would leave no route around the table. Measure the actual yard and compare every major zone with the image.
Site restrictions disappear unless you add them yourself. The AI may place a pergola over an easement, crowd a property line, or put a structure where underground utilities run. Mark property lines, setbacks, gates, drainage routes, and known service locations on your working image.
Plants are drawn at the wrong maturity. A small accent tree in the render may eventually dominate the patio or interfere with overhead services. Research mature height, spread, root behavior, sun needs, and water needs in a reliable plant database or with a local nursery.
Decorative structures can be impossible. Fire features may sit below low branches, walls may lack support, decks may float without footings, and pergolas may exceed local limits. A contractor or qualified designer must review anything structural, raised, combustible, or connected to utilities.
Research on outdoor text-to-image systems also points to a practical limitation. Fine-tuning can improve image quality, yet detailed plant rendering and spatial proportionality remain unreliable, which is why landscape image-generation research supports an iterative workflow with human correction rather than one-shot generation.
Before spending money, verify dimensions, restrictions, mature plant sizes, drainage, fire rules, and building requirements. The render is a fast concept artist's draft, not a permit set.
Exporting a Plan and Estimating Materials
The handoff starts when you stop treating the render as the deliverable. Export every useful view your platform provides, then turn the visual zones into quantities a contractor can understand.
A high-resolution render communicates the intended appearance. A 2D overhead plan shows relationships between zones. A plant list helps identify what the AI is proposing, although every species still needs verification. Some platforms reserve high-resolution downloads, plant schedules, or detailed plans for paid tiers, so check the export options before promising a contractor a complete package.
Build a working quantity sheet
Measure the plan against the actual yard, not the image alone. Break the design into simple categories and record the unit that a supplier or installer will quote.
| Material Category | Unit | Typical Waste Buffer |
|---|---|---|
| Pavers or other hardscape | Square feet | Add extra for cuts and breakage |
| Mulch or soil amendment | Cubic yards or bags | Add extra for uneven depths and settling |
| Sod or turf | Square feet | Add extra for trimming and fitting |
| Edging | Linear feet | Add extra for corners and adjustments |
| Shrubs and perennials | Count by size | Allow for replacements or design changes |
| Trees | Count by mature category and container size | Confirm availability before ordering |
| Gravel or rock | Square feet and depth | Add extra for spreading variation |
| Lighting fixtures | Count | Allow for layout changes and spare components |
For the math behind area and volume estimates, use these mulch sod and paver formulas. Keep hardscape, planting, drainage, lighting, and structures on separate lines. That separation makes it easier to remove a feature or compare contractor proposals without losing the entire design.
Package the handoff clearly
Send contractors a render PDF, an overhead plan PDF, a plant list or spreadsheet, and a one-page scope summary. The summary should state what stays, what gets removed, the intended use of each zone, preferred materials, access limitations, and questions that still need an onsite answer.
Don't present AI-generated quantities as final. Confirm grades, drainage, utility locations, access, local code requirements, and material availability before digging or ordering. Contractor-ready AI workflows are increasingly moving toward blueprints, bills of quantities, planting guides, and zone-verified planting, but the key benefit is reducing ambiguity, not eliminating professional checks, as discussed in current AI landscape design trends.
If you want to turn a real backyard photo into concepts, compare styles, refine elements, and prepare a clearer handoff before contacting installers, visit OutdoorBrite. Use the output as a working draft, then verify dimensions, plants, drainage, code requirements, and material quantities with the people who'll build the yard.
See your yard reimagined
Start creating