Elevate Your Home: Backyard Landscape Ideas Hillside
Discover backyard landscape ideas hillside solutions. Stop erosion, add value, & beautify your sloped yard with terracing, plants & water features.
A backyard slope usually starts as a frustration. You look out the window and see runoff, awkward mowing, exposed roots, or a patch of ground that feels too steep to enjoy. Most homeowners don't lack ideas. They lack confidence that the idea will still work after the first hard rain.
That's why good hillside design starts with control, not decoration. You need stable grades, safe circulation, and planting that belongs on a slope. Once those pieces are right, the same grade that used to feel limiting can become the most distinctive part of the property.
These backyard design concepts for a hillside focus on practical moves that hold up over time. Some create usable space. Some slow water. Some make steep yards easier to use and maintain. Each one can be tested first with OutdoorBrite so you can compare layouts, materials, and plant massing on a photo of your actual yard before committing to labor and materials. If you're dealing with a difficult block, it also helps to see how builders approach Flascon's services for sloping land.
Table of Contents
- 1. Terraced Garden Beds with Retaining Walls
- 2. Sloped Pathways and Staircase Gardens
- 3. Native Plant Ground Covers and Erosion Control
- 4. Hillside Water Features and Rain Gardens
- 5. Tiered Deck and Patio Platforms
- 6. Contoured Landscaping with Mixed Shrubs and Trees
- 7. Slope Stabilization with Geotextiles and Erosion Control Blankets
- 8. Hillside Lighting and Nighttime Garden Design
- 8-Point Hillside Landscape Ideas Comparison
- Visualize Your Perfect Hillside Oasis Before You Build
1. Terraced Garden Beds with Retaining Walls
Terracing is the move that changes a steep yard from ornamental only to practically usable. On stronger slopes, it's also the main engineering answer. For slopes greater than 15%, terracing is the primary solution because vegetation alone can't effectively control runoff velocity over that slope length.
That threshold has practical implications. If you leave a long uninterrupted incline, water accelerates, strips soil, and leaves you with a dry upper bank and a soggy lower edge. A well-built retaining wall system interrupts that flow and creates planting shelves that are easier to irrigate, mulch, and maintain.
Start with fewer, stronger levels
Most homeowners overcomplicate terraces on paper. They draw too many skinny bands, which drives up wall complexity and creates hard-to-plant spaces. Two or three generous levels usually work better than a stack of narrow ledges.
Real examples of this approach show up in residential gardens inspired by Napa vineyard terraces or Mediterranean hillside homes in California, where stone walls give each level a clear purpose. One level might hold shrubs, one might hold a dining pad, and one might become a cutting garden or orchard edge.
- Keep drainage behind the wall: Retaining walls fail when water pressure builds up behind them, not because the face material looked weak.
- Match the wall to the house: Segmental block, natural stone, and formed concrete all read differently. Test each in a realistic rendering before you buy.
- Build for access: A terrace that can't be reached comfortably becomes dead space.
Use OutdoorBrite before you order wall material
OutdoorBrite is especially useful here because retaining walls are expensive to revise once installed. Upload a yard photo, generate options with stone, concrete block, or rendered wall finishes, and compare how many levels the slope can visually handle before it feels busy.
If you're starting small, study how to build a small retaining wall before scaling up the concept. For hauling spoil, gravel, and base material on larger installs, contractors often rely on equipment like ANTS Trailers' side dump solutions, because hillside jobs punish inefficient material handling.
Practical rule: On a hillside, the hidden work matters more than the wall face. Drainage, footing prep, and backfill decide whether the terrace lasts.
2. Sloped Pathways and Staircase Gardens
A hillside without a clear route feels steeper than it is. Once you add a well-placed path or stair run, the whole yard starts making sense.
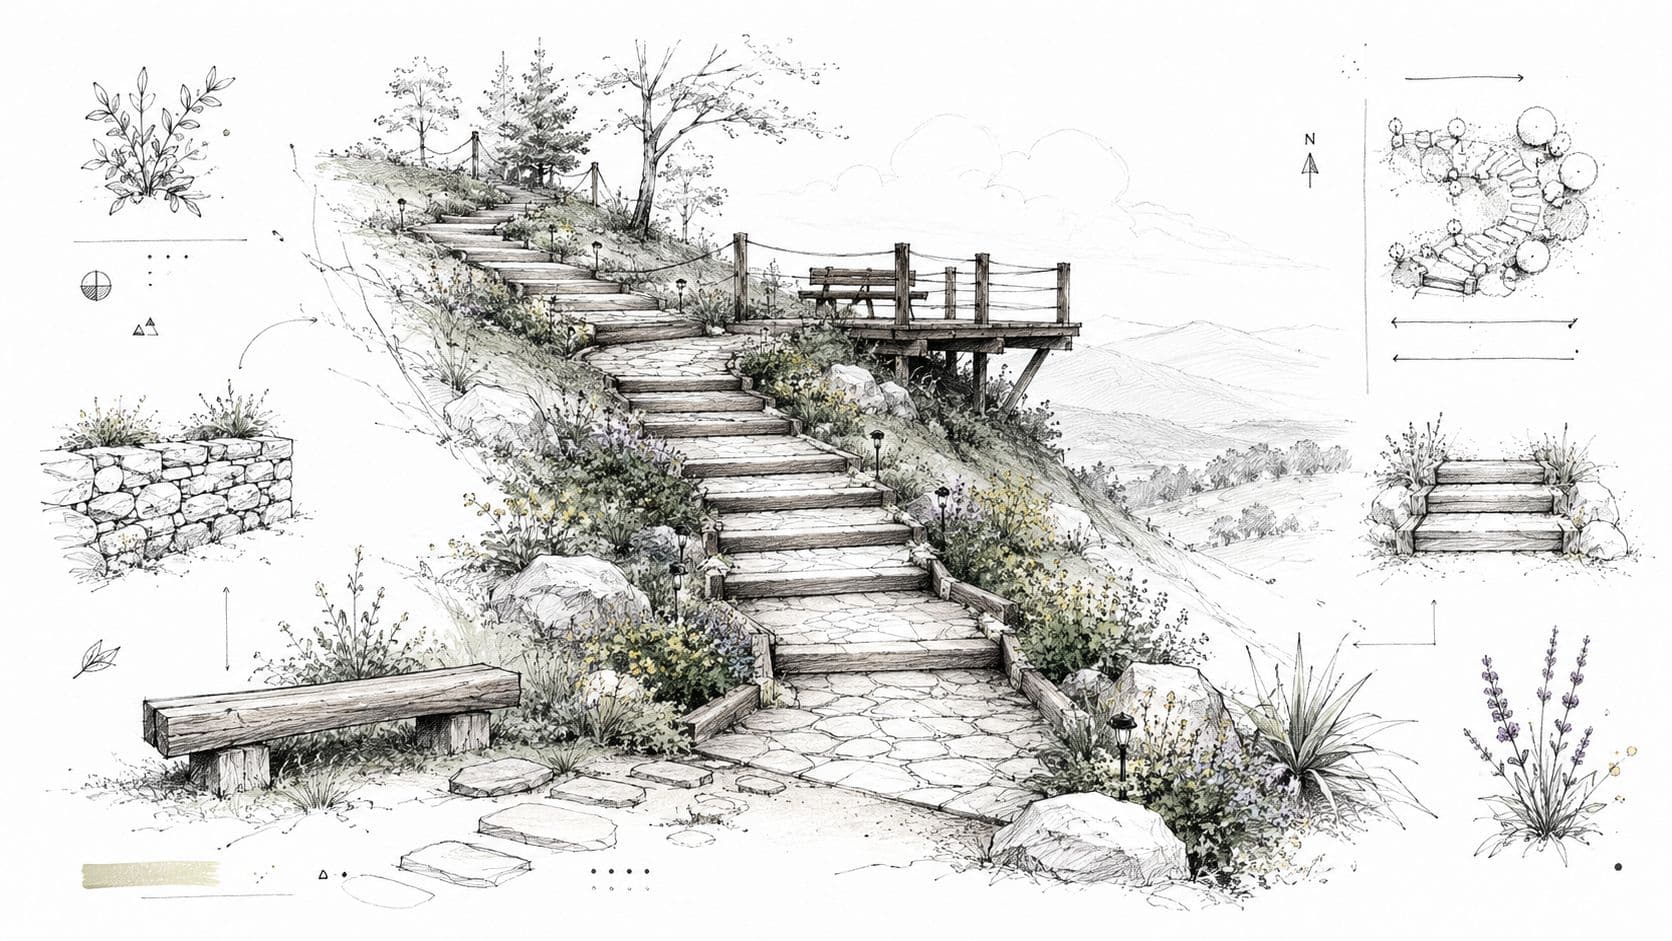
The biggest mistake I see is treating circulation as an afterthought. People install plants first, then wedge in steps wherever they fit. Good hillside access works the other way around. You map how people move, where they pause, and what they need to carry.
Safety comes from grade control
For walkways to stay safe and functional, the running slope should be no more than 5%, with cross-slope at or below 2% under ADA-based guidance. Once a path exceeds that threshold, you need to break grade with short landings or convert it to steps. That isn't red tape. It's what keeps a walkway from acting like a ramp and reduces runoff and erosion problems.
Japanese garden paths handle this beautifully. They meander, pause, and reveal views in stages. In a modern residential version, a run of stone or timber stairs with planted shoulders can make a difficult grade feel deliberate instead of punishing.
Make the route feel intentional
OutdoorBrite helps at the planning stage because stairs are visual as much as functional. Use the lighting and environment settings to preview the route at dusk, when shadows expose whether edges are clear or risky.
A few layout choices consistently work well:
- Add landings where the view changes: A turn or pause point makes a long climb feel shorter.
- Plant the edges with discipline: Loose, floppy plants that spill onto treads create maintenance and safety issues.
- Choose one primary material language: Randomly mixing stone, timber, and composite often makes small slopes feel cluttered.
A good hillside stair doesn't just get you uphill. It gives the yard rhythm.
3. Native Plant Ground Covers and Erosion Control
A lot of hillsides do not need walls first. They need root mass, surface coverage, and a planting plan that can handle runoff before the next hard rain.
Ground covers earn their keep on moderate slopes because they solve two problems at once. They hold soil in place and cut down the amount of exposed dirt that invites weeds, washouts, and constant re-mulching. The mistake is treating the whole bank like one flat bed. A stronger approach is to combine fast-spreading ground covers with a few deeper-rooted shrubs and upright accent plants, so the slope holds together visually and physically.
What works best depends on climate, sun, and how you plan to maintain it. Kinnikinnick and other low native spreaders can knit together a dry bank in the Pacific Northwest. In California, buckwheat and sages usually give better long-term performance than thirstier filler plants. In the Southeast, native sedges and ornamental grasses often establish faster than broad mats of ground cover and do a better job catching moving soil during heavy storms.
OutdoorBrite is useful here because planting density and plant mix are hard to judge from a sketch. Upload a photo of the slope and test a few directions before you buy trays of plants. Compare a tight evergreen planting against a looser native mix. You can catch a common planning mistake early. A bank that looks full in a planting plan can still read patchy from the patio or street if the foliage texture is too uniform.
If you want alternatives to turf on a bank, you can explore ground cover options and compare how they read from a distance.
A few rules save money and callbacks later:
- Plant closer than you would on flat ground: Wide spacing leaves bare soil exposed for too long and usually leads to weed pressure and minor erosion in the first season.
- Use mulch selectively: On exposed grades, lightweight shredded mulch tends to migrate downhill. Finer bark or tackifier-treated mulch usually stays put better.
- Build in layers: Low mats cover soil, but shrubs and clumping grasses add root depth and help break the visual monotony of a single-species bank.
- Avoid high-water plants at the top of a dry slope: They often struggle first, then leave gaps that become erosion channels.
The trade-off is straightforward. A planted slope is usually less expensive than hard construction up front, but it asks for more attention during establishment. The first year matters. Get irrigation, spacing, and plant choice right, and the bank gets easier each season. Get them wrong, and you end up replanting thin spots while the soil keeps moving downhill.
4. Hillside Water Features and Rain Gardens
On flat ground, a water feature is mostly aesthetic. On a slope, it can be part of your drainage strategy if you place it correctly.
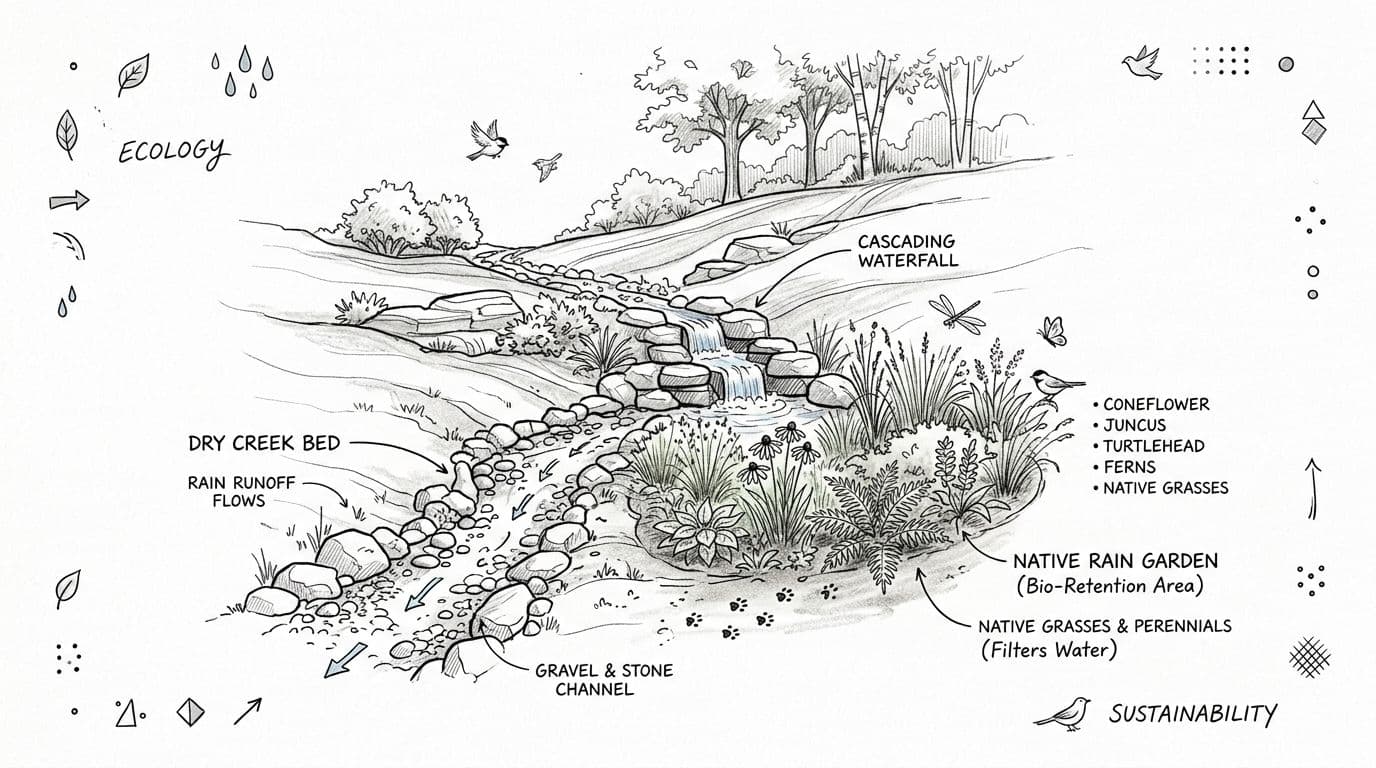
Dry creek beds, infiltration pockets, and rain gardens can catch runoff, slow it down, and turn a recurring problem area into a focal point. The trick is making them look like they belong to the landform instead of reading like a drainage ditch dressed up with stones.
Move water on purpose
A dry creek bed works best where water already wants to travel. Don't force it uphill or across the slope just because the shape looks nice in plan view. Follow the natural line, vary stone size for a more convincing bed, and soften the edges with plants that can handle periodic wet feet.
Austin and Portland gardens often use this combination well. The feature handles runoff, but it also gives the eye something to follow through the yard. On hillside sites, that visual line can organize the whole design.
The irrigation mistake that burns people
There's a real blind spot in a lot of hillside advice. People hear “use drip irrigation” but never get told why it matters so much on grade. Yardzen identifies a micro-irrigation efficiency gap on slopes and notes that water runoff can exceed 50% without specialized containment. That's exactly why overhead spray on a bank so often leads to overwatering, runoff, and weak root establishment.
Use OutdoorBrite to test where a dry creek bed, rain garden basin, or planted swale should sit relative to terraces, stairs, and lower lawn areas. It's much easier to spot a bad water path on a render than after the first storm.
Don't build a decorative stream where you need a drainage solution. On a hillside, water features have to earn their place.
5. Tiered Deck and Patio Platforms
You step out the back door expecting a usable yard and get a drop-off instead. That is the moment tiered deck and patio platforms earn their keep. On a hillside, they turn hard-to-use grade changes into outdoor rooms with a clear purpose.
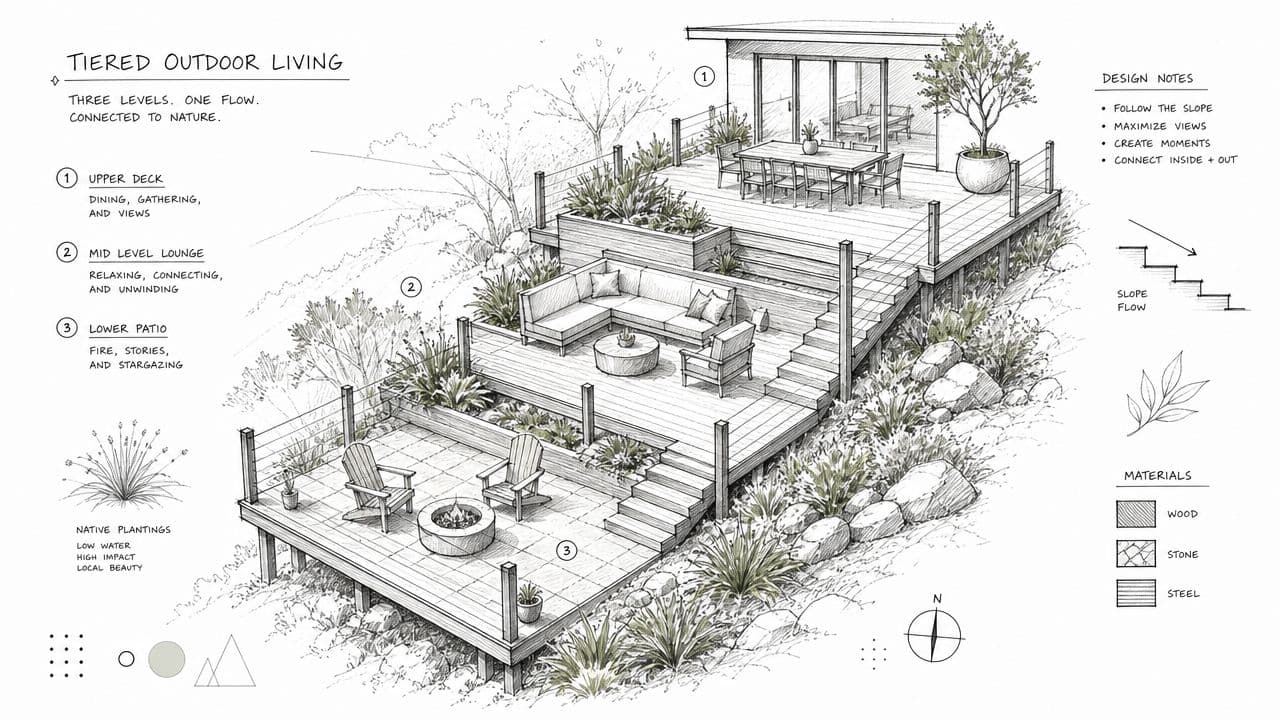
A single oversized deck usually fights the site. Two or three smaller levels tend to fit the slope better, reduce the visual bulk, and make construction easier to phase if the budget is tight. One level can handle dining near the house, another can hold lounge seating, and a lower patio can become a fire pit area or a quiet spot to catch the view.
Give each platform one job.
That sounds simple, but it prevents a common design mistake. Homeowners often try to fit dining, grilling, lounging, and circulation on every level, which creates cramped corners and expensive square footage that never gets used well. I size each platform from the furniture backward. Measure the table, chair pullback, grill clearance, and walking paths first, then set the platform dimensions.
Material choice matters more on a slope than it does on flat ground. Wood framing is often the fastest way to span grade changes, but it needs regular maintenance and careful detailing where posts meet soil. Composite cuts down on upkeep, though it can look flat or feel hot in full sun. Masonry patios feel permanent and quiet underfoot, but they need real base prep and retaining support, so costs rise quickly as the slope gets steeper.
OutdoorBrite helps at the stage where people usually guess. Before permits, engineering, or contractor pricing, test platform heights, railing styles, stair runs, and furniture layouts in a visual mockup. You can catch problems early, such as a railing blocking the kitchen view, a lower patio that feels disconnected from the house, or stairs that land in an awkward traffic path. If you're comparing options, it helps to work through them in landscape design software before you commit to one buildable direction.
There is also a structural trade-off homeowners miss. More tiers can reduce the height of any one retaining edge, but they also add stairs, footings, guardrails, and transitions. Fewer levels simplify construction, yet they can create a taller, heavier-looking platform. The right answer depends on slope severity, view priorities, and how often you will use each zone.
Watch tree placement near the structure too. Roots, framing, paving, and walls can start competing for the same space faster than people expect on a narrow hillside yard. If you plan to add shade trees or large shrubs near supports or hard surfaces, review expert root barrier installation before finalizing the layout.
Three checks help avoid expensive revisions later:
- Stand inside the house and study the view: platform height and rail design change what you see from major windows.
- Leave room for drainage and access: water, under-deck maintenance, and stair landings need space on sloped sites.
- Use plants between built levels: that softens the structure and keeps the yard from feeling overbuilt.
6. Contoured Landscaping with Mixed Shrubs and Trees
Not every hillside needs walls, stairs, or platforms. Sometimes the best answer is to lean into the landform and shape it with planting masses.
Contoured planting works when the slope already drains reasonably well and you want a softer, more natural look. Think chaparral-style groupings in California, layered understory gardens in the Appalachians, or Pacific Northwest slopes with conifers, shrubs, and ground-level woodland plants.
Plant to match the slope's moisture pattern
One of the most useful hillside truths is simple. Water moves downhill. That means the top of the bank usually dries out first, while the lower edge stays wetter longer. Plant selection should follow that pattern, with tougher, drought-tolerant choices higher up and thirstier plants lower down, as noted earlier in the discussion of slope hydrology.
This is also where root behavior matters. Large woody plants can stabilize a slope, but they can also create conflicts near structures, hardscape edges, and underground lines. If you're planting near a house or retaining wall, it's worth understanding expert root barrier installation before placing aggressive-rooted trees.
Think in masses, not specimens
Homeowners often shop a hillside one plant at a time. That usually produces a spotted look that never settles into the ground. Better results come from repeating a few shrubs in larger drifts, then punctuating with small trees or structural accents.
OutdoorBrite helps because you can preview plants at mature scale instead of nursery scale. That's critical on slopes. A plant that looks tiny in a pot can dominate a narrow bank a few seasons later, especially when viewed from below.
- Place taller plants upslope: That keeps lower views more open and usually reads more naturally.
- Mix evergreen and deciduous material: A bare hillside in winter often feels harsher than expected.
- Repeat forms: Repetition calms steep sites that already have a lot of visual movement.
7. Slope Stabilization with Geotextiles and Erosion Control Blankets
A common hillside mistake happens right after grading. The bank looks clean, planting is scheduled, then the first hard rain cuts channels through the soil before roots have a chance to hold anything in place.
Geotextiles and erosion control blankets solve that timing problem. They protect disturbed soil during the vulnerable window between earthwork and plant establishment.
Use temporary reinforcement where the slope is still settling
On moderate grades, a blanket can hold seed, topsoil, and mulch in place long enough for the site to knit together. Coir works well where you want slower breakdown and better durability. Jute is often cheaper, but it breaks down faster and can be the wrong choice on a slope that will stay exposed for a full season.
That trade-off matters. Paying more for the right blanket is usually cheaper than repairing gullies, replacing washed-out plants, and regrading a bank after every storm.
OutdoorBrite helps at the planning stage because this category is hard for homeowners to judge from a materials list alone. The blanket itself is temporary and rarely attractive, so I use OutdoorBrite to show the finished planting overlay before installation starts. That keeps the conversation focused on the end result, not the awkward interim phase.
Installation determines whether it works
Blankets fail for predictable reasons. Edges are left loose. Overlaps are too short. Staples are spaced too far apart. Water gets under the fabric, lifts it, and turns a simple stabilization layer into loose debris on the slope.
Match the product to the actual site. Moderate slopes with surface erosion often respond well to biodegradable blankets and geotextiles. Steeper banks, active slumping, or repeated washouts usually need built structure first, then surface stabilization after the grade is secure. As noted earlier, lighter treatments help with erosion. They do not fix a bank that is already moving.
Field note: If the slope shows cracking near the top, bulging at the toe, or deep rills after every storm, skip the cosmetic fix. Stabilize the grade first, then install planting and surface protection.
8. Hillside Lighting and Nighttime Garden Design
You come home after dark, step out of the car, and the slope that looked manageable at noon suddenly reads as a blind drop, a black stair run, and a few scattered shadows. Good hillside lighting fixes that fast. It makes grade changes legible, guides people where you want them to walk, and gives the yard depth instead of glare.
Start at the bottom and work uphill. On sloped sites, the approach matters more than the view from the patio because that is where footing changes, stairs begin, and visitors decide where to place the next step. If the route is clear, the rest of the lighting can stay restrained.
Light the route first
Path lights, step lights, and low fixtures at landings do more work than a row of dramatic spotlights aimed at trees. I usually treat stairs, turns, and surface transitions as the priority zones. If those points are visible from both directions, the yard feels safer and more polished with fewer fixtures.
A common mistake is bright uplighting on the upper bank with almost no light at the lower entry. That forces eyes to adjust to hot spots and shadows at the same time. Warm color temperatures tend to work well near seating areas. Slightly cleaner, task-focused light often belongs at steps, gates, and entries where depth perception matters.
To see how layered lighting changes a slope, this example is worth watching:
Use OutdoorBrite to test night scenes
OutdoorBrite earns its keep here because lighting plans are hard to judge from fixture specs alone. Before a homeowner buys transformers, runs wire, or cores lights into masonry, I like to test night views in a render. That lets you compare beam spread on stairs, check whether retaining walls read as useful structure or just bright stripes, and catch glare problems before installation day.
It also helps with budgeting. On a hillside, more fixtures do not always produce a better result. Often the smarter move is fewer lights, placed lower and aimed with more discipline. OutdoorBrite makes that easier to see early, which can save real money on wiring, labor, and replacements.
Use these rules to keep the system practical:
- Hide the source whenever possible: People should notice the illuminated step, wall face, or tree canopy, not a bare bulb in their line of sight.
- Use a few vertical focal points: One or two lit trunks or canopies give the slope depth and orientation better than scattering small fixtures everywhere.
- Account for plant growth now: Shrubs and grasses will spread. If a fixture will be buried or blocked in two seasons, move the plant or choose a different mounting location.
- Keep maintenance in mind: Hillsides are harder to service. Fewer fixture types, accessible transformers, and durable connections usually beat a complicated setup with perfect symmetry on paper.
The best nighttime yards on a slope feel calm, not theatrical. You should be able to walk the route, read the grade, and enjoy the planting and stonework without the lighting demanding attention. OutdoorBrite helps you get there before the first trench is dug.
8-Point Hillside Landscape Ideas Comparison
| Solution | 🔄 Implementation complexity | ⚡ Resources & estimated cost | 📊 Expected outcomes | Ideal use cases | ⭐ Key advantages / 💡 Tips |
|---|---|---|---|---|---|
| Terraced Garden Beds with Retaining Walls | High, structural work, engineering, permits | High materials & labor; heavy equipment; $5,000–$50,000+ | Creates usable flat planting areas, strong erosion control, improved drainage | Steep hillsides where flat garden space is needed; architectural landscaping | ⭐ Excellent erosion control & layered aesthetics. 💡 Start with 2–3 terraces; ensure drainage and engineer tall walls. |
| Sloped Pathways and Staircase Gardens | Medium, careful grading, drainage, safety design | Moderate materials/labor (stone/wood/composite); $3,000–$20,000 | Improved access and safety; defined circulation and focal views | Properties needing safe access, viewing platforms, or winding garden routes | ⭐ Balances function and form; enhances access. 💡 Use comfortable rise/tread (6–8" / 12"); plan drainage under stairs. |
| Native Plant Ground Covers and Erosion Control | Low–Medium, planting strategy and establishment time | Low–moderate plant/material costs; $1,500–$8,000; low long‑term inputs | Stabilizes soil, reduces irrigation, supports wildlife over time | Mild–moderate slopes, ecological restoration, low‑maintenance projects | ⭐ Cost‑effective, sustainable erosion control. 💡 Plant densely with natives; expect a season(s) to establish. |
| Hillside Water Features and Rain Gardens | Medium–High, hydrology planning and possible plumbing | Moderate–high (excavation, stone, plants, pumps); $2,500–$15,000 | Captures/filters runoff, reduces erosion, creates strong visual focal points | Sites with runoff issues or interest in stormwater solutions and water features | ⭐ Dual-purpose: stormwater management + visual interest. 💡 Map flow paths and use wet/dry tolerant plants. |
| Tiered Deck and Patio Platforms | High, structural supports, permits, skilled labor | High materials & contractor costs; $10,000–$60,000+ | Multiple usable outdoor living levels, increased property value | Steep yards requiring flat entertaining/dining areas and panoramic views | ⭐ Maximizes usable space and views. 💡 Design each level for a specific use; check permits and sightlines. |
| Contoured Landscaping with Mixed Shrubs and Trees | Medium, long‑term planning, species selection | Moderate (plants, irrigation, labor); $2,000–$12,000; ongoing maintenance | Natural contours, privacy, increasing ecological value and maturity over years | Naturalistic hillside designs, privacy screening, habitat enhancement | ⭐ Natural, affordable long‑term depth and screening. 💡 Select plants by mature size; place tallest upslope and mix evergreens/deciduous. |
| Slope Stabilization with Geotextiles & Erosion Blankets | Low–Medium, correct anchoring and overlap required | Low cost materials & quick install; $500–$3,000 | Immediate erosion control; protects seedbeds while vegetation establishes | Newly exposed slopes, post‑construction, wildfire recovery, steep unvegetated areas | ⭐ Fast, cost‑effective temporary stabilization. 💡 Install before planting, overlap 6–12" and anchor securely; use biodegradable options if desired. |
| Hillside Lighting and Nighttime Garden Design | Medium, electrical work, thoughtful layout to limit glare | Variable fixture and install costs; $2,000–$15,000+; requires electrician | Extends use after dark, improves safety, highlights features and depth | Pathways/stairs for safety, accenting plantings/water features, evening entertainment | ⭐ Enhances safety and ambiance with energy‑efficient LEDs. 💡 Test angles and color temps (warm for ambiance), add dimmers and smart controls. |
Visualize Your Perfect Hillside Oasis Before You Build
A hillside backyard can become the best part of a property, but only if the design respects gravity, drainage, and access from the start. The yards that work well aren't always the ones with the biggest budgets. They're the ones where the owner made a few solid choices early and didn't try to force flat-yard ideas onto sloped ground.
That usually means picking the right strategy for the actual grade. Some hillsides need terracing because uninterrupted slope length makes runoff too aggressive. Some need safe circulation first, especially if the yard is difficult to move through or maintain. Others improve dramatically with disciplined planting, erosion control, and smarter irrigation. The wrong solution usually looks fine on day one and starts failing after weather and maintenance expose the weak points.
The practical value of OutdoorBrite is that it reduces that guesswork before equipment shows up. You can upload a photo of your own yard, test retaining wall materials, compare stair layouts, try native planting palettes, and preview deck levels or lighting scenes without committing to excavation. That matters on hillside projects because revisions are expensive once walls, footings, drainage lines, or structural framing are in place.
It also helps you make better trade-offs. A render can show you that two terraces feel cleaner than four. It can reveal that a dry creek bed belongs on a different line. It can show that the railing you liked blocks the best view, or that your plant mix looks sparse from the patio and overcrowded from below. Those are the kinds of mistakes that don't show up clearly in a sketch or mood board.
For homeowners, that means more confidence. For contractors and designers, it means clearer approvals and fewer rounds of revision. For sellers and property managers, it means you can improve a difficult yard with a plan that feels intentional instead of patched together.
If you're collecting backyard design ideas for a hillside, don't stop at inspiration photos. Test the idea against your actual slope. The best hillside designs look natural, but there's nothing accidental about them. They work because the structure, planting, water movement, and circulation were solved together. OutdoorBrite gives you a fast way to see that whole picture before you build.
OutdoorBrite Money makes that planning step simple. With OutdoorBrite Money, you can upload a photo of your hillside yard, generate photorealistic redesigns in seconds, compare styles and materials, and make smarter decisions before spending on labor, stone, timber, or planting. If you want a clearer path from rough slope to finished outdoor area, it's one of the fastest ways to move from ideas to a plan you can build.
See your yard reimagined
Start creating