
Small Retaining Wall: A Complete DIY Build Guide for 2026
Planning to build a small retaining wall? Our step-by-step DIY guide covers materials, design, drainage, and costs to help you build a safe and beautiful wall.
You're probably standing in the yard looking at a slope that keeps slumping into the lawn, washing mulch where it doesn't belong, or making one part of the yard unusable. The fix seems simple. Stack some blocks, fill behind them, and call it done.
That's where a lot of small retaining wall projects go wrong. A short wall can still fail if the base settles, the wall is built too straight when the system expects a backward lean, or water gets trapped behind it. The good news is that a reasonable garden wall is absolutely within reach for a careful DIYer. The trick is to treat it like a soil-retention system, not yard decor.
Table of Contents
- First Steps in Planning Your Retaining Wall
- Choosing the Right Retaining Wall Materials
- Essential Engineering for a Wall That Lasts
- Constructing Your Wall A Step-by-Step Guide
- Landscape Integration and Finishing Touches
- Budgeting Maintenance and When to Call a Pro
First Steps in Planning Your Retaining Wall
What small really means on site
A small retaining wall isn't just a wall that looks short from the patio. It's a wall with limited retained load, manageable site conditions, and a layout that doesn't support something critical like a driveway, structure, or steep upper slope.
That's the gap most DIY advice misses. Many how-to guides focus on leveling blocks and spreading gravel, but they skip the point where a modest wall stops being simple and starts carrying real risk. As noted by CornerStone Wall Solutions, wall geometry and setback are structural choices, not cosmetic ones, and even a small wall can become unsafe if it's built vertical when the system expects a backward lean, or batter, as discussed in their article on retaining wall lean or tilt.
Practical rule: If the wall is holding back more than loose garden soil and flat lawn, slow down and assess the load before you buy material.
A wall around a planting bed is one thing. A wall cut into a slope where runoff moves through the area is different. A wall near a fence line, patio edge, shed pad, or pool deck deserves more caution than most weekend guides suggest.
Check the ground before you check block colors
Walk the site after rain if you can. You want to know where water travels, where it pools, and whether the soil stays firm underfoot or turns soft. A wall doesn't fail because the block looked wrong. It fails because the site was read wrong.
Check these items first:
- Drainage path: Watch where roof runoff, downspouts, and natural surface water move.
- Slope above the wall: The more hillside feeding pressure behind the wall, the less forgiving the build will be.
- Underground conflicts: Call for utility locating before excavation. Hitting a buried line turns a simple project into an expensive one fast.
- Access: Make sure you can get base gravel, block, and backfill material to the area without destroying the yard around it.
Sort permits and layout before buying material
Permit rules vary by city and county, and they can change based on wall height, location, and whether the wall supports a surcharge load. If you're in Florida, this guide to Jacksonville permitting gives a useful picture of how local permit review tends to work and why early code checks save time.
For design planning, don't just sketch a straight line on paper. Put stakes in the ground, run a string line, and stand back from different angles. Curves often look better in a yard and can feel less imposing than a long straight run.
If you want to test placement and style before digging, tools in these Best landscape design apps can help you compare wall shapes, material looks, and planting layouts against an actual photo of your yard.
Choosing the Right Retaining Wall Materials
Material choice decides how the wall goes together, how forgiving it is to build, and how much maintenance you'll accept later. Most DIY projects come down to interlocking concrete block, pressure-treated timber, or natural stone.
The three materials most DIYers consider
Interlocking concrete block is the most practical choice for many homeowners. The units are designed to stack predictably, many systems build in batter, and they're easier to keep aligned than rough stone. If the yard has curves, steps, or short terrace runs, modular block is usually the cleanest path.
Pressure-treated timber works when the look fits the yard and the wall is simple. It cuts easily, handles gentle curves differently than block, and goes in fast if the layout is straightforward. The downside is long-term durability. Timber walls can look good for years, but they don't age like concrete or stone.
Natural stone has the best visual character and the highest skill demand. It doesn't forgive poor base prep, and it takes patience to sort, fit, and pin stable courses. When it's done right, it looks like it belongs in its setting. When it's rushed, it looks uneven and tends to move.
Retaining wall material comparison
| Material | Avg. Cost / sq. ft. | DIY Difficulty | Estimated Lifespan | Best For |
|---|---|---|---|---|
| Interlocking concrete block | Varies by brand, size, and delivery | Moderate | Long-term when installed correctly | Most DIY retaining walls |
| Pressure-treated timber | Varies by lumber market and fasteners | Moderate | Shorter than block or stone in most outdoor settings | Rustic gardens and simple, low walls |
| Natural stone | Varies widely by stone type and sourcing | High | Long-term when built on a proper base | Premium appearance and natural landscapes |
No honest table should give you fake price ranges or invented lifespan numbers. Material cost swings hard based on local supply, delivery distance, block style, and whether you need caps, drainage stone, fabric, adhesive, or extra excavation.
Don't choose by face price alone. A cheaper wall unit that takes longer to set, requires more cutting, or creates drainage headaches can cost more in the end.
How I'd choose for a real yard
For a first retaining wall, I'd push most DIYers toward modular concrete block. It gives you repeatability, better alignment control, and cleaner corners and curves. That matters more than people think because the first-time builder usually loses time fixing inconsistencies, not hauling stone.
Timber makes sense if you want a softer, less formal look and understand that maintenance and replacement will come sooner. It can be a smart fit around vegetable gardens, utility areas, or informal side yards.
Natural stone is worth it when the wall is visible from a main patio, front walk, or focal planting area and you have the patience to build slowly. If your larger goal is tying the wall into a broader hardscape plan, this guide to outdoor space design is useful for thinking through how walls, paving, planting, and grade changes work together.
Essential Engineering for a Wall That Lasts
A retaining wall is resisting soil pressure all day, every day. It also has to deal with water, which is what turns a decent-looking wall into a bowing wall if the build behind it is wrong.
Why retaining walls fail
The wall face gets all the attention, but the hidden work does the essential job. The soil pushes forward. Water adds pressure and softens support. Poor compaction lets the wall settle unevenly. Once the base moves or the wall rotates, the face starts telling on you.
Texas DOT's retaining wall guidance is a good reminder that these are soil-retention systems, not decorative stacks. It notes that retaining walls are generally used when a stable slope cannot be accommodated, cites a minimum embedment of 1 to 2 feet below finished grade for some MSE walls, discourages placement on slopes steeper than 4:1, and notes stability can be marginal at 3:1 or 4:1 in some soils. It also cites a typical factor of safety of 2.0 in bearing capacity, and notes a widely cited gravity-wall rule that wall thickness may need to be 50% to 60% of the wall height for stability in some cases, which shows why even short walls need real mass and support in TxDOT retaining wall guidance.
That doesn't mean your backyard wall needs highway-level complexity. It does mean the basic engineering principles aren't optional just because the wall is in a garden.
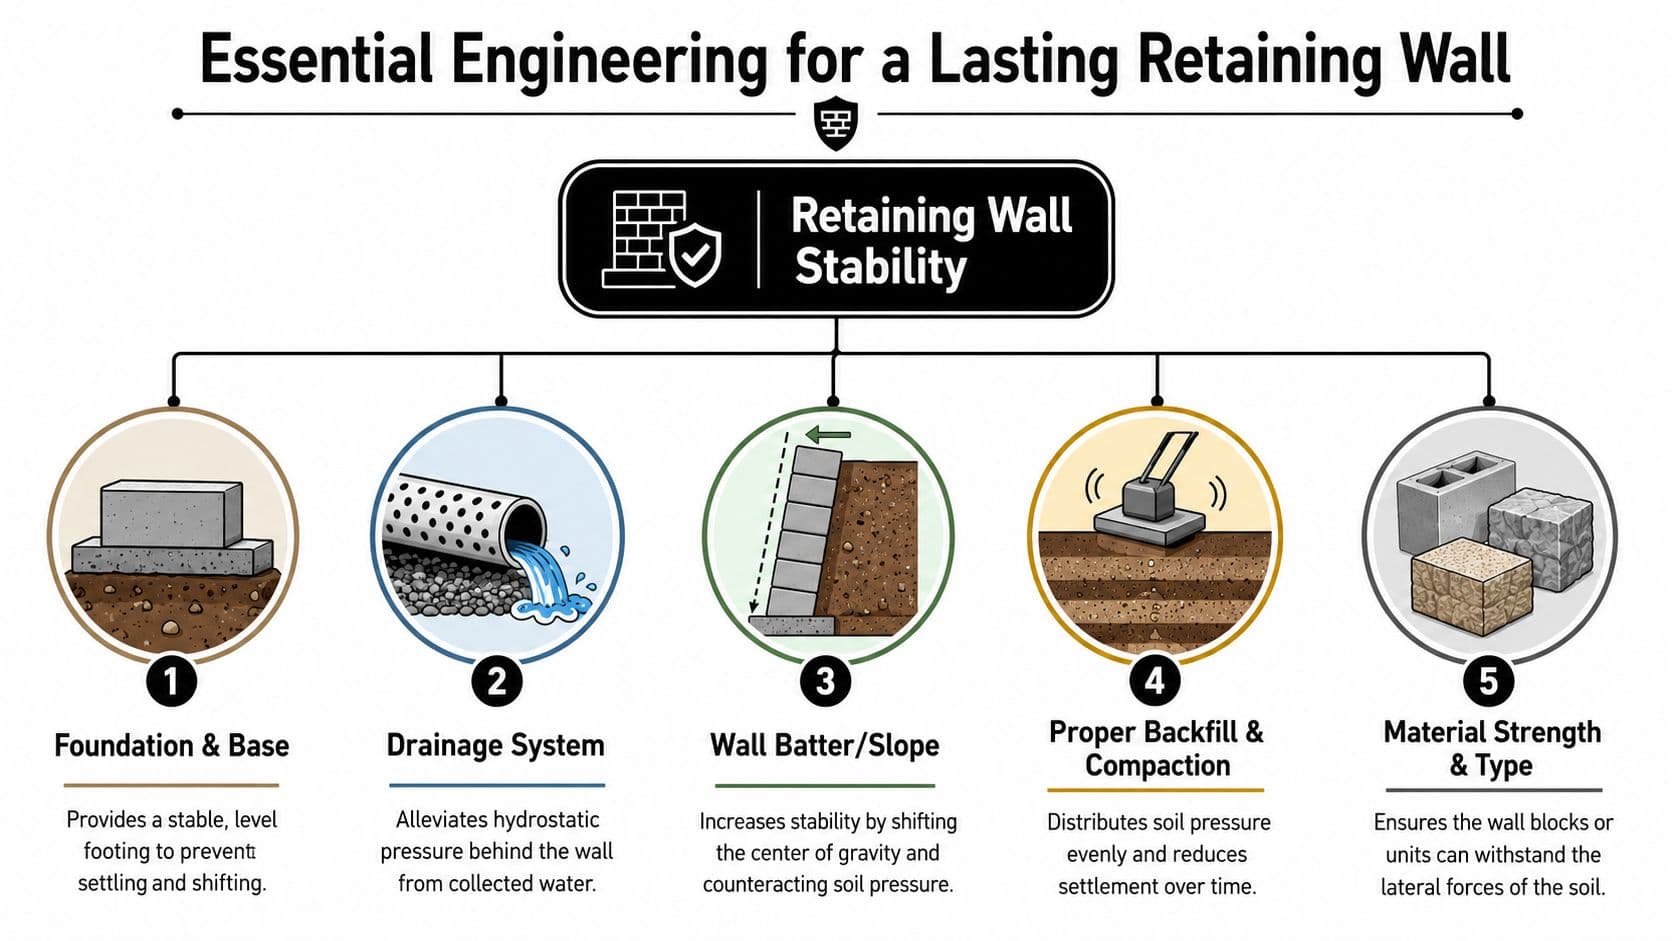
The five parts that carry the load
Base support comes first. If the trench bottom is soft, uneven, or poorly compacted, the wall will mirror those defects.
Embedment matters because a buried first portion of the wall helps prevent sliding and toe kick-out. A wall sitting entirely on top of grade is asking too much from the visible course.
Batter shifts the wall's center of gravity back toward the retained soil. When a block system is designed to lean back, building it plumb instead changes how it handles load.
Backfill and compaction control settlement. Loose fill behind a wall looks fine for a while. Then it consolidates, drops, and starts pulling everything out of alignment.
Drainage relieves trapped water. Wet soil is heavier. Standing water behind a wall is worse.
A retaining wall usually doesn't fail all at once. It starts with small movement, a little rotation, a slight belly in the face, and drainage that never quite dries out.
If you're also building nearby railings, fences, or guard elements, the logic is similar. Loads transfer into the ground, and footing size matters. This primer on properly sizing post footings is a useful companion read for understanding why ground support can't be guessed.
Where DIY judgment should stop
If the site includes a steep slope, soft subgrade, heavy runoff, or something valuable at the top or bottom of the wall, don't wing it. The danger isn't just cosmetic failure. It's loss of support where people walk, park, or place structures.
That's the line I use in the field. If a failure would be annoying, DIY may be reasonable. If a failure would be expensive or unsafe, get design help first.
Constructing Your Wall A Step-by-Step Guide
The build itself isn't complicated. What makes it fail is usually impatience during excavation, base prep, and first-course placement.
Lay out and excavate the trench
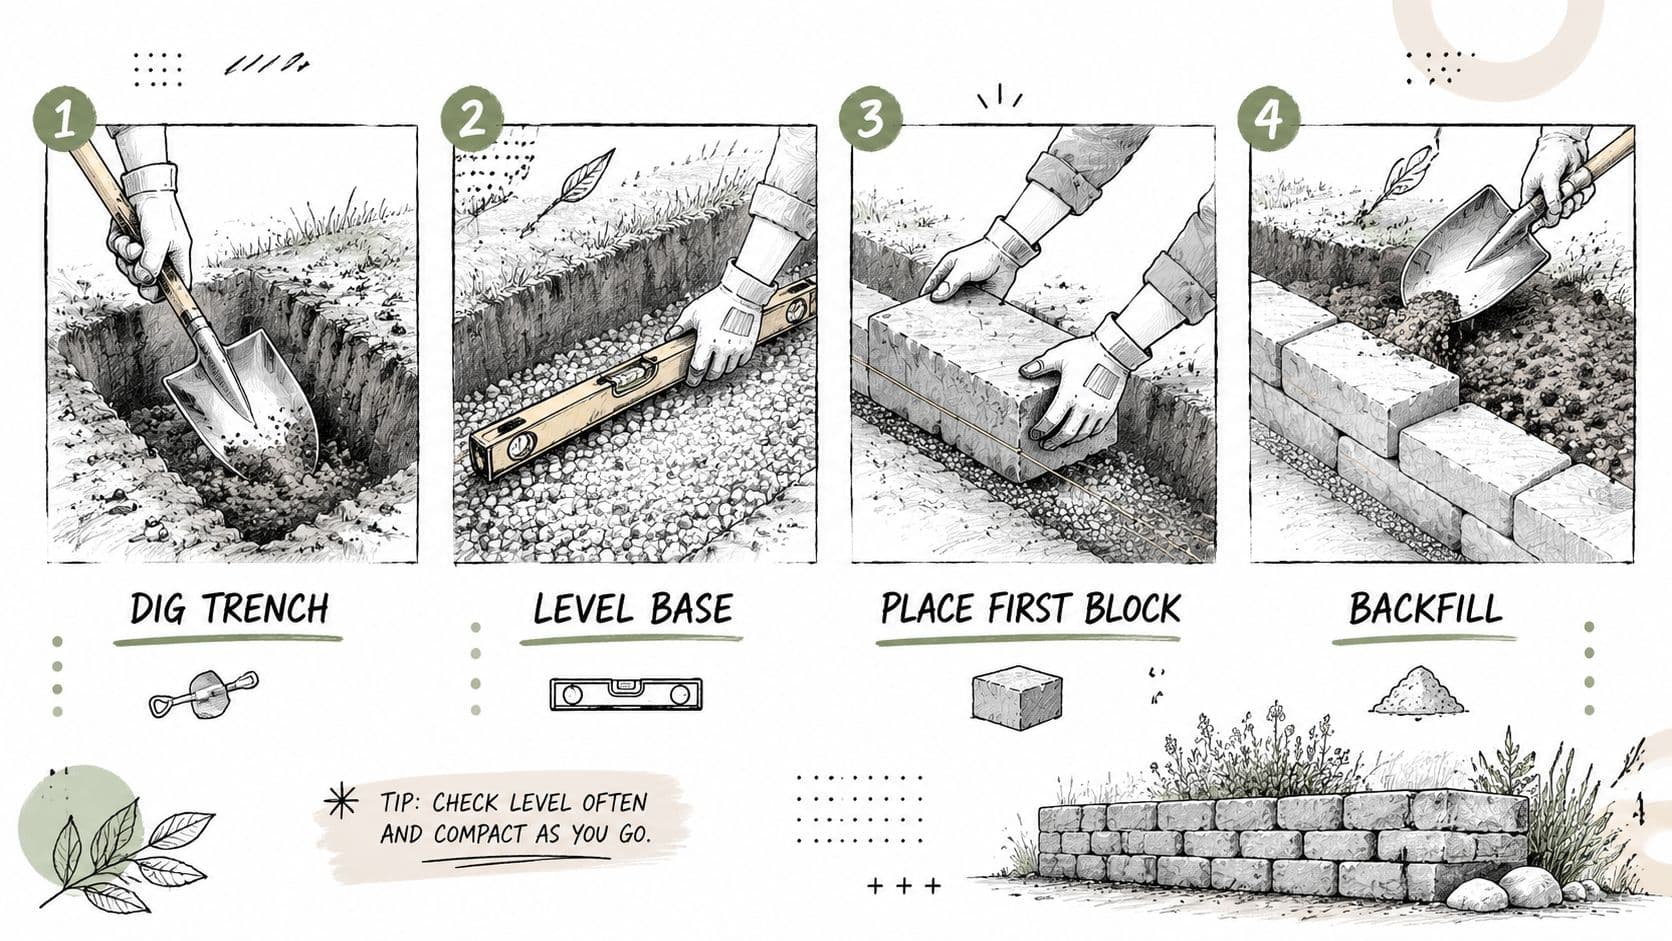
Mark the wall with paint, a hose, or a string line. For curves, a garden hose gives you a cleaner visual than trying to eyeball individual block placement. Once the line feels right, mark both the wall face and excavation limits.
For modular concrete block walls, Allan Block guidance calls for excavating a trench at least twice the block width and placing a 4–8 inch compacted gravel base, with compaction of the base and backfill to 95% Standard Proctor density under ASTM D698 to reduce settlement and rotation risk, as outlined in the Allan Block specification guideline.
That trench width gives you room to work, level, and support the wall properly. Don't carve a narrow slot just wide enough for the block. That saves labor on day one and creates headaches for years.
Build the base and set the first course
Spread the gravel base in lifts you can compact well. If you dump it all in at once and only tamp the top, the lower layer stays loose. The goal is a base that feels hard and uniform underfoot, not fluffy.
Then set the first course. This is the slowest part of the whole job, and it should be. Use a level across adjacent units and a long straightedge or string line across multiple units. Tap blocks down with a dead blow mallet, not a steel hammer that can chip edges.
A few habits keep this stage clean:
- Work from the lowest point: Let the grade dictate where the wall starts, not the easiest place to stand.
- Check front-to-back and side-to-side level: A block can read level one way and still be wrong.
- Remove and fix, don't shim with loose soil: If a unit rocks, pull it and correct the base.
Set the first course like the rest of the wall depends on it, because it does.
Stack courses and manage backfill as you go
Clean the top of each course before the next block goes on. A small pebble under one unit can create a visible wobble that gets worse three rows later. If your block system has a lip, pin, or setback feature, make sure it's seated exactly as intended.
Install drainage stone directly behind the wall as you build. Keep structural backfill separate from muddy site spoil if the spoil holds water or contains a lot of clay. Don't wait until the wall is full height to dump everything behind it. Build in stages so the wall and backfill rise together.
Before moving higher, watch this walkthrough if you want a visual check on sequencing and handling:
Finish the top and clean the site
Once the wall reaches final height, finish the upper backfill so water sheds away from the wall instead of into it. That top grade holds more importance than often realized. If surface water drains toward the back of the wall, you're feeding the very pressure you worked to reduce.
For cap units, dry-fit first. Confirm overhang, joint spacing, and any cuts before adhesive goes down. A clean top course makes even an ordinary wall look professional.
Final closeout checklist:
- Confirm alignment: Stand back and sight along the face from both ends.
- Check for rocking caps: Press each one before adhesive cures.
- Rake and dress surrounding soil: A neat finish helps you spot drainage issues later.
- Keep heavy loads off the backfill early: Don't park equipment or stack materials right behind a fresh wall.
Landscape Integration and Finishing Touches
A good wall shouldn't look like an afterthought. It should look like the yard was always supposed to step, terrace, or frame that space.
Make the wall look planted in, not dropped in
The easiest way to soften a retaining wall is with planting that connects the top, face, and toe of the wall. Use the upper bed for shrubs or grasses that give the wall scale. At the base, add lower plantings that break up the hard line and keep the wall from looking isolated.
Good pairings usually follow a simple pattern:
- Cascading plants at the cap line: These soften the edge and visually tie the wall into the bed above.
- Compact plants at the toe: Keep the lower face visible while avoiding a cluttered base.
- Repeating texture, not chaos: Too many plant types make a short wall look busy fast.
Add usable details
A wide cap can turn the wall into casual seating near a fire pit or patio edge. Low-voltage lighting tucked near the wall can make grade changes safer at night and highlight the texture of block or stone.
If the wall borders steps, a walkway, or a patio, repeat the same material family or color temperature nearby. That's what makes the wall feel integrated instead of randomly added.
The best-looking retaining walls don't fight the yard. They make the grade change feel intentional.
Test the look before planting
Before you buy plants, mulch, and lighting, it helps to preview combinations against the finished wall. OutdoorBrite Money lets you upload a yard photo and generate alternate outdoor design concepts, which is useful for trying different wall-adjacent planting styles and layout ideas without guessing.

That step saves a lot of rework. It's not the wall itself that typically causes regret. Rather, it's the planting choices that make the area feel too crowded, too sparse, or disconnected from the rest of the yard.
Budgeting Maintenance and When to Call a Pro
A retaining wall budget isn't just block or timber. Delivery, gravel, drainage stone, fabric, adhesive, blades, compactor rental, disposal, and your own time all count. Access matters too. A wall in the backyard with a long wheelbarrow route costs more effort than one near the driveway, even if the material quantity is similar.
What actually affects cost
Material is only one piece. The bigger cost drivers are usually excavation difficulty, how much base and backfill you need, whether spoil has to be hauled off, and how much cutting the layout requires.
There's also a smart comparison to make between DIY and professional installation. Tensar notes that geogrid reinforced soil walls can cut construction costs by up to 75% and reduce build times by 50% compared with traditional retaining wall types, while also allowing design lives of 100 years or more in their discussion of retaining wall system types. That matters because once a wall gets more structural, engineered systems can become more economical than trying to force a simple DIY approach where it no longer fits.
If you're pricing labor versus doing it yourself, this breakdown of what landscapers charge per hour helps frame labor as one line item among many, not the whole budget.
A maintenance routine that catches trouble early
A small retaining wall doesn't need constant attention, but it does need inspection. Most failures give warning before they become major repairs.
Use a simple maintenance checklist:
- Look for movement: Check for bulging, leaning, or widening joints.
- Watch water behavior: After rain, look for standing water, muddy seepage, or washout at the toe.
- Inspect the cap and face: Loose caps and shifted blocks are early signals.
- Keep drains clear: Don't let mulch, roots, or debris trap water where it should release.
The red flags that change this from DIY to professional work
If the wall is tied to a driveway, close to a foundation, or built into a difficult slope, that's professional territory in my book. The same goes for walls showing active lean, settlement, or cracking in adjacent hardscape.
Hiring the right contractor matters as much as deciding to hire one. If you're screening companies, it helps to understand what it means to get bonded and insured so you know what protections and qualifications to ask about before work starts.
The smartest DIY move isn't always doing the whole job yourself. Sometimes it's knowing where your skills stop and where proper design starts.
If you want to compare retaining wall layouts, materials, and planting ideas before spending on block and gravel, OutdoorBrite Money lets you test design directions on a real photo of your yard so you can make cleaner decisions before the build begins.
See your yard reimagined
Start creating




