Drought Tolerant Landscaping Design: Your Guide to a Green
Transform your yard! Our guide to drought tolerant landscaping design covers site assessment, plant selection, and smart irrigation for a beautiful, water-wise
Your grass is thinning, the sunny side yard bakes by noon, and every summer you promise yourself you'll stop pouring water into an outdoor space that still looks tired. That's where most drought tolerant outdoor design projects start. Not with a grand vision, but with frustration.
The good news is that a water-wise yard doesn't have to look sparse or severe. Done well, it feels intentional. You trade thirsty lawn for structure, texture, shade, and plants that want to live in your conditions. You also avoid one of the biggest DIY mistakes: buying plants first and trying to force a design around them later.
A better approach is to treat your yard like a system. Water moves through it. Sun shifts across it. Soil either helps you or fights you. Once you understand those pieces, the design decisions get much easier.
Table of Contents
- Begin with Site Assessment and Clear Goals
- Build a Water-Smart Foundation with Soil and Grading
- Select Plants Strategically with Hydrozoning
- Integrate Hardscapes and Mulch for Maximum Efficiency
- Implement Smart Irrigation and Water-Saving Techniques
- Use Phased Implementation and Enjoy Low-Effort Maintenance
Begin with Site Assessment and Clear Goals
Most struggling yards tell you what's wrong if you slow down and look. The patchy lawn near the driveway is usually heat and reflected glare. The bed that stays soggy after rain is usually a drainage issue, not a plant problem. Good drought tolerant landscaping design starts with observation, not shopping.
A strong first benchmark helps frame the payoff. Xeriscaping can reduce outdoor gardening water consumption by 50 to 70 percent, and well-designed xeriscapes may need watering only once every two to three weeks in summer according to this xeriscaping guide from Planet Desert. Those savings come from design decisions made before installation.
Read the yard before you redesign it
Spend a few days tracking what your yard does.
- Watch the sun: Note which areas get full afternoon exposure, which ones only get morning sun, and which stay shaded.
- Check wind exposure: Corners near fences, side yards, and open lots often dry out faster than the rest of the property.
- Follow water movement: After irrigation or rain, see where water runs, where it ponds, and where it disappears quickly.
- Notice use patterns: A route people walk every day shouldn't become a delicate planting bed.
- Mark problem zones: Pet paths, play areas, utility access, and trash can routes matter more than most planting plans admit.
Practical rule: If a plant keeps failing in one spot, assume the site is wrong for the plant before assuming the plant is wrong for the site.
For homeowners who want examples before making permanent choices, a visual planning tool helps. A landscaping design app lets you test layout ideas against a real photo of your yard, which is useful when you're deciding how much gravel, planting area, patio space, or screening you want.
Set goals that make design decisions easier
Clients often say they want a low-maintenance yard. That's too vague to design from. A better brief sounds like this:
| Priority | What it means in practice |
|---|---|
| Lower water use | Less turf, better zoning, efficient irrigation |
| Outdoor living | Shade, seating, paths, and usable surfaces |
| Pollinator support | Repeated bloom, habitat layers, less chemical input |
| Kid or dog use | Durable surfaces and clear circulation routes |
| Curb appeal | Strong front-of-house structure and year-round form |
Once your goals are clear, choices get simpler. If you want a sitting area, place it where you already spend time. If you want less upkeep, reduce edge lines and avoid fussy mixed beds that need constant editing. If you want a lawn alternative, reviewing examples of water-wise backyard landscaping can help you compare ground covers, gravel-based layouts, and native planting mixes before you commit.
One practical option in this stage is OutdoorBrite Money. It transforms a yard photo into photorealistic redesign concepts, which helps homeowners compare drought-tolerant layouts before buying material or removing turf.
Build a Water-Smart Foundation with Soil and Grading
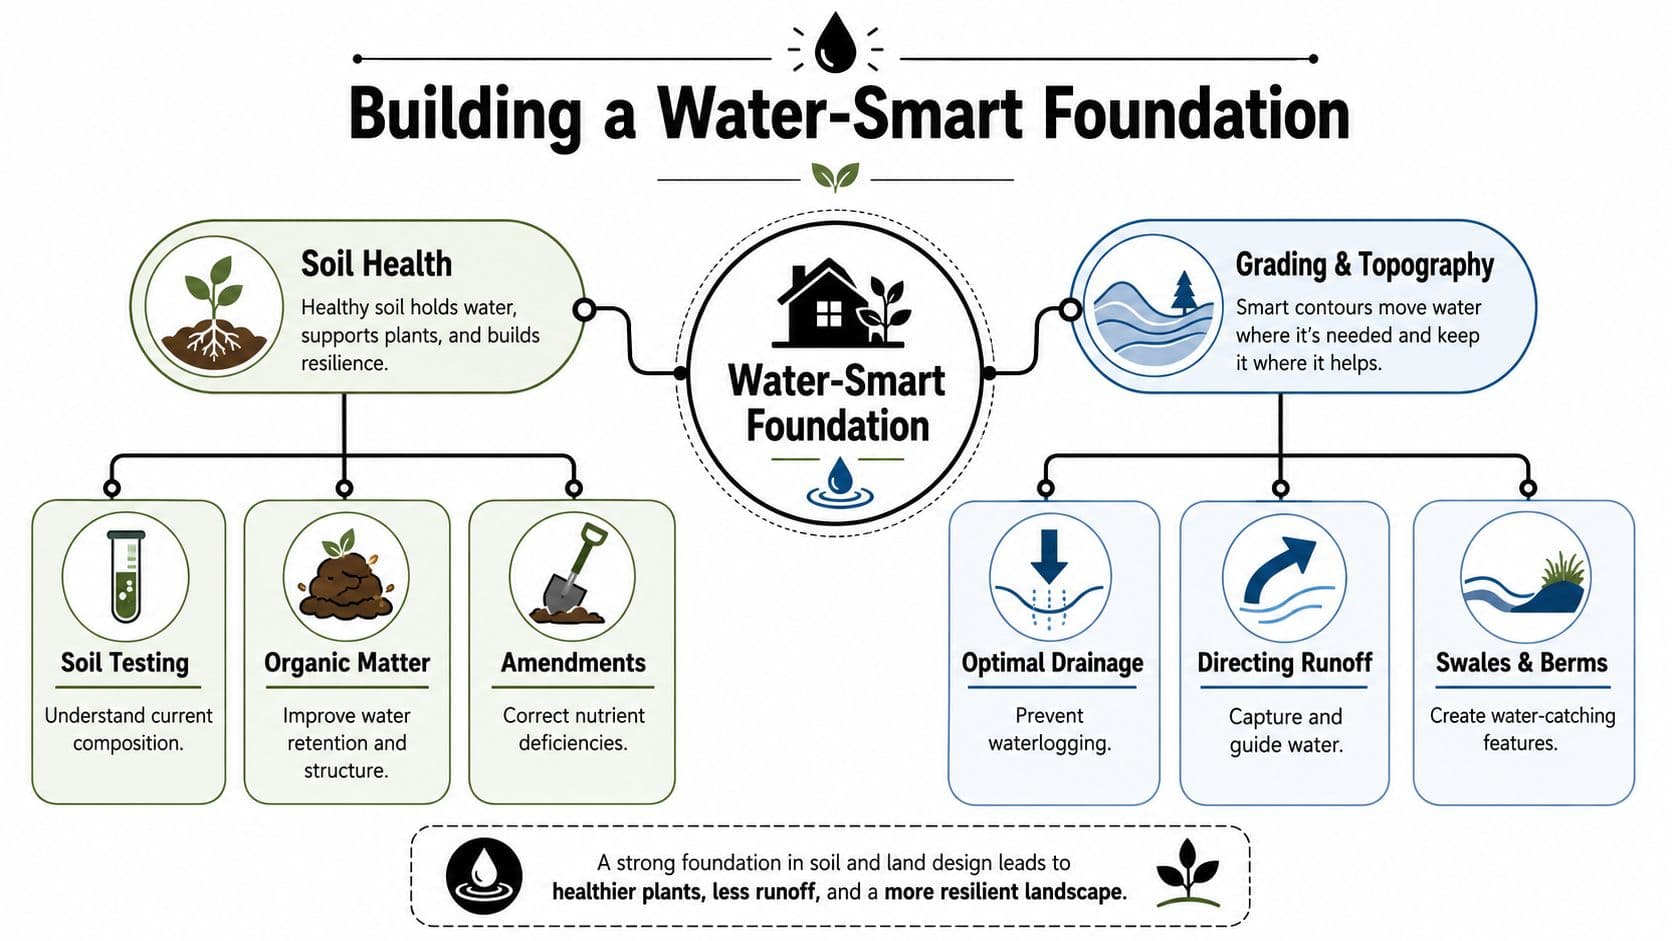
Plants get the attention, but soil and grading decide whether the design will settle in or struggle. I've seen expensive installs fail because the site shed water too fast, held it too long, or compacted so hard that roots never got established. A water-wise design needs a root zone that stores moisture and a surface that sends rain somewhere useful.
Healthy soil and smart grading work together. Soil acts like the sponge. Grading decides where the sponge gets wet.
Start with what your soil already does
You don't need a lab report to learn the basics. Dig a few test holes in different parts of the yard. Wet the soil, squeeze it, and observe how it behaves.
- Sandy soil drains quickly and often needs more organic matter to hold moisture.
- Clay-heavy soil holds water longer, but it can suffocate roots if compacted.
- Loam usually gives you the easiest starting point because it balances drainage and retention.
Compost often improves structure and water holding, but the key is matching the amendment to the site instead of dumping the same mix everywhere. The OutdoorBrite soil preparation guide is a useful reference if you want a plain-language walkthrough before planting.
Soil improvement is usually less visible than new plants, but it affects every watering decision you make afterward.
Use grading to keep rain on your property
Flat sites often waste rain because water sheets off before it can soak in. Subtle grade changes fix that. Swales are shallow low points that collect and slow runoff. Berms are raised mounds built from excavated soil. Together, they create small wet and dry zones across the same yard.
That matters because creating swales and berms can increase in-situ rainwater capture by 30 to 40 percent compared to flat area designs, based on this Denver Botanic Gardens video reference. In practice, that means less runoff, better infiltration, and more flexibility in plant placement.
Here's a simple way to view it:
| Feature | Best use | What it helps you avoid |
|---|---|---|
| Swale | Catch runoff from roofs, walks, or mild slopes | Water racing into the street |
| Berm | Lift plants that dislike wet feet | Root stress in low spots |
| Gentle basin | Hold water around trees or shrubs | Shallow watering that evaporates fast |
Many DIY projects improve dramatically with just a shovel and patience. You don't need dramatic earthwork. Small contour changes often do enough to redirect water into planting areas instead of away from them.
Select Plants Strategically with Hydrozoning
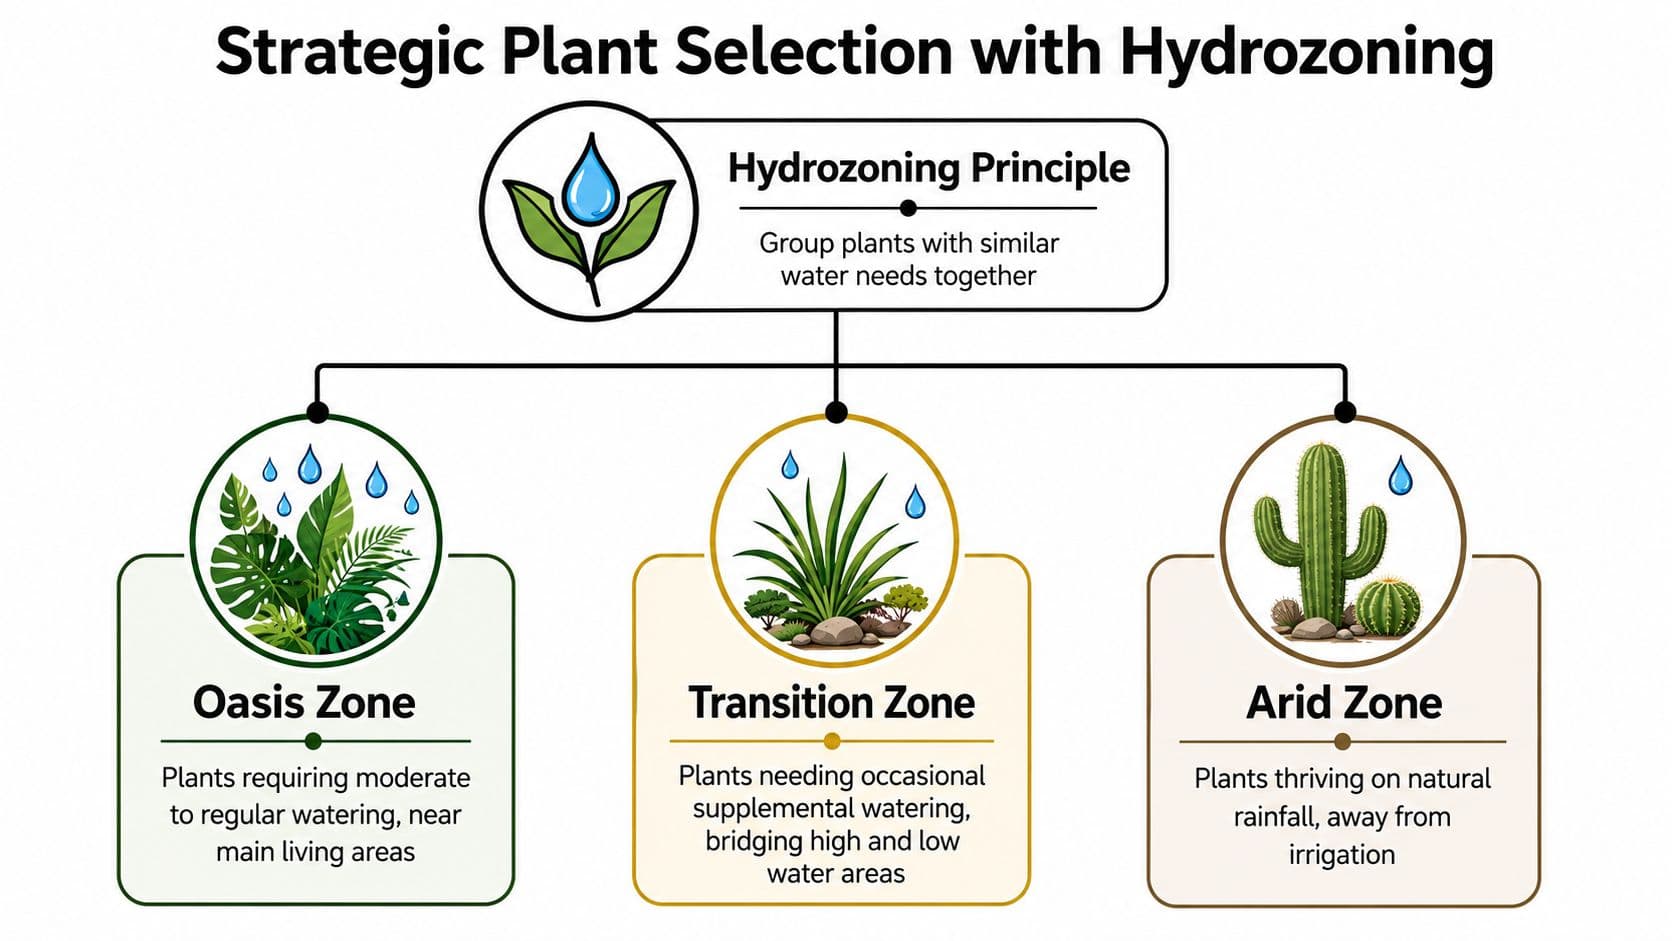
A good planting plan isn't a collection of drought-tolerant species. It's a system where plants share similar conditions and irrigation needs. That's why hydrozoning matters so much. If you ignore it, even excellent plant choices can fail.
The common mistake is mixing everything together. A rosemary near a thirsty ornamental bed. A succulent beside a lawn edge. A native grass on the same valve as annual color. The result is predictable. Some plants stay too dry, and the low-water plants get too much.
Think in zones, not individual plants
Hydrozoning is critical because grouping plants with similar water needs prevents over-irrigation. Placing low-water plants in high-water zones can lead to 30 to 40 percent higher water loss and root rot, and turf should always be irrigated on a separate zone from other plantings according to this hydrozoning guidance from Landscaping by J Michael.
That single principle cleans up a lot of design problems. A simple layout usually includes:
-
Arid zone
This is the lowest-water area. Put it in the hottest parts of the yard or farther from daily activity. Succulents, tough shrubs, and regionally appropriate natives fit well here. -
Transition zone
This is the buffer between dry planting and any area that gets occasional extra water. Many perennial mixes work well here if drainage is good. -
Oasis zone
Keep this small. Place it close to seating, entries, or a kitchen view where you'll appreciate lusher planting. If you want herbs, containers, or a cutting bed, this is the place.
A lawn, if you keep one at all, should be treated as its own functional surface rather than a default background. Homeowners comparing turf substitutes may find these natural lawn care alternatives by Barefoot Organics useful when deciding whether a smaller lawn, a groundcover mix, or a non-lawn surface makes more sense.
Here's a quick visual explainer before you map your zones:
Build a low-water landscape that still supports pollinators
Many homeowners worry that a dry garden won't feed bees and butterflies. It can, but the planting has to be layered. The reliable approach is to use flowering perennials and grasses as a repeating matrix, then add seasonal bloomers in pockets rather than creating one thirsty flower bed.
A pollinator-friendly drought garden works better when the structure is durable and the bloom is woven through it, not isolated in one showy corner.
To keep the plan grounded, use a shortlist instead of a giant plant palette:
- Structural anchors: Tough shrubs, succulents, or evergreen forms that hold the design together year-round.
- Matrix plants: Native grasses, sedges, and hardy perennials that repeat across beds.
- Seasonal accents: A few flowering species that extend nectar availability without turning the whole yard into a high-input garden.
If you want help building that palette, you can find sustainable landscaping plants by climate and design style, then sort them into the zones above instead of choosing on appearance alone.
Integrate Hardscapes and Mulch for Maximum Efficiency
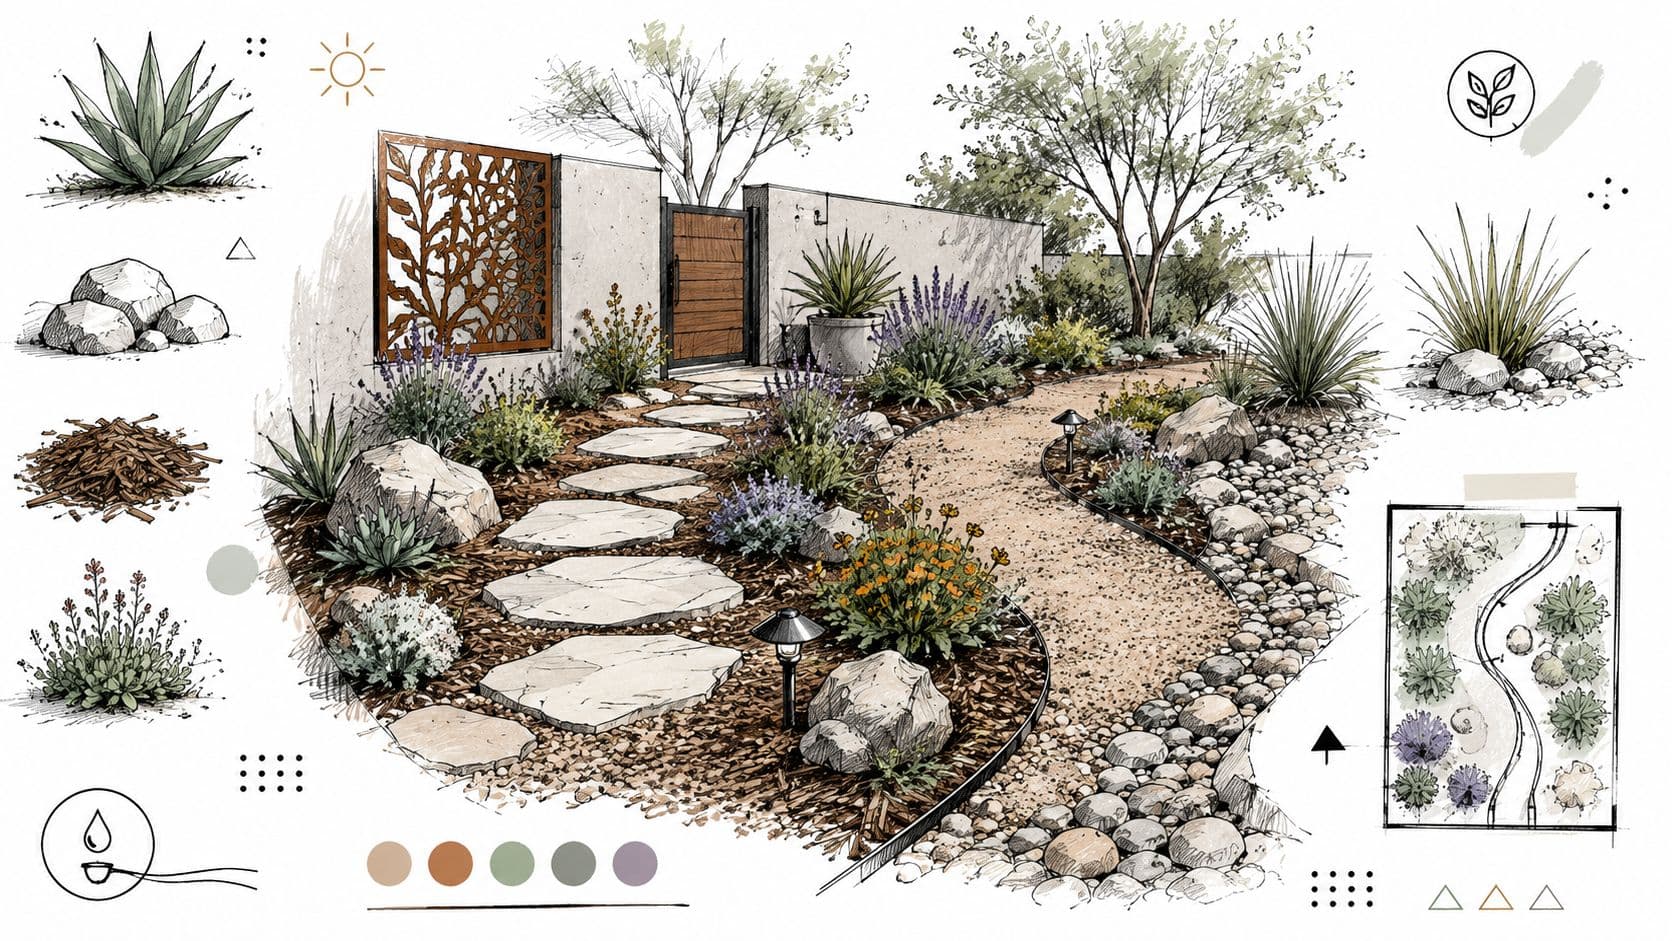
The non-plant parts of a yard often decide whether the whole outdoor space feels polished or improvised. Paths, patios, edging, gravel courts, and mulch all control how water moves and how much work the yard creates later. In drought tolerant design, these elements should do more than fill space. They should reduce stress on the planted areas.
A hardscape plan also helps solve the practical issues that plants can't. People need places to walk, sit, turn around, roll bins, and move equipment. If you don't design those routes, foot traffic will create them for you.
Choose hardscapes that help the landscape work
Permeable surfaces are usually the right call for drought-conscious yards. Gravel paths, decomposed granite, spaced pavers, and similar materials let rain move into the soil instead of bouncing off into the gutter. They also soften the look of a dry garden compared with large slabs of uninterrupted concrete.
Use hardscape intentionally:
- Near entries: Stable surfaces make circulation clear.
- Along desire lines: Put paths where people already walk.
- In hot spots: Gravel or stone can replace lawn where turf never looked good anyway.
- Around seating: Define outdoor rooms so the yard feels designed, not just reduced.
Mulch is not decoration
Most DIY planting areas are under-mulched. A thin layer looks tidy for a week, then dries out, shifts around, and stops doing its job. Applying 3 to 4 inches of organic mulch or 2 to 3 inches of inorganic mulch is a benchmark for success, and you should keep a 2 to 3 inch mulch-free zone around the base of woody plants to prevent root collar diseases according to this mulch and drought-landscape guide from Cal Cascades. The same source notes that proper mulching can reduce evaporation by up to 40 percent.
Organic mulch and inorganic mulch each have a place.
| Material | Works well when | Trade-off |
|---|---|---|
| Wood chips | You want soil-building and a softer look | Needs refreshing over time |
| Shredded bark | You want a finished ornamental appearance | Can shift on slopes |
| Gravel | You want durability and crisp structure | Stores heat in exposed spots |
One practical detail gets missed all the time. Keep mulch away from trunks and shrub crowns. Mulch piled against bark traps moisture where you don't want it and causes avoidable plant stress.
Implement Smart Irrigation and Water-Saving Techniques
A lot of first-time water-wise projects fail at the irrigation stage, not because the plants were wrong, but because the watering method never matched the plan. I see it often. A yard gets new drought-tolerant plants, then keeps the same spray heads that used to water thirsty turf. The result is overspray on walks, dry root zones, and plants that look confusingly stressed.
Outdoor water use is a large share of household demand in many regions. The U.S. Environmental Protection Agency's WaterSense program notes that outdoor water use can account for nearly 30 percent of the average home's water use, and more in dry climates. That is why irrigation design deserves as much attention as plant selection.
Match the delivery method to the planting zone
Spray irrigation still has a place, but only in limited areas that need broad, even coverage. Mixed beds, shrub groupings, and tree pockets usually perform better on drip. The goal is simple. Put water into the soil where roots can reach it, at a rate the soil can absorb.
If an existing system needs work, these are the failure points I check first:
- Wet pavement or siding: Water is missing the planting area.
- Runoff after a short cycle: Application rate is higher than infiltration.
- One valve serving very different plants: Turf, shrubs, and containers are being forced onto the same schedule.
- Stress patterns within one bed: Plants on the same line are getting more or less water than intended because emitter layout does not match spacing or exposure.
The University of California Agriculture and Natural Resources guide to drip irrigation explains why drip works well in planted beds. It applies water slowly and locally, which reduces overspray and evaporation compared with overhead methods.
Build a system you can actually adjust
Good irrigation is rarely complicated, but it is specific. Group valves by water need and sun exposure. Keep higher-demand areas separate from established dry beds. Use pressure-regulated drip components so emitters perform consistently. Add a filter where drip lines require it, because clogged emitters are one of the most common DIY problems.
A practical setup often includes:
- Separate valves by use: Keep any remaining turf, foundation plantings, containers, and edible beds on different schedules.
- Drip tubing or inline emitter line for beds: This gives more even coverage than trying to aim spray heads around shrubs.
- Smart controllers with seasonal adjustment: They cut back automatic overwatering when temperatures drop or rain arrives.
- Cycle-and-soak scheduling on tighter soils: Shorter repeated runs reduce runoff and help water move into the root zone.
- Rain capture where allowed: If you plan to store roof runoff, reviewing different types of polyethylene tanks helps match tank shape and capacity to side-yard space, downspout location, and intended use.
Use the plan before you trench
This is also where AI planning tools can save money. Before any pipe is laid, I like to test bed shapes, dry creek placements, and planting density in a visual mockup. OutdoorBrite is useful for that early pass because homeowners can see whether a valve should serve a shaded side yard, a basin planting, or a sunny front bed before the install begins. It is far cheaper to move a zone on a screen than after trenches are cut.
That matters even more if you are building small basins, swales, or other micro-topography to catch runoff. Captured water changes how long soil stays moist. A low pocket beside a downspout should not be watered on the same schedule as a raised area near pavement. If you miss that distinction, the irrigation system fights the grading instead of supporting it.
The best systems are quiet and predictable. Water lands where it should, the schedule fits each zone, and adjustments are easy after the first hot spell.
Use Phased Implementation and Enjoy Low-Effort Maintenance
A full yard conversion can feel too big if you treat it as one giant weekend project. It goes better in phases. You keep momentum, spread out spending, and make smarter decisions because each finished piece teaches you something about the next one.
The first phase usually handles the backbone. That means grading adjustments, major paths, irrigation rough-in, and the main planting beds. The second phase often adds secondary areas like side yards, screening beds, or a smaller seating space. Decorative details, containers, and experimental planting usually belong at the end, not the beginning.
Build in stages without losing the plan
A phased approach works best when the full layout is decided early, even if the install is delayed.
Try a sequence like this:
-
Correct the site first
Fix drainage issues, shape basins or swales, and remove problem turf before you think about finishing touches. -
Install irrigation by zone
It's easier to adjust emitters after planting than to rebuild hardscape because you skipped planning. -
Plant the structural layer
Trees, anchor shrubs, and the main matrix plants should go in before accent plants. -
Fill gaps as the yard settles Small edits are easier after you've watched the yard through a season.
That last step matters because plant spacing in dry gardens is often misunderstood. Spacing plants closely to shade soil and crowd out weeds can reduce evaporation by up to 40 percent. If ground cover drops below 70 percent, weed seed germination can increase by 20 to 30 percent, as noted in the earlier mulch and hardscape section's source. The lesson is simple: don't install isolated plants in wide fields of bare soil and expect low maintenance.
What maintenance looks like after installation
A traditional lawn asks for constant repetition. Mow, edge, fertilize, irrigate, repeat. A well-planned drought-tolerant design asks for observation and occasional intervention instead.
A simple maintenance rhythm looks like this:
| Season or task | What to check |
|---|---|
| Early season | Reset emitters, clear debris, inspect mulch depth |
| Warm months | Watch establishment watering, remove weeds early |
| After storms | Check swales, basins, and runoff paths |
| Cool season | Prune selectively and review plant performance |
The goal isn't zero maintenance. The goal is maintenance that feels occasional and useful instead of constant and repetitive.
Most yards also benefit from restraint in year one. Don't rush to replace every open pocket. Let the main plants establish, watch where shade develops, and then tighten the planting where it's needed. That patience usually produces a cleaner, calmer design than trying to finish every inch immediately.
If you want to compare drought-tolerant layouts before removing turf or buying materials, OutdoorBrite Money lets you upload a yard photo and generate photorealistic redesign ideas. It's a practical way to test planting zones, gravel areas, patios, and overall style so you can make decisions with a clearer picture of the finished space.
See your yard reimagined
Start creating