Front Yard Landscaping on a Budget: 8 Smart Ideas
Transform your curb appeal without breaking the bank. Discover 8 smart ideas for front yard landscaping on a budget, from DIY projects to low-cost plants.
You pull into the driveway after work, look at the front yard, and know exactly why the house feels a little tired. The grass is thin, the beds are bare, and every quote you have seen makes the job feel bigger than it needs to be.
A good front-yard refresh does not start with buying everything at the garden center. It starts with deciding what the yard needs to do. Frame the entry. Clean up the view from the street. Cut maintenance where it keeps eating time and money. If your goal is to boost curb appeal and home value, the best low-cost projects are usually the ones that simplify the space and make it look intentional from 30 feet away.
That is the trade-off homeowners miss. A smaller budget means each dollar has to show. Fresh mulch, a tighter bed line, fewer plant varieties, and one strong focal point usually do more for the front of the house than a scattered mix of bargain-bin plants.
This guide walks through eight budget-friendly ideas with realistic DIY cost ranges and the basic steps to do them well. Some are true weekend jobs. Some are smart to phase over a month or two. In my experience, that phased approach is where homeowners save the most, because it leaves room to correct mistakes before they spread across the whole yard.
Before you buy stone, mulch, or plants, test the plan on a photo of your actual house. OutdoorBrite helps with that. You can preview bed shapes, reduce lawn areas, try a path, or place a focal feature before spending money on materials. That kind of pre-visualization cuts down on one of the most common budget mistakes. Buying twice because the first idea looked better in your head than it does at the curb.
Table of Contents
- 1. Native Plant Landscaping
- 2. Hardscape with Recycled Materials
- 3. Mulch and Ground Cover Strategy
- 4. DIY Raised Garden Beds
- 5. Ornamental Grasses and Perennials
- 6. Xeriscaping Drought-Resistant Design
- 7. Simplify and Eliminate Lawn
- 8. Focal Point Features DIY Structures
- 8-Option Budget Front Yard Landscaping Comparison
- Your Budget-Friendly Dream Yard Is Within Reach
1. Native Plant Landscaping
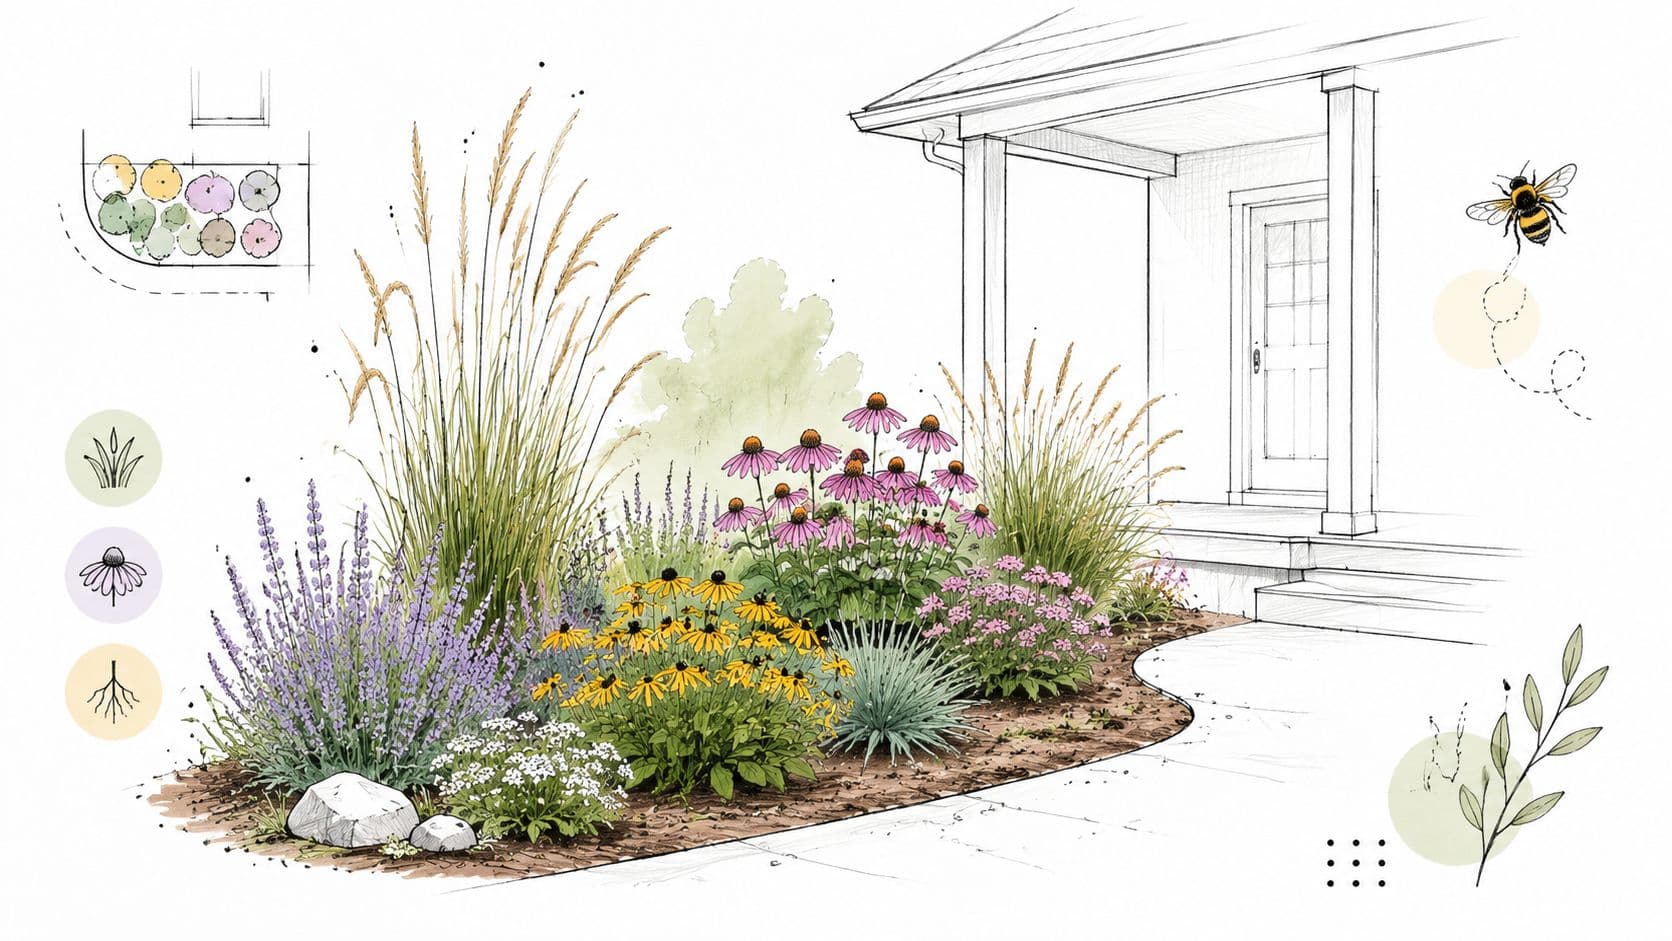
Native plants are one of the smartest ways to approach front yard landscaping on a budget because they reduce the number of battles you have to fight. You're not trying to force thirsty, fussy plants into the wrong soil, the wrong rainfall pattern, and the wrong temperature swings.
In practice, that means less replacement, less fertilizer chasing, and less hand-watering. If you live in Texas, that could look like native wildflowers and prairie grasses. In California, it might be California poppies, sages, and other drought-tolerant regional picks. In the Northeast, coneflowers, black-eyed Susans, and native grasses often give you color without drama.
Start with plants that already fit your yard
Don't start with a giant palette. Start with three to five durable species that suit your light, drainage, and region. Then repeat them in clusters so the yard looks designed, not random.
A lot of homeowners make the same mistake here. They buy one of everything because the nursery looked good that day. That usually creates a spotty, high-maintenance bed that never reads clearly from the street.
Practical rule: Massing beats collecting. A few repeated plants almost always look better than a dozen one-offs.
A simple way to do it:
- Get a local plant list: Ask your cooperative extension office or a reputable native plant nursery for region-specific suggestions.
- Group by repetition: Plant the same variety in clusters so each variety reads as a shape.
- Mulch early: Mulch keeps weeds down while young plants fill in.
- Plan for mature size: Don't crowd the bed just because the plants are small at purchase.
OutdoorBrite helps here because native gardens change a lot with season and maturity. Testing layouts on your actual home photo makes it easier to see whether a loose pollinator look works with your house style or whether you need a cleaner, more formal arrangement.
2. Hardscape with Recycled Materials
Cheap landscaping often looks cheap for one reason. It has no structure. Reclaimed hardscape fixes that fast.
A brick edge, gravel path, or salvaged stone border gives the eye something permanent to read. Even simple plants look better when they're framed well. I've seen front yards go from forgettable to sharp just by adding a defined walkway and bed edging from reused materials.
Use structure to make cheap landscaping look intentional
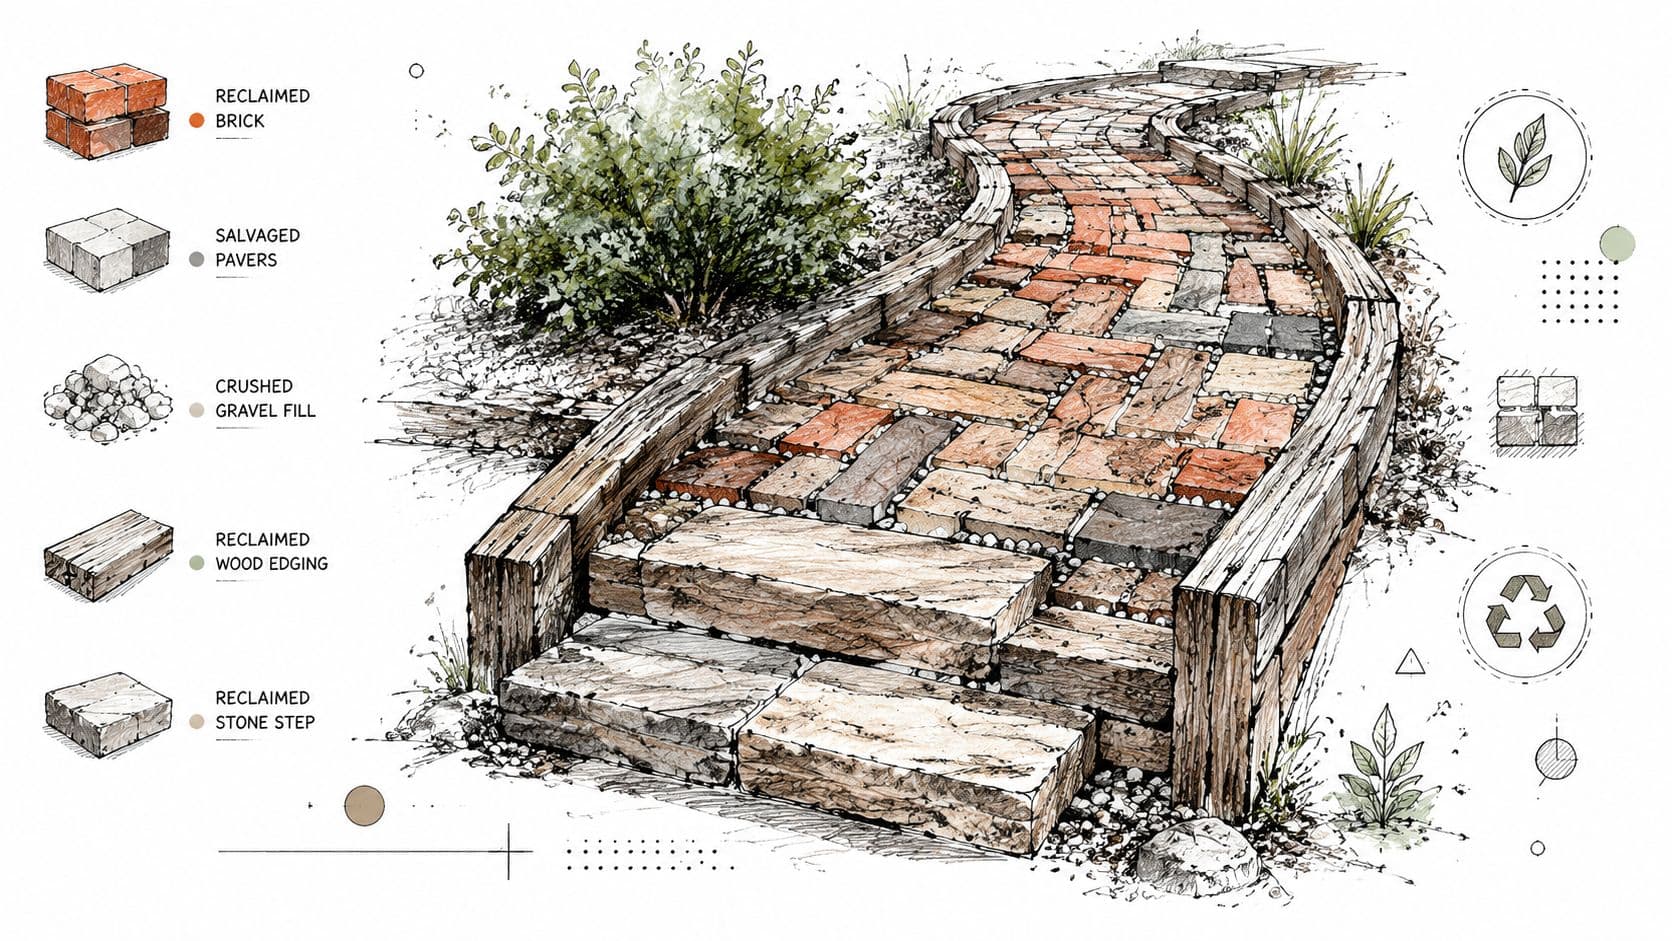
Look for reclaimed brick, surplus pavers, broken concrete pieces, crushed granite, curbing, or rot-resistant scrap lumber. Habitat ReStore, local salvage yards, neighborhood marketplace listings, and demolition leftovers are often better hunting grounds than big-box stores if you want character.
What works well:
- Salvaged brick paths: Great for traditional homes and older neighborhoods.
- Gravel or decomposed stone walks: Good for cottage, farmhouse, and low-water designs.
- Mixed-material edging: Stone plus wood can look intentional if the lines are simple.
- Reclaimed curbing: Cleanest option when you want a stronger border.
What usually doesn't work is mixing too many materials without a clear pattern. If the path, edging, and bed border all fight each other, the yard starts to feel improvised.
Before you haul anything home, measure the exact run length and width. Recycled materials are only a bargain if you don't have to make three extra trips because you guessed wrong. OutdoorBrite is useful at this stage because you can test whether a reclaimed brick path fits your house better than gravel or rectangular pavers before you commit to one look.
A front yard doesn't need expensive materials. It needs clean lines, repeated shapes, and a layout that makes sense from the sidewalk.
3. Mulch and Ground Cover Strategy
You pull into the driveway after work, and the first thing you notice is the bare dirt. The plants may be fine, but exposed soil makes the whole front yard read as half-finished. Mulch is one of the fastest, lowest-cost fixes because it gives the beds a clean, intentional surface in a single afternoon.
For homeowners doing the labor themselves, this is often the project that stretches a small budget the farthest. A few bags from a home center work for tiny areas, but bulk delivery usually gives better value once you have more than a couple of beds to cover. If you already have edging boards or bed dividers to replace, compare simple options with these affordable deck materials before you buy new lumber.
Start with mulch, then add living coverage where it solves a problem
Mulch is the fast finish. Ground cover is the long play.
Use mulch around shrubs, perennials, and young trees where you want weed suppression and a tidy look right away. Add low-growing plants only in spots where they do a job mulch does poorly, like sunny slopes, narrow dry strips, or areas where rain keeps washing loose material away.
The install order matters. Cut the bed edge first so the shape reads clearly from the sidewalk. Pull weeds, rake out debris, and water hard, dry soil before you spread anything. Then apply mulch in an even layer and keep it pulled back from trunks, crowns, and stems so moisture does not sit where rot starts.
A practical budget plan looks like this:
- Bagged wood mulch: Best for small touch-ups and small front beds.
- Bulk wood chips or shredded mulch: Better value for larger areas if you can wheelbarrow it yourself.
- Bark mulch: Cleaner, more finished look near the porch or front walk.
- Creeping thyme, sedum, or similar low growers: Good in hot, exposed spots where mulch shifts or thins out.
- Wood-chip side paths: Useful in informal yards, especially where grass refuses to fill in.
The common mistake is laying weed fabric under everything and expecting a permanent fix. In most front yards, weeds still root in the debris that collects on top, and later changes become harder because every new plant means cutting through fabric. I get better long-term results with properly prepared soil, a solid mulch layer, and a quick seasonal refresh.
Before you buy a yard of mulch or trays of ground cover, test the color and bed shape against your house with a garden ai design. It is a simple way to see whether dark brown mulch, natural wood chips, or more living coverage will look cleaner from the street, before you spend money or move material by hand.
4. DIY Raised Garden Beds
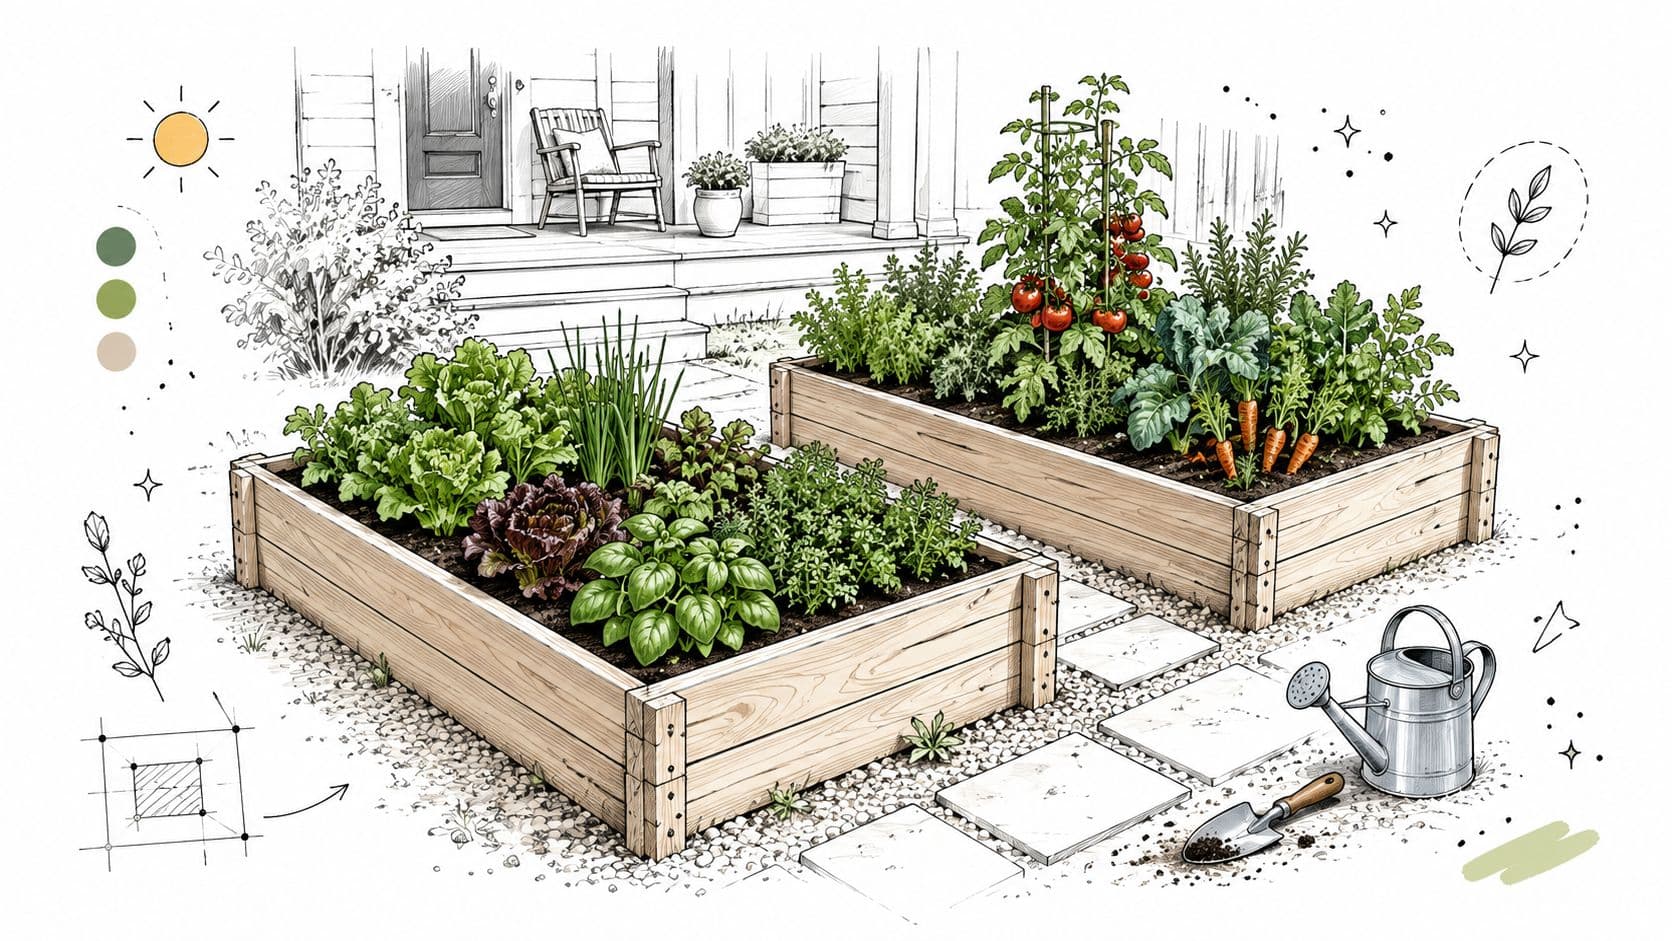
You step out to the curb, look at the front yard, and the problem is clear. The space feels flat, scattered, and expensive to fix all at once. Raised beds solve that fast because they create order in a small footprint and give the eye a place to land.
They also let you control the budget better than a full front-yard overhaul. A simple DIY bed can be built with basic lumber, corrugated metal, or stacked block, then filled in stages instead of all at once. For many homeowners, that is the difference between getting a project done this season and putting it off again.
Build a front-yard feature that looks intentional
Raised beds work best when they match the scale of the house and sit where they make visual sense. Near a walkway, under a front window, or as a pair framing the entry usually reads better than dropping one random box in the middle of the lawn.
Keep the shape simple. Straight runs and clean rectangles are easier to build square, easier to fill, and easier to make look polished from the street. Curves eat time, waste material, and show every small mistake.
Here is the budget range I give homeowners for a basic DIY setup:
- Low end: One small bed built from standard boards, filled with a layered mix of branches, yard waste, compost, and topsoil.
- Mid range: Two matching beds with better finish boards or simple metal sides, plus purchased soil for the top planting layer.
- Higher end: More height, more soil, cleaner edging, and upgraded materials chosen to match the porch, fence, or trim.
How to build them without wasting money
Start with layout before you buy a single board. Mark the footprint with stakes, a hose, or painter's tape on the grass. Then stand at the street and at the front door. If the bed looks too deep, it probably is. Front-yard beds usually look better and cost less when they stay narrow enough to reach across without stepping in them.
A practical build sequence:
- Pick the location for sun first. Herbs, vegetables, and cut flowers need real light, not the convenient shady corner by the porch.
- Set the size. About 3 to 4 feet wide is a practical width. Length is flexible.
- Choose the material. Wood is the easiest for first-time builders. Metal gives a cleaner, more modern look. Block or stone lasts longer but takes more labor.
- Level the base. A bed built on a slope will always look homemade in the wrong way.
- Fill in layers. Use coarse material in the bottom if the bed is tall, then add better soil where roots will grow.
- Plant with restraint. A few strong repeats look better than cramming in every plant you like.
The biggest cost mistake is overbuilding the bed and underfunding the soil. Plants do not care how expensive the sidewalls were if the growing mix is poor.
If you are weighing lumber, composite trim details, or nearby entry upgrades, it helps to compare affordable deck materials with the same mindset. Pick what fits the weather, the look of the house, and the maintenance you will keep up with.
Before cutting lumber, test one-bed and two-bed layouts with a garden ai design tool. It is a practical way to see whether the bed height, placement, and material style fit the facade before you spend on boards, soil, and hardware.
Watch a simple build process before cutting lumber:
5. Ornamental Grasses and Perennials
A front yard usually looks sparse the first weekend after planting. By the second growing season, grasses start to fill out, perennials settle in, and the whole bed reads as intentional instead of newly installed. That is why this category earns its keep on a tight budget.
Perennials and ornamental grasses cut down on repeat spending. You buy them once, give them room, and let time do part of the work. Annual-heavy planting can look cheap at checkout and expensive by midsummer once you factor in replacements, extra water, and the temptation to keep patching bare spots. That long-view cost trade-off is one reason this guide to cheap simple front yard landscaping ideas resonates with homeowners trying to stretch a modest budget.
A practical starter plan is simple. Use one ornamental grass for height and movement, one dependable perennial for color, and one evergreen shrub or structural plant if your climate supports it. Repeat that trio instead of buying one of everything at the nursery.
Here are a few combinations that usually hold up well from the street:
- Prairie-style bed: Switchgrass or little bluestem with coneflower and black-eyed Susan.
- Clean, low-fuss bed: Repeated clumps of fountain grass or similar upright grass with wide mulch spacing.
- Pollinator-friendly strip: Salvias, coreopsis, or yarrow mixed with a looser grass layer.
- Dry-climate bed: Blue fescue, lavender, and other plants suited to inexpensive drought tolerant landscaping.
Group plants in small clusters so they read clearly from the curb. Three or five of the same perennial usually looks stronger than singles scattered across the bed.
The biggest planting mistake is spacing for today's pot size instead of mature width. I see this all the time. A bed looks full on install day, then turns into a maintenance job a year later because every plant is fighting for light and airflow. Leave the gaps. Mulch is cheaper than redoing an overcrowded bed.
For DIY budgeting, start with a bed that uses 6 to 10 perennial plugs or 1-gallon plants, 3 to 5 grasses, and 2 to 3 bags of mulch for a small foundation area. Cost changes by region and plant size, but this approach usually stays far more manageable than filling the same space with larger shrubs on day one. If the budget is tight, buy fewer plants and repeat them. Repetition looks better anyway.
A simple install sequence works well:
- Mark the bed with a hose or marking paint.
- Set plants out while still in pots and check spacing from the street.
- Place taller grasses toward the back or at corners.
- Mass matching perennials in clusters instead of alternating every variety.
- Plant, water, then mulch around the root zone without burying the crowns.
Before you dig, mock up two or three versions in an AI planner so you can test spacing, color balance, and mature size without wasting money on impulse buys. OutdoorBrite is especially useful here because grasses and perennials often look underwhelming in nursery pots. A preview helps you commit to the long game and avoid overplanting.
If you are blending these beds with low-water turf alternatives, this roundup of xeriscaping and artificial turf ideas can help you compare where grass-like texture belongs and where lawn replacement makes more sense.
6. Xeriscaping Drought-Resistant Design
Xeriscaping gets misunderstood because people hear “dry” and picture a yard full of gravel with no personality. Good xeriscaping isn't barren. It's controlled.
It uses the right plants, tighter irrigation, and less turf so the yard works with your climate instead of fighting it. That matters more than ever in places where watering a front lawn feels like paying to lose the same argument every week.
Cut water demand before you cut aesthetics
Start by identifying the thirstiest parts of the yard. Usually that's lawn, annual beds near pavement, and plants that don't match the site. Replace those first with drought-tolerant shrubs, regional natives, succulents where climate allows, and durable mulched or rocked planting zones.
Good xeriscape design usually depends on grouping plants by water need. That way, irrigation matches the plants instead of overwatering some and underwatering others. If you're planning a redesign around that idea, this guide to inexpensive drought tolerant landscaping is a useful companion.
A few practical moves:
- Hydrozone the planting: Keep similar water users together.
- Reduce turf selectively: Don't rip out everything at once if you're unsure.
- Use rock where it fits the climate: Best in arid settings, not every yard.
- Lean into foliage color: Gray, blue, and silver leaves help the scheme feel cohesive.
There's also a beginner trade-off here. No-dig and dry-pour ideas are getting more attention, but not every low-cost method is low-risk for a novice. A key budget question isn't just material price. It's whether your skill level makes the project worth attempting, a gap highlighted in this roundup of cheap simple front yard landscaping ideas.
If you want inspiration for lower-water layouts and lawn substitutes, it also helps to compare xeriscaping and artificial turf ideas. Even if you don't use turf, the contrast helps clarify what kind of low-water look you want.
7. Simplify and Eliminate Lawn
Saturday morning usually makes the problem obvious. You drag the mower out, wrestle with a thin strip by the driveway, scalp a dry patch under the front windows, then spend the rest of the time cleaning up edges that never looked good to begin with. That is the lawn area to cut first.
Front-yard turf earns its keep only when it gives the house breathing room or creates a usable space. A lot of it does neither. It just eats water, fertilizer, and weekend hours. In budget projects, I usually get the best return by keeping a smaller, cleaner lawn shape and converting the fussy parts into beds, gravel, or living ground cover.
The smart move is to edit, not gut the whole yard at once. Start with the awkward square footage. Narrow side strips, shaded patches, steep slopes, and corners the mower misses are the easiest wins because they cost the most time and give the least visual payoff.
A practical DIY sequence looks like this:
- Mark the new lawn line with a hose or marking paint: Curves should be broad and simple enough to edge with a string trimmer.
- Remove turf in phases: Sheet mulching with cardboard and mulch is the cheapest route, but it takes patience. Sod cutter rental is faster, but harder on the budget and your back.
- Install edging before finish materials: Steel, plastic, brick, or a clean spade edge keeps the new shape readable from the street.
- Cover bare soil right away: Mulch, gravel, or planting should go in as soon as the grass is gone so weeds do not take over.
- Choose the replacement by traffic level: Low-traffic areas can use spreading plants. For ideas, this guide to the best ground cover options helps narrow down what works as a lawn alternative.
For a small front-yard conversion, many homeowners can tackle one zone for the cost of cardboard, compost, mulch, and a few plants. A simple DIY section often lands in the low hundreds if you already own basic tools. Bring in a crew, add irrigation changes, or remove a large amount of sod, and the price climbs fast. That trade-off matters. Saving money on labor only works if the project is small enough to finish cleanly.
One mistake I see often is removing grass before there is a clear replacement plan. The yard sits as bare dirt for a month, weeds move in, rain cuts channels, and the whole thing starts to look unfinished. Another common mistake is replacing every bit of lawn with rock. Rock cuts watering, but it can look harsh against some homes and it reflects heat. Most front yards look better with a mix of planting and non-lawn surfaces.
This is also a good place to use OutdoorBrite before spending a dollar. Mock up a tighter lawn shape, test a ground cover bed under the windows, or compare mulch versus gravel near the walk. Pre-visualizing the layout helps you catch proportion problems early, which is one of the easiest ways to avoid buying the wrong materials or removing more turf than the yard can handle.
8. Focal Point Features DIY Structures
Guests usually read the front yard in about five seconds. If nothing stands out, the whole space can feel unfinished even after you have cleaned beds, added mulch, and trimmed plants. One well-placed feature fixes that fast because it gives the yard a clear center.
The best budget focal points do two jobs at once. They draw attention, and they solve a problem. A trellis can break up a blank wall. A raised planter can add height near a flat entry. A small sitting pad can make an awkward corner feel intentional. A birdbath or grouped stone feature can fill empty space without adding much maintenance.
Start by standing at the sidewalk and then at the front door. Look for the spot your eye keeps skipping over. That is usually where the feature belongs. In my work, homeowners save the most money when they build around what already exists instead of forcing a new idea into the yard.
A simple DIY pad is one of the more useful options because it can support a bench, a pair of containers, or a large accent pot. Material cost often falls in the low hundreds for a basic small pad if the base prep is done carefully and the size stays modest. Go bigger, add edge restraints, or choose premium finishes, and the cost climbs quickly. That trade-off matters. A small, clean feature usually looks better than a larger one built on a rushed budget.
Here are the budget-friendly options that tend to earn their keep:
- Trellis with a climber: Best near porches, garage walls, or any flat section of the facade. Budget for the trellis, anchors, and one plant. Install it securely into framing or masonry, not just siding.
- Raised planter box: Good near the entry where you need height right away. Use rot-resistant lumber, keep soil a few inches below the rim, and do not block drainage against the house.
- Small gravel or concrete sitting area: Works in a corner that feels empty. Keep it large enough for one bench or two chairs, and edge it cleanly so it does not drift into the lawn or planting beds.
- Stone grouping or pedestal feature: Works best with simple home styles. Use fewer, larger pieces instead of a pile of small ones. That looks more intentional and costs less to maintain.
The common mistake is oversizing the feature. Small front yards need restraint. A focal point should catch the eye, not dominate every view.
OutdoorBrite is useful here before you buy lumber, gravel, or planters. Mock up a trellis on the wall, test a square pad versus a round one, or compare one large planter with a cluster of three. Pre-visualizing the feature helps you catch scale problems early, which is one of the easiest ways to avoid wasting money on a project that looked better in your head than it will in the yard.
Keep the structure simple. Let the planting around it finish the job.
8-Option Budget Front Yard Landscaping Comparison
A side-by-side comparison helps when every extra bag of mulch or trip to the nursery affects the budget. Use this chart to match the right approach to your yard, your time, and your skill level before you buy materials.
If you want to avoid expensive do-overs, mock up the layout in OutdoorBrite first. It is a practical way to test bed shapes, lawn reduction, gravel areas, and focal features before you commit money to soil, plants, stone, or lumber.
| Option | DIY Difficulty 🔄 | Budget Range ⚡ | What You Get 📊 | Best Fit ⭐ | Practical Tips 💡 |
|---|---|---|---|---|---|
| Native Plant Landscaping | Moderate. Plant choice matters, and the first season takes attention | Starter plantings can begin around $50 to $150, with lower upkeep later | Better drought tolerance, habitat for pollinators, and a yard that settles in over time | Homeowners who want lower maintenance and plants suited to local conditions | Start with a small group of proven natives, not a long shopping list. Check mature size before planting. Use OutdoorBrite to test groupings so the bed does not look sparse or overcrowded |
| Hardscape with Recycled Materials | Moderate. Material hunting takes time, but installation is often DIY-friendly | Material costs can stay low if you source salvaged brick, concrete, or stone | Strong structure, more definition, and a custom look without paying for all-new materials | Walkways, edging, and utility zones that need durability | Measure the area first and collect materials second. Sort pieces by thickness before laying them. Skip random pickups that do not fit the plan |
| Mulch and Ground Cover Strategy | Low. One of the easiest weekend projects | Low material cost, especially for small to mid-size beds | Cleaner appearance, fewer weeds, and better moisture retention | Tired planting beds that need fast improvement without a big spend | Lay out bed lines with a hose, weed first, then apply mulch at a consistent depth. Keep mulch pulled back from trunks, stems, and siding |
| DIY Raised Garden Beds | Moderate. Basic carpentry and soil filling are the main jobs | Often about $50 to $150 per 4x8 bed, depending on lumber and soil | Better drainage, easier soil control, and a clear planting zone near the entry or walk | Homeowners growing herbs, flowers, or compact edible plants | Use untreated or rot-resistant boards, keep beds level, and fill with a soil blend that drains well. Preview bed placement in OutdoorBrite so it does not crowd the front walk |
| Ornamental Grasses and Perennials | Low to moderate. Planting is simple, spacing is where mistakes happen | Many varieties are affordable per plant, especially in small containers | Long season color and texture with less yearly replanting | Border plantings and repeated masses along the front of the house | Buy fewer plants and space them for mature width. Repeat the same varieties for a cleaner look and lower cost |
| Xeriscaping (Drought-Resistant Design) | Moderate to high. The plan needs to match sun, drainage, and water use | Higher up front than mulch alone, but often cheaper to maintain | Lower irrigation demand and less mowing or trimming over time | Dry regions, hot exposures, and homeowners tired of watering | Group plants by water needs, improve drainage where needed, and use gravel only where it makes sense. A quick visual test in OutdoorBrite helps prevent a dry yard from feeling harsh |
| Simplify and Eliminate Lawn | Moderate. Removal and replanting are easier in phases | Costs vary with square footage and disposal, but upkeep drops after conversion | Less mowing, less edging, and more room for beds, gravel, or usable space | Homes with too much front lawn and not enough purpose | Remove the least useful turf first, usually awkward strips or areas that struggle. Check HOA or city rules before you cut sod |
| Focal Point Features (DIY Structures) | Low to moderate, depending on what you build | Many projects fit a modest budget with basic tools and simple materials | Stronger curb appeal and a clearer visual center | Small yards that need one feature to organize the view | Keep the scale restrained. One trellis, planter, bench pad, or stone feature usually works better than several small accents competing for attention |
Your Budget-Friendly Dream Yard Is Within Reach
You walk out to the curb, look at the front yard, and know it needs help. The mistake is assuming that means a full rip-out, a big contractor bill, or a weekend of impulse-buying plants that do not solve the problem.
Good results usually come from three decisions made early. Keep a simple layout. Spend on the parts people notice first, like bed lines, mulch coverage, and one clear focal feature. Save labor-heavy or technical work, such as grading, drainage correction, or irrigation changes, for the spots that need it.
As noted earlier, costs can swing hard depending on scope. A yard refresh with mulch, plant cleanup, divided perennials, and a small DIY feature sits in a very different budget range than sod removal, hauling, masonry work, and new watering lines. That trade-off matters more than any single price tag. Homeowners save the most money when they decide what the yard needs before they start buying materials.
I usually recommend planning in layers. First, sketch the shape of beds, paths, and any lawn reduction. Next, price the base materials, mulch, gravel, edging, soil, and fasteners. Then add plants last, after you know how much square footage you are filling. That order prevents one of the most common budget mistakes. Spending half the money on plants, then realizing there is nothing left for the material that makes the yard look finished.
DIY works best when you match the project to your skill level. Spreading mulch, building simple raised beds, setting a small gravel pad, or planting tough perennials are manageable for many homeowners. Regrading soil near the foundation, cutting large roots, or installing long runs of paver edging can get expensive to fix if done wrong. Hire the risky parts. Do the visible, lower-risk work yourself.
OutdoorBrite helps before any money leaves your wallet. Upload a photo of your front yard, test bed shapes, compare low-cost material ideas, and see whether reducing lawn or adding one feature improves the whole view. That pre-visualization step is not fluff. It helps you catch scale problems, avoid clashing materials, and skip purchases that looked good in the store but do not fit the house.
OutdoorBrite Money helps you make those choices before you spend on plants, pavers, mulch, or labor. With OutdoorBrite Money, you can upload a photo of your front yard, generate realistic redesigns in different styles, and pressure-test budget ideas before you commit. That means fewer expensive mistakes, clearer material decisions, and a front yard plan you can build with confidence.
A strong front yard on a budget is rarely finished in one push. It comes together in smart phases, with a full plan from the start and careful spending at each step.
See your yard reimagined
Start creating