How Far Should Pergola Be from House: A Practical Guide
Learn how far should pergola be from house, with clearance, code, drainage, and attached vs freestanding placement tips for a safe backyard build.
You're standing on the patio with a tape measure, trying to decide where the pergola posts should land. One guide says to leave a small gap, another gives a larger setback, and a third assumes the pergola will be attached to the house. The conflicting advice is frustrating because each answer may be correct for a different type of project.
The answer to how far a pergola should be from a house depends on the structure's design, your local rules, and the conditions on your lot. An attached pergola connects directly to the dwelling, while a freestanding pergola needs its own placement clearance. Drainage, easements, maintenance access, property lines, and wildfire risk can change the best location even when a proposed layout satisfies the basic zoning rule.
Table of Contents
- Why Pergola Distance From the House Is Not One-Size-Fits-All
- Attached vs Freestanding Pergolas and Why It Changes Everything
- Structural Clearances for an Attached Pergola
- Freestanding Pergola Distance From the House
- Comparing Attached and Freestanding Placement Side by Side
- Site Checks That Can Override Any Code Minimum
- Your Pre-Build Pergola Placement Checklist
- Putting It All Together and Visualizing Your Layout
Why Pergola Distance From the House Is Not One-Size-Fits-All
There is no single distance that every pergola must maintain from a house. The correct separation depends on whether the pergola is attached or freestanding, how your local authority classifies it, what materials you're using, and which zoning or fire-safety provisions apply.
Start with the structure type. An attached pergola has a house separation of 0 feet at the connection point because it joins directly to the dwelling. That doesn't make it automatically simple. The attachment can turn an accessory project into a building alteration that requires permits, structural review, ledger fastening, and weatherproofing.
A freestanding pergola follows a different path. Your local authority may regulate its distance from the house, property lines, other structures, easements, or all of these. Chicago, for example, requires combustible pergola-related screens and similar elements to be at least 6 feet from another building on the same lot, with related requirements for combustible horizontal elements and specified exceptions under its building code. Treat that as a local example, not a universal backyard rule. Review the Chicago building code provisions for pergola-related separation before applying any number to your own property.
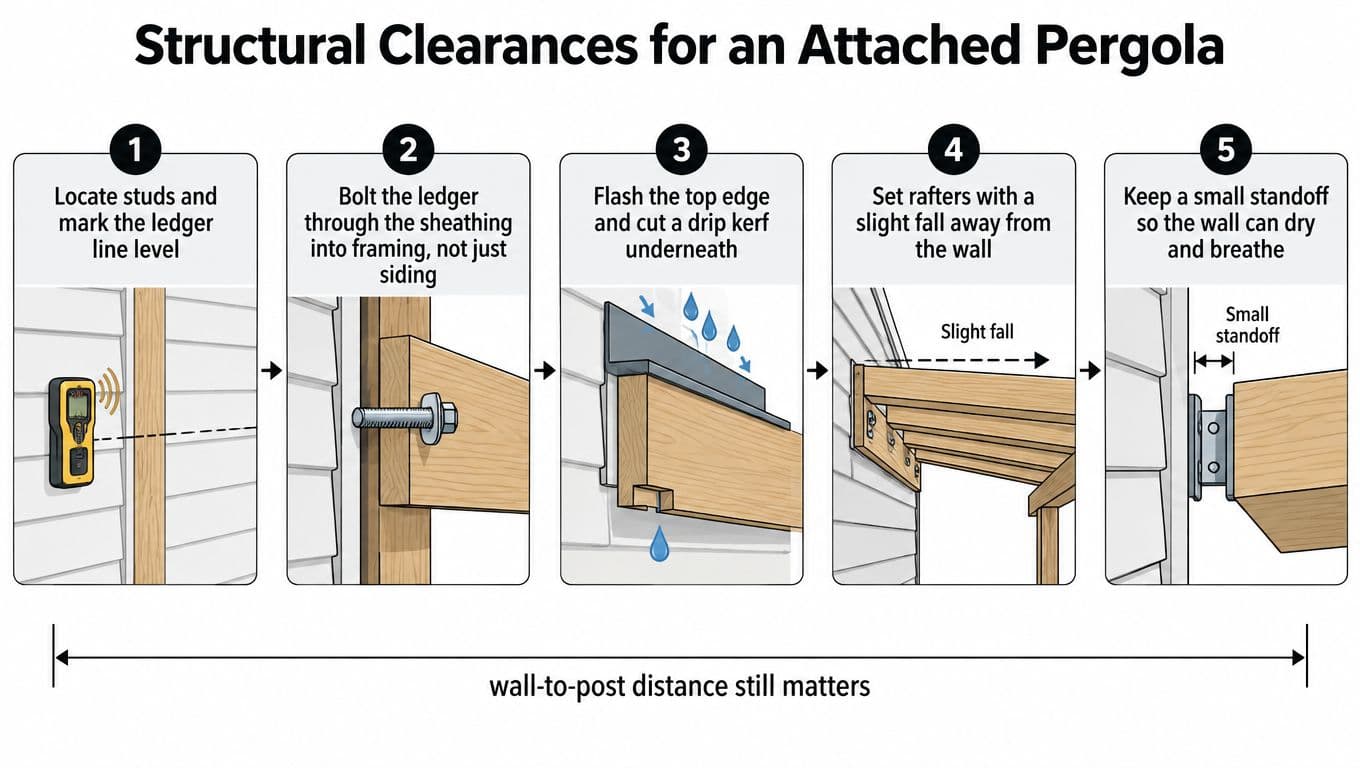
Use this decision first
Ask one question before measuring anything else: Will the pergola be physically fastened to the house?
- Yes, attached: Plan for a direct connection, then focus on structural framing, flashing, drainage, permits, and the location of the outer posts.
- No, freestanding: Start with local accessory-structure setbacks, then add enough room for maintenance, drainage, inspection, and safe movement.
- Near a hazard: Treat fire exposure, combustible storage, steep slopes, drainage routes, and utility corridors as layout constraints, not afterthoughts.
The legal minimum is only the floor. A pergola can meet a setback and still block a gutter, trap moisture against siding, obstruct a utility easement, or leave no room to repaint the wall. Choose the distance only after filtering the project through structure type, local code, and site conditions.
Attached vs Freestanding Pergolas and Why It Changes Everything
An attached pergola uses the house as one side of its support system. A ledger, beam, or similar connection fastens to the dwelling, and the outer posts carry the opposite side. A freestanding pergola stands independently on its own posts and footings, with no structural reliance on the house wall.
That distinction changes nearly every planning decision.
An attached design can create a strong visual connection between the indoor and outdoor spaces and may use less yard depth. But the wall connection carries serious risks if it's treated as decorative carpentry. The ledger must connect to verified structural framing, and any roof or solid cover meeting the wall needs properly integrated flashing and water management.
A freestanding design avoids the wall attachment. That protects the siding and reduces the risk of roof or wall penetration, but it needs a complete structural system, independent footings, and enough land to satisfy setbacks and access requirements. It's also easier to reposition during planning if the layout proves awkward.
| Factor | Attached Pergola | Freestanding Pergola |
|---|---|---|
| Structural relationship | Connects to verified framing in the house | Relies entirely on its own posts and footings |
| House separation | Direct connection at the ledger or beam | Requires a planned gap between structures |
| Main technical risk | Flashing, ledger fastening, water intrusion, and load transfer | Footing placement, stability, setbacks, and site access |
| Permit review | May be treated as an alteration to the dwelling | Usually reviewed as an accessory structure, subject to local classification |
| Drainage | Must coordinate with the house roof, wall, and gutters | Can be planned independently, but must still discharge water safely |
| Long-term flexibility | Permanent and difficult to relocate | Easier to reposition if the site allows it |
Don't choose attached because it appears closer or cheaper. Choose it when the house wall can accept the load, the flashing can be installed correctly, and the permit path is clear. Choose freestanding when you want to avoid wall work, when the siding or masonry is difficult to modify, or when a maintenance gap makes more sense for the property.
The safest layout is the one that fits both the structure and the way you'll maintain it. A pergola that looks good on a plan but blocks a door, downspout, or service route is poorly placed.
Structural Clearances for an Attached Pergola
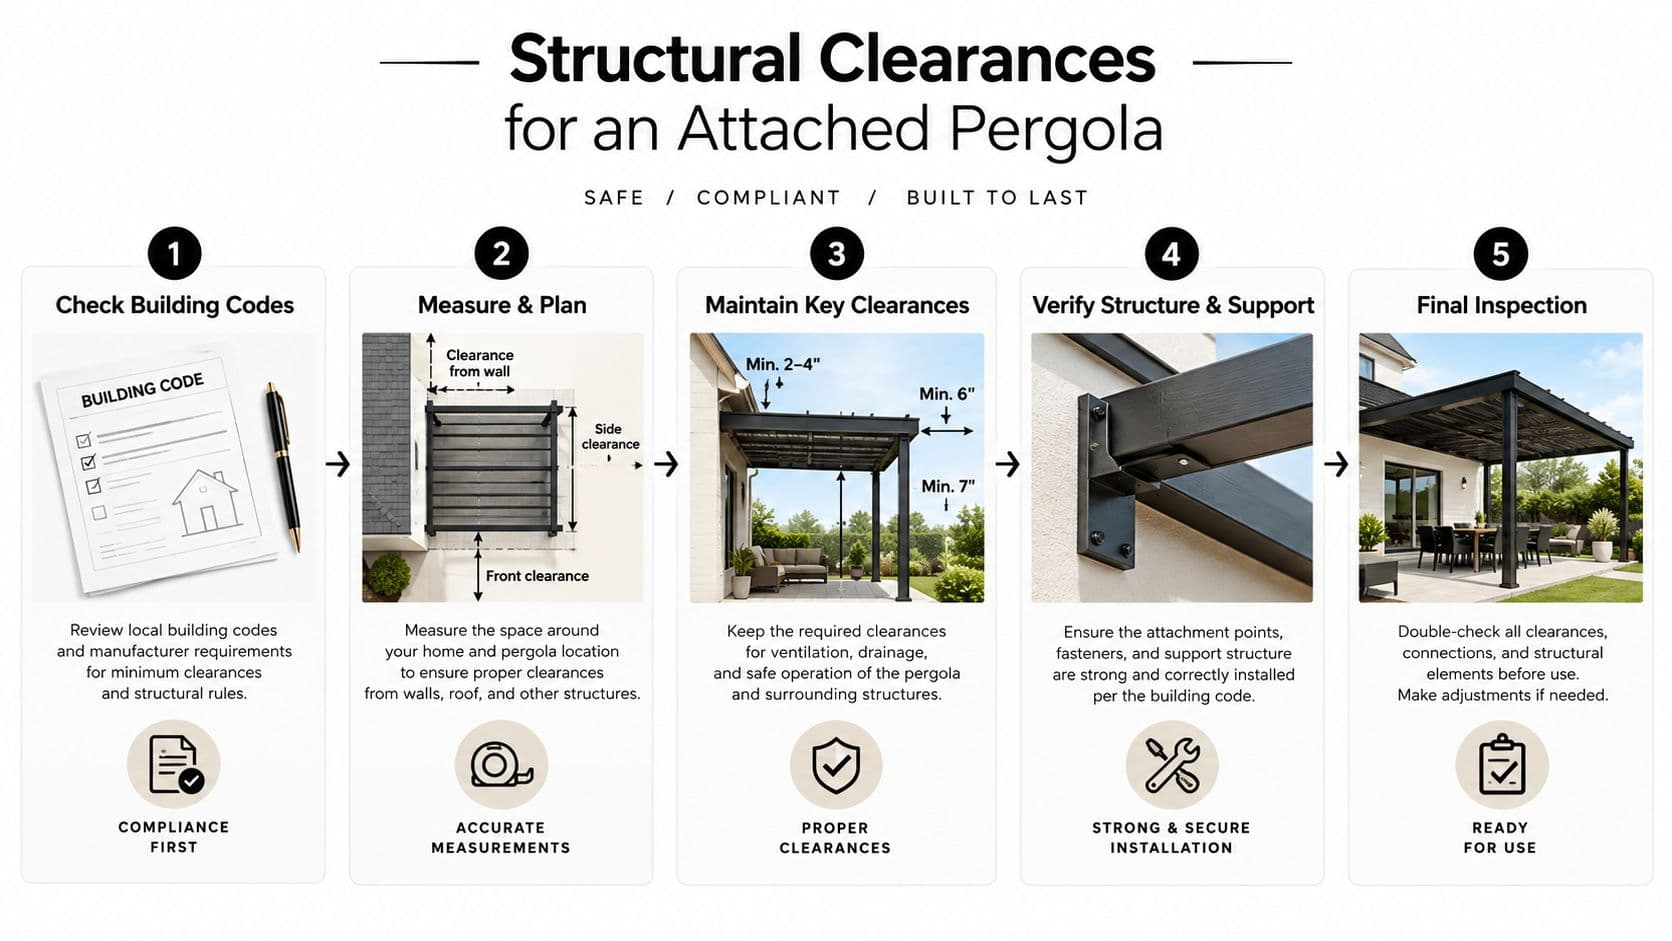
An attached pergola can sit directly against the house, but the connection must be engineered and weatherproofed. The nominal house-to-pergola distance is effectively zero at the ledger. The more important measurement is often the projection from the wall to the outer beam and posts.
Build the wall connection around structure
A ledger or beam must fasten to verified structural framing. Siding, stucco, brick veneer, and insulation aren't substitutes for framing capable of carrying gravity, uplift, and lateral loads. Before drilling, identify the actual framing and confirm that the proposed fasteners and spacing meet the approved design.
Water management deserves equal attention. Guidance for covered assemblies calls for corrosion-resistant sidewall flashing that extends at least 4 inches vertically and horizontally and directs water onto the roof or into a gutter. Installing it may require temporarily removing siding or stucco so the flashing can connect properly with the wall's weather-resistive barrier. The patio-cover specifications for ledger attachment and flashing illustrate why this work shouldn't be improvised.
The roof or cover also needs a deliberate fall for drainage. A local patio-cover specification calls for a slope of at least 1/4 inch per foot for covered assemblies. The exact requirement for your pergola may differ, especially if the structure is open at the top, but water must never be allowed to pond against the wall or run toward the foundation.
Watch the outer posts
The outer posts need their own properly sized footings. Their position determines the depth of the attached pergola, the usable walking space, and how much of the patio the structure covers. Keep posts away from door swings, steps, furniture paths, drainage outlets, and areas where you'll need a ladder or service access.
Common failures include:
- Weak ledger fastening: Fasteners miss the structural framing or rely on cladding.
- Incomplete flashing: The top edge isn't sealed into the wall's weather barrier.
- Poor drainage: The cover slopes toward the house or discharges beside the foundation.
- Inadequate footings: Posts shift, settle, or lift under site and weather loads.
- Unsupported spans: Beams or rafters exceed the capacity of the approved design.
Structural rule: If the attachment changes the roofline, penetrates a wall, or supports a covered assembly, involve the building department and a qualified structural professional before construction.
For design inspiration that still keeps the connection details in view, explore ideas that can transform your backyard with a pergola.
Freestanding Pergola Distance From the House
A freestanding pergola doesn't use the house as a structural anchor, but the space between the two structures still needs careful planning. Start with the local code. In U.S. jurisdictions, a practical starting point is often at least 5 feet from the house, but that figure isn't universal and must be confirmed with the local planning or building department.
Some municipalities focus mainly on property-line setbacks. Others regulate the distance from the dwelling as well. Miami-Dade County, for example, lists a 10-foot spacing requirement from the house for certain small pergolas, while larger structures fall under different accessory-building rules. That example is exactly why a simple “3 feet” or “5 feet” answer can mislead homeowners.
Once you know the legal minimum, add a design buffer. A gap of 2 to 3 feet beyond the legal minimum improves access for painting, roof-drainage inspection, pest checks, and repairs. It also gives you room to work behind the pergola without squeezing between a post and the wall.
| Dimension | Legal Minimum Typical | Practical Recommendation | Reason to Add Space |
|---|---|---|---|
| House-to-pergola gap | Confirm with local code | Add a maintenance buffer beyond the minimum | Wall access, inspection, and drainage |
| Side access | May be regulated separately | Leave a usable walking and service route | Mowing, furniture movement, and repairs |
| Property-line clearance | Confirm zoning and survey records | Keep the full structure inside the allowed area | Posts, footings, beams, and eaves all count |
| Rear or side setback | Varies by municipality | Design around the strictest applicable boundary | Avoid redesign after permitting |
Measure from the parts that occupy space. Roof projections, gutters, posts, footings, screens, and decorative elements can extend beyond the clear distance between the wall and the nearest post.
If you want privacy panels or screens, plan them with the same discipline as the pergola itself. A resource about a backyard pergola with privacy can help you think through how enclosure changes sightlines, wind exposure, and the effective footprint.
Don't place the pergola farther from the house just to create a larger gap. The new location might sit over a drainage route, utility easement, unstable slope, or flood-sensitive area. The best freestanding location is the one that satisfies the rules while preserving access and keeping water away from structures.
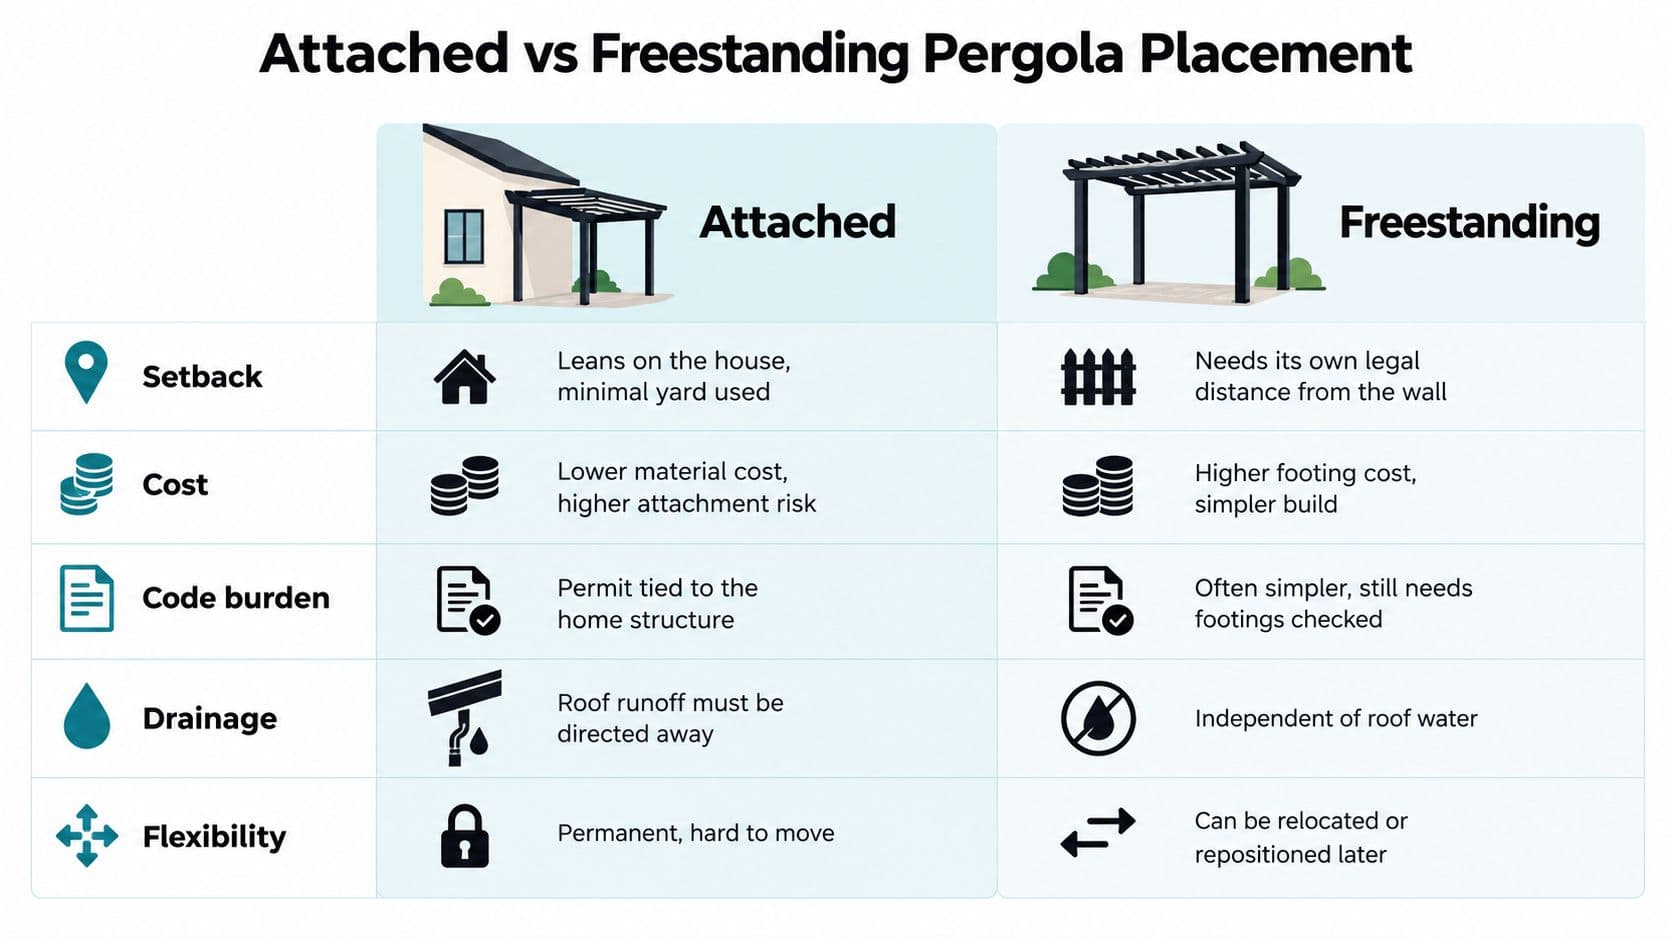
Comparing Attached and Freestanding Placement Side by Side
Both configurations can create a comfortable outdoor room, but they solve different problems.
An attached pergola suits a patio directly outside a living room, kitchen, or rear door. It keeps the space visually connected to the house and can work well where yard depth is limited. The tradeoff is a permanent structural tie-in, more detailed wall work, and a greater chance that permits or inspections will affect the schedule.
A freestanding pergola gives you more control over orientation and placement. You can angle it toward a garden, pool, view, or seating area without matching the house wall. You'll need more independent structure and usable yard, but you avoid ledger attachment and can preserve the existing roof and siding system.
| Decision area | Attached placement | Freestanding placement |
|---|---|---|
| Yard depth | Uses the house edge as one side of the layout | Needs independent space around the full structure |
| Structural work | Requires a properly designed wall connection | Requires complete post, beam, and footing support |
| Code burden | May trigger review as a dwelling alteration | May fall under accessory-structure rules |
| Drainage | Must coordinate with the home's wall, eaves, and gutters | Has independent roof drainage but still needs a safe discharge path |
| Maintenance | Can make wall and gutter access more difficult | Can preserve a service gap around the house |
| Flexibility | Feels permanent and is difficult to move | Can be repositioned if the site and code allow |
| Best fit | Patio directly connected to indoor living space | Yard zones that need separation from the home |
Make the choice based on the lot, not on a generic preference. An attached pergola is the stronger option when the wall connection is sound and the patio naturally extends from the house. A freestanding pergola is the better option when you need independent orientation, want to avoid wall penetration, or have a difficult exterior wall.
The cheapest-looking layout can become the expensive one if it causes water intrusion or forces a late redesign. Price the structural and permitting risk, not just the lumber and posts.
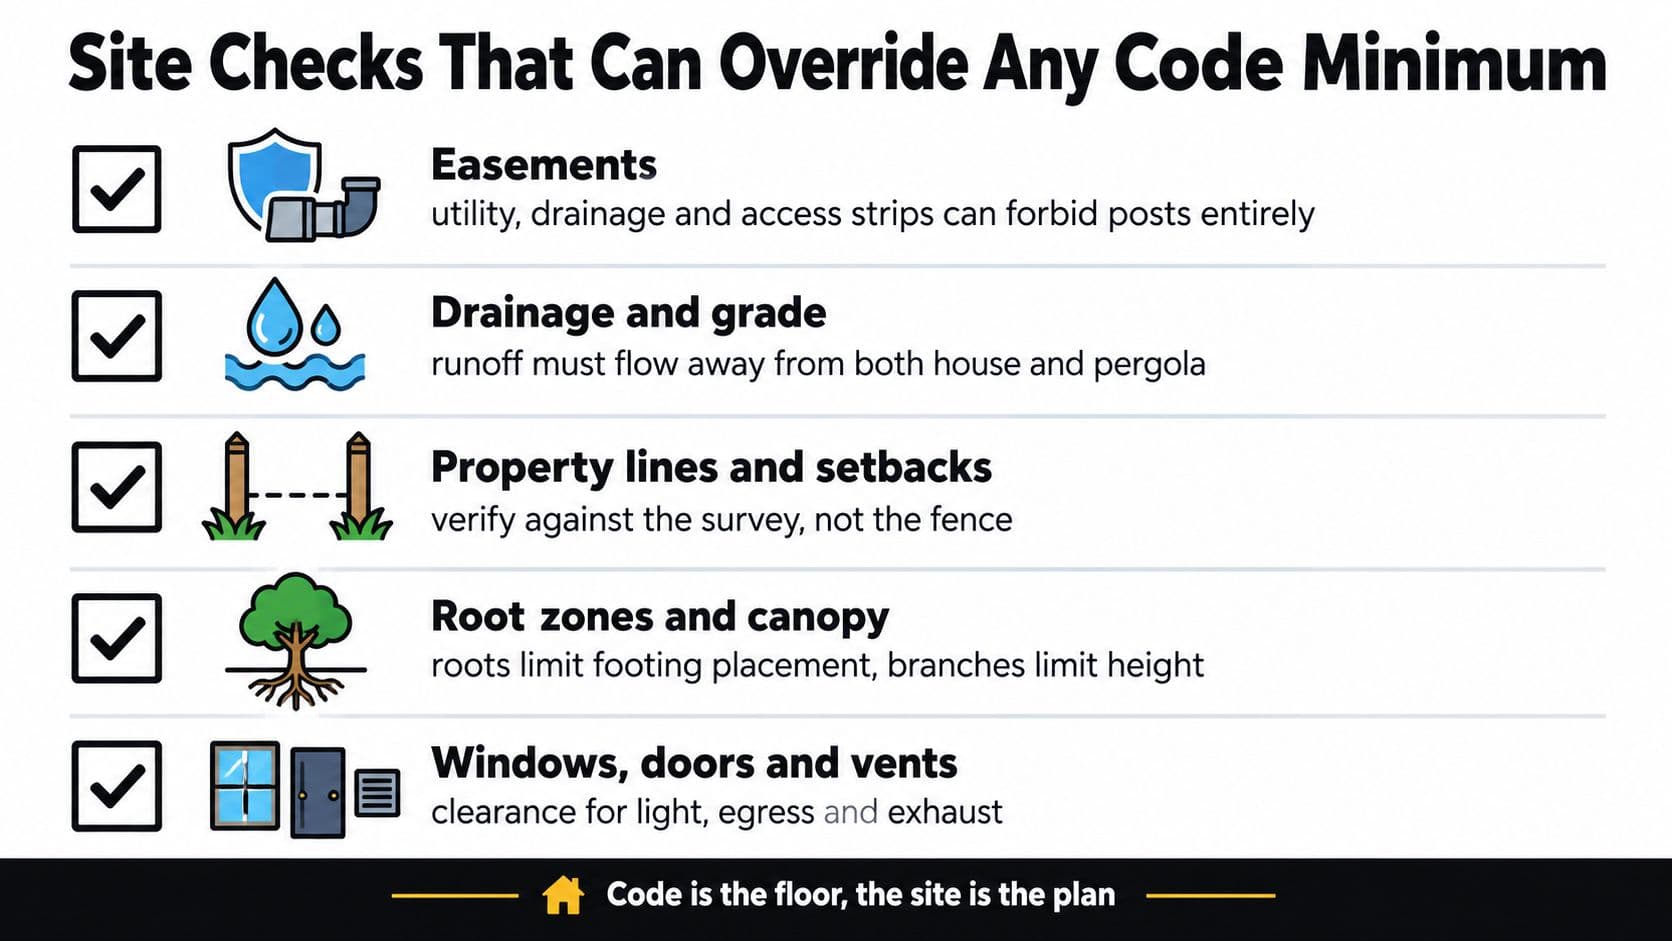
Site Checks That Can Override Any Code Minimum
Code establishes a baseline. It doesn't tell you whether a post will hit a sewer line, whether runoff will collect against the foundation, or whether the proposed location sits inside an easement. Walk the property before you commit to the drawing.
Five checks belong on every site walk
- Easements: Utility, drainage, and access easements can restrict construction even when the land is part of your lot. Some local guidance states that no part of a pergola may extend into an easement, so check recorded documents and the site plan before placing posts. The Joondalup guidance for patios, pergolas, and shade structures shows how easements and drainage conditions can affect placement.
- Underground services: Locate water, gas, electric, sewer, and communication lines before excavation. A pergola can be legally positioned and still be unsafe to build if a footing conflicts with buried infrastructure.
- Drainage and grade: Trace where roof water, surface runoff, and downspout discharge travel during a storm. Keep water moving away from the house, the pergola footings, and neighboring lots.
- Access and maintenance: Preserve a route for gutter cleaning, siding work, pest inspection, furniture movement, and future repairs. A tight gap may look efficient on paper but become unusable once posts, screens, and gutters are installed.
- Fire exposure: Evaluate wood fences, stored firewood, propane, dry planting, and other combustible materials near the proposed structure. Fire conditions can demand a more conservative location and more fire-resistant materials than ordinary zoning would require.
Wildfire changes the question
In wildfire-defensible-space planning, a U.S. federal Ready.gov home-builder guide recommends separating auxiliary structures, including pergolas, from the home by at least 50 feet, with greater distance where combustible materials are stored. That is a wildfire mitigation recommendation, not a normal suburban setback. It demonstrates how the answer changes when the hazard changes. Review the Ready.gov defensible-space guidance for auxiliary structures if your property is in a wildfire-prone area.
A pergola farther from the house isn't automatically safer if it sits over a drainage route or utility corridor. Use the site, not a memorized number, to determine the final location. For grading and runoff decisions, use this OutdoorBrite landscape planning resource alongside your survey and local requirements.
Your Pre-Build Pergola Placement Checklist
Don't pour concrete until the layout has survived a real site check. Use this sequence in order.
- Stake the footprint. Mark the posts, beams, roof projection, screens, and footings with stakes and string. Don't mark only the clear space between the house and the nearest post.
- Identify the structure type. Decide whether the pergola is attached or freestanding. That choice determines which structural and permit questions you need to ask.
- Verify setbacks. Check the house separation, side and rear property-line setbacks, height limits, lot-coverage rules, and any accessory-structure provisions with the local authority.
- Check the survey and easements. Confirm the actual property lines. Don't rely on a fence as proof of the boundary, and don't assume an easement is buildable because it crosses your yard.
- Map underground services. Arrange utility locating before digging. Mark the service routes on the plan and move footings rather than trying to work around an uncertain line.
- Trace water movement. Watch where downspouts discharge and where surface water collects. Redirect runoff before construction, not after the posts are set.
- Review doors and windows. Confirm that posts won't obstruct door swings, emergency access, ventilation, natural light, or views from the rooms that face the yard.
- Test the sightlines. Stand inside the house and photograph the staked footprint from the kitchen, living room, and bedrooms. Then stand beneath the proposed pergola and look back toward the house.
- Plan maintenance access. Make sure you can reach siding, gutters, footings, fasteners, and any screens without dismantling the structure.
- Take the plan to the building department. Bring the marked dimensions, site sketch, structure type, materials, and photos. Ask specifically about permits, setbacks, fire separation, easements, drainage, and homeowners-association restrictions.
That final conversation is cheaper than moving posts. If the official answer conflicts with an online guide, follow the authority that has jurisdiction over your property.
Putting It All Together and Visualizing Your Layout
Start with one decision: will the pergola connect to the house or remain independent? If it shares the wall or uses a ledger, mark the attachment point and the outer post line on your sketch. If it stands separately, draw the full footprint, including the roof projection, then verify the local setback before refining the layout. This decision tree separates a legal minimum from the space the finished structure needs.
Use graph paper to map the house, property lines, pergola footprint, doors, windows, gutters, downspouts, utilities, and furniture. A free online three-dimensional planner can help you judge proportions, but it cannot confirm a survey, property boundary, easement, drainage route, or site condition.
For a quicker visual test, use an ai backyard patio design concept to compare the pergola's scale and position against a photo of your yard. Treat the concept as a planning aid, not a construction layout. Check the selected design with measurements, stakes, drainage observations, and the local code.
String and stakes reveal clearance problems better than a polished rendering. Mark the complete roof projection, then stand at every nearby doorway. Open the doors, walk around the proposed furniture, and look back toward the house from the seating area. Check whether the structure blocks useful views or creates an awkward route between the house and yard.
Walk the marked layout at the time of day you expect to use it. Morning and afternoon sun angles can change the useful shade, while indoor sightlines show whether the pergola frames the yard or blocks it. View it from neighboring areas as well, particularly if you plan to add privacy screens.
Then apply the site overrides. Keep footings and posts out of easements, drainage paths, and unsafe slopes. Preserve access for siding, gutters, utilities, fasteners, and future repairs. On a wildfire-prone property, confirm the required defensible-space approach with the local building department before fixing the footprint.
The building department has the final word on classification, setbacks, permits, and fire provisions. Requirements vary by municipality, and the code minimum may leave too little room for maintenance or water management. If the official answer conflicts with an online guide, follow the authority with jurisdiction over your property.
Once you have chosen the structure type and tested its position, use the layout to guide the next conversation with your contractor or local building department.
OutdoorBrite turns a photo of your yard into realistic redesign concepts, so you can test a pergola's position, scale, privacy elements, and surrounding planting before committing to construction. Visit OutdoorBrite to compare alternatives and take a clearer plan to your contractor or local building department.
See your yard reimagined
Start creating