How Much Does Xeriscaping Cost in 2026? a Price Guide
Wondering how much does xeriscaping cost? See per-square-foot rates, yard-size ranges, DIY savings and payback so you can budget your project.
Professional xeriscaping in the United States runs about $5 to $20 per square foot, while a basic planting-focused conversion can cost about $3 to $4 per square foot. For a 1,000-square-foot yard, that means roughly $3,000 to $4,000 for basic planting or $5,000 to $20,000 for a broader professional installation.
The difference isn't whether you choose drought-tolerant plants. You're paying for the condition of the site, who does the work, and how much construction accompanies the planting. The installation bill and the water-bill payback are separate calculations, and combining them too early can make an expensive redesign look more economical than it is.
Table of Contents
- Typical Xeriscaping Cost by Yard Size
- What Actually Drives the Price of a Xeriscape
- Professional Installation Versus DIY Costs
- Three Real Budget Scenarios Compared
- Water Savings and Payback Over Time
- Build Your Budget and Lock In Quotes
Typical Xeriscaping Cost by Yard Size
Start with the area you're converting, not your entire lot. For a professional installation, MeasureScout's 2026 cost guide gives a planning range of $5–$20 per square foot.
That range is useful for screening a budget, but it isn't a quote. A flat planting bed with usable soil and an existing walkway is a different purchase from a sloping yard with new drainage, masonry, and irrigation.
Xeriscaping cost ranges by yard size
The professional totals below are calculated from that published unit-price range. The basic and complex-build columns distinguish planting work from construction-heavy projects; the DIY estimate is a separate published benchmark, not a discount applied to the professional column.
| Yard size | Professional range | Basic or DIY range | Complex build |
|---|---|---|---|
| 500 sq ft | $2,500–$10,000 | $1,288–$4,317 DIY benchmark | Price irrigation and masonry separately |
| 1,000 sq ft | $5,000–$20,000 | $3,000–$4,000 for basic planting | About $20,000 |
| 2,000 sq ft | $10,000–$40,000 | Obtain a planting-only or DIY materials estimate | Itemize walls, paths, drainage, and irrigation |
| National average project | About $17,000, HomeAdvisor's 2025 benchmark | Not a DIY benchmark | Not a fixed hardscape allowance |
Don't read across a row as though every column buys the same finished yard. The DIY benchmark includes the homeowner's work, while a contractor's proposal can include equipment, hauling, installation, and project coordination. Likewise, a planting-only conversion shouldn't be compared directly with a complete outdoor renovation.
Budgeting rule: Use square footage to establish a starting allowance. Use an itemized scope to decide whether a contractor's price is reasonable.
For a front-yard project that also includes entrances, edging, or other improvements, compare the scope with budget estimates from OutdoorBrite. Keep those improvements visible rather than burying them inside a single xeriscaping rate.
The most useful number isn't the midpoint of the range. It's the allowance for your conversion area and intended scope. Mark the applicable row, then identify whether your project is mainly planting, infrastructure repair, or outdoor construction before setting a spending limit.
What Actually Drives the Price of a Xeriscape
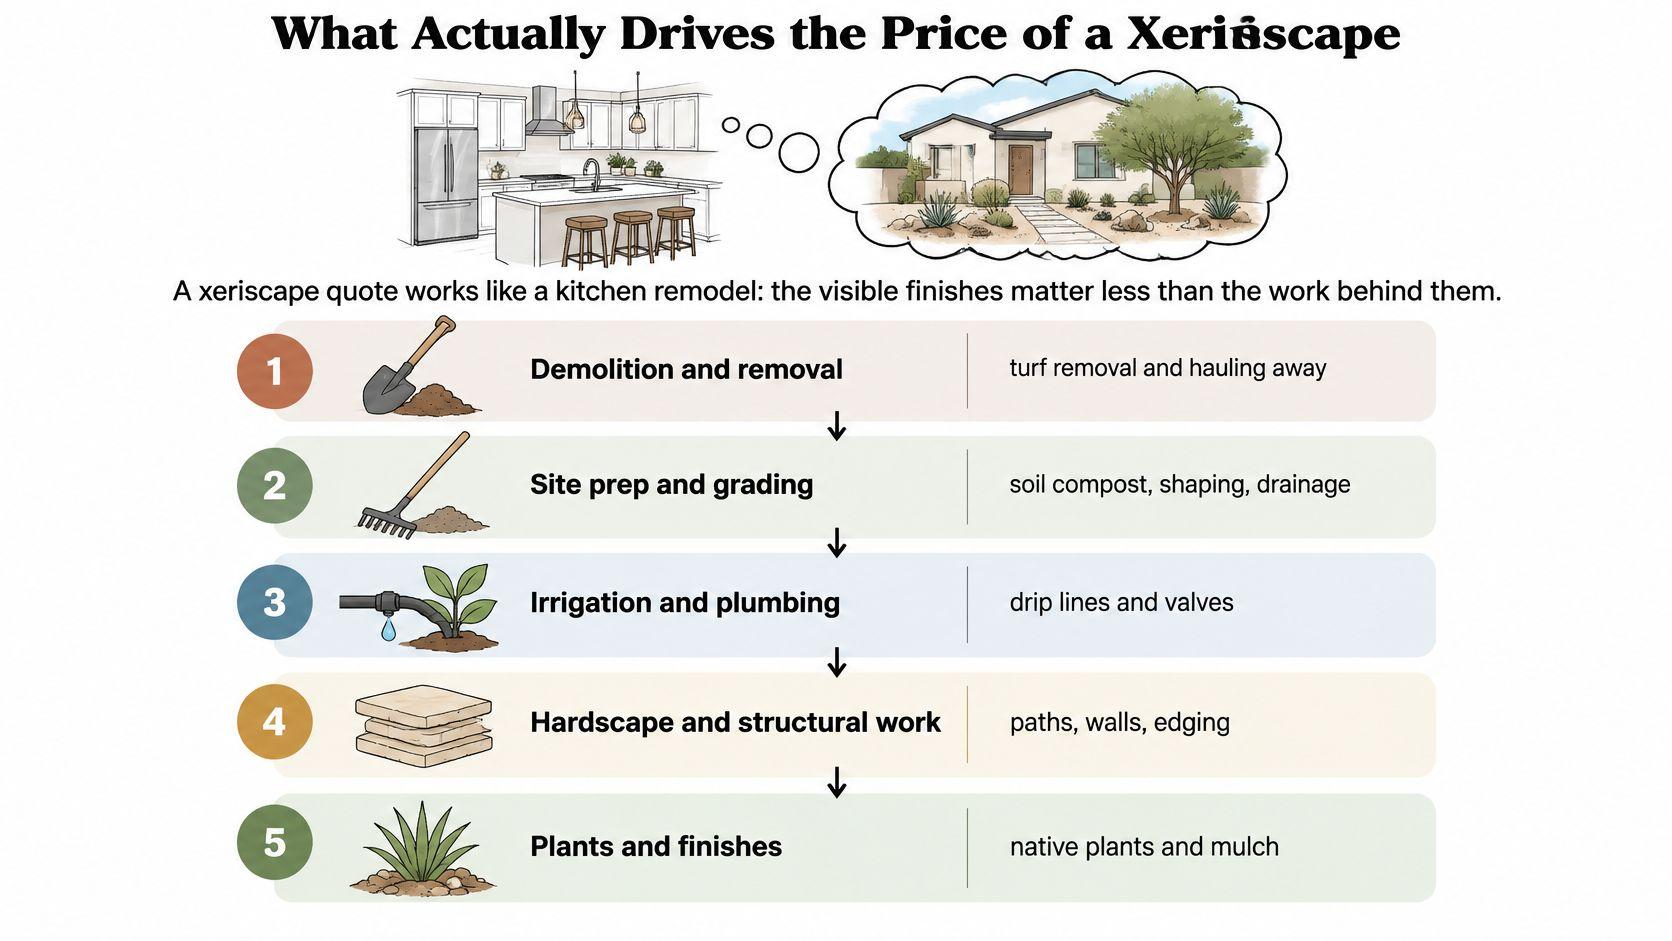
A xeriscape quote works like a kitchen remodel: the visible finishes can matter less than the demolition, plumbing, and structural work behind them. Choosing inexpensive plants won't offset extensive excavation or a retaining wall.
The EPA's municipal landscaping guidance places a simple drought-tolerant conversion with little or no hardscape at approximately $3–$4 per square foot, rising to about $20 per square foot for complex installations combining planting, drip irrigation, and hardscape. For the document's planning example, a 1,000-square-foot project therefore spans roughly $3,000–$4,000 to $20,000.
The underlying work explains that spread.
Inspect the site before choosing finishes
Start by checking the work that must happen before planting:
- Demolition and removal. Identify turf, old edging, unwanted beds, concrete, and debris that must leave the property. Ask whether loading, hauling, and disposal are included.
- Grading and drainage. Mark depressions, erosion, and runoff toward buildings. Don't approve decorative finishes before a contractor explains how water will move through the site.
- Soil preparation. Test the soil and assess compaction before ordering amendments. Don't prescribe compost uniformly when the plant palette and existing soil may call for different preparation.
- Plant maturity and density. Compare container sizes, quantities, and mature spacing. A proposal for closely spaced mature shrubs isn't equivalent to one using smaller plants with room to grow.
If the conversion follows tree removal, use the Richmond Tree Experts GA replanting tips to help frame questions about the former tree area before placing new beds. Have an arborist assess remaining roots or tree-related risks rather than treating that ground as an ordinary planting surface.
Separate infrastructure from landscaping
Irrigation changes deserve their own scope: retained valves, abandoned spray heads, new drip zones, controls, and testing. Hardscape deserves another, including excavation, base preparation, edging, delivery access, and installation.
For a patio component, compare what homeowners pay for stone patios instead of spreading its cost across unrelated planting beds.
Keep usable soil and existing paths where they're suitable. Ask contractors to price irrigation and masonry separately, then request an alternate without optional hardscape. For a construction-heavy design, reducing the amount of new paving or wall work is the clearest lever to test before cutting the planting budget.
Professional Installation Versus DIY Costs
The same 500-square-foot conversion can carry a very different cash cost depending on who does the work and what the estimate includes. Angi's xeriscaping cost guide puts labor at approximately 60%–75% of a professional project. DIY lowers the bill by replacing paid labor with your own time, while materials and equipment remain expenses.
Albuquerque's Xeriscape 101 brochure gives a local municipal benchmark: professional installation costs about $1.00–$4.00 or more per square foot, and homeowners who install after obtaining a plan can save 50% or more. The same guidance estimates irrigation conversion at about $0.60 or more per square foot professionally and about $0.20 per square foot for DIY.
Professional versus DIY cost by line item
| Cost line | Professional | DIY |
|---|---|---|
| Basic installation | $1.00–$4.00 or more per sq. ft., according to Albuquerque's Xeriscape 101 brochure | 50% or more in potential savings after obtaining a plan, according to the same municipal guidance |
| Irrigation conversion | About $0.60 or more per sq. ft., according to the same municipal guidance | About $0.20 per sq. ft., according to the same municipal guidance |
| Labor share of total | Approximately 60%–75%, according to Angi's xeriscaping cost guide | Homeowner labor replaces the paid labor included in a professional project |
| 500 sq. ft. project | Match the bid's scope and materials to the DIY estimate before comparing | $1,288–$4,317, according to Xeriscaping.com's 2026 estimate |
These figures use different cost bases, so they are not a single standardized price range. A per-square-foot benchmark, an irrigation-conversion estimate, and a project estimate may cover different work. Compare the same area, materials, and scope before judging the difference.
Where homeowner savings stop
Plants, mulch, drip components, delivery, disposal, and rented tools still require cash. A sod cutter may speed up turf removal, but the homeowner still supplies the time and effort to remove it, move materials, and prepare planting beds.
Hire for the consequences of a mistake, not just the difficulty of the task.
A hybrid approach can keep planting and mulching in the DIY budget while assigning drainage changes, structural masonry, or irrigation work to a contractor when you cannot confidently design or test them. Use a licensed professional for electrical work and an appropriately qualified arborist to assess a tree with structural risk.
The order of work affects both cost and rework: address drainage and soil preparation first, complete buried infrastructure next, then plant in a suitable local season and mulch. DIY offers a lower cash cost when you have the time, skills, and physical capacity. The actual saving is smaller when unpaid labor is scarce or the work requires correction.
Three Real Budget Scenarios Compared
The following scenarios are illustrative purchasing decisions, not documented homeowner invoices. They show how the same xeriscaping label can describe very different projects.
The visual comparison helps separate yard scale from installation complexity.
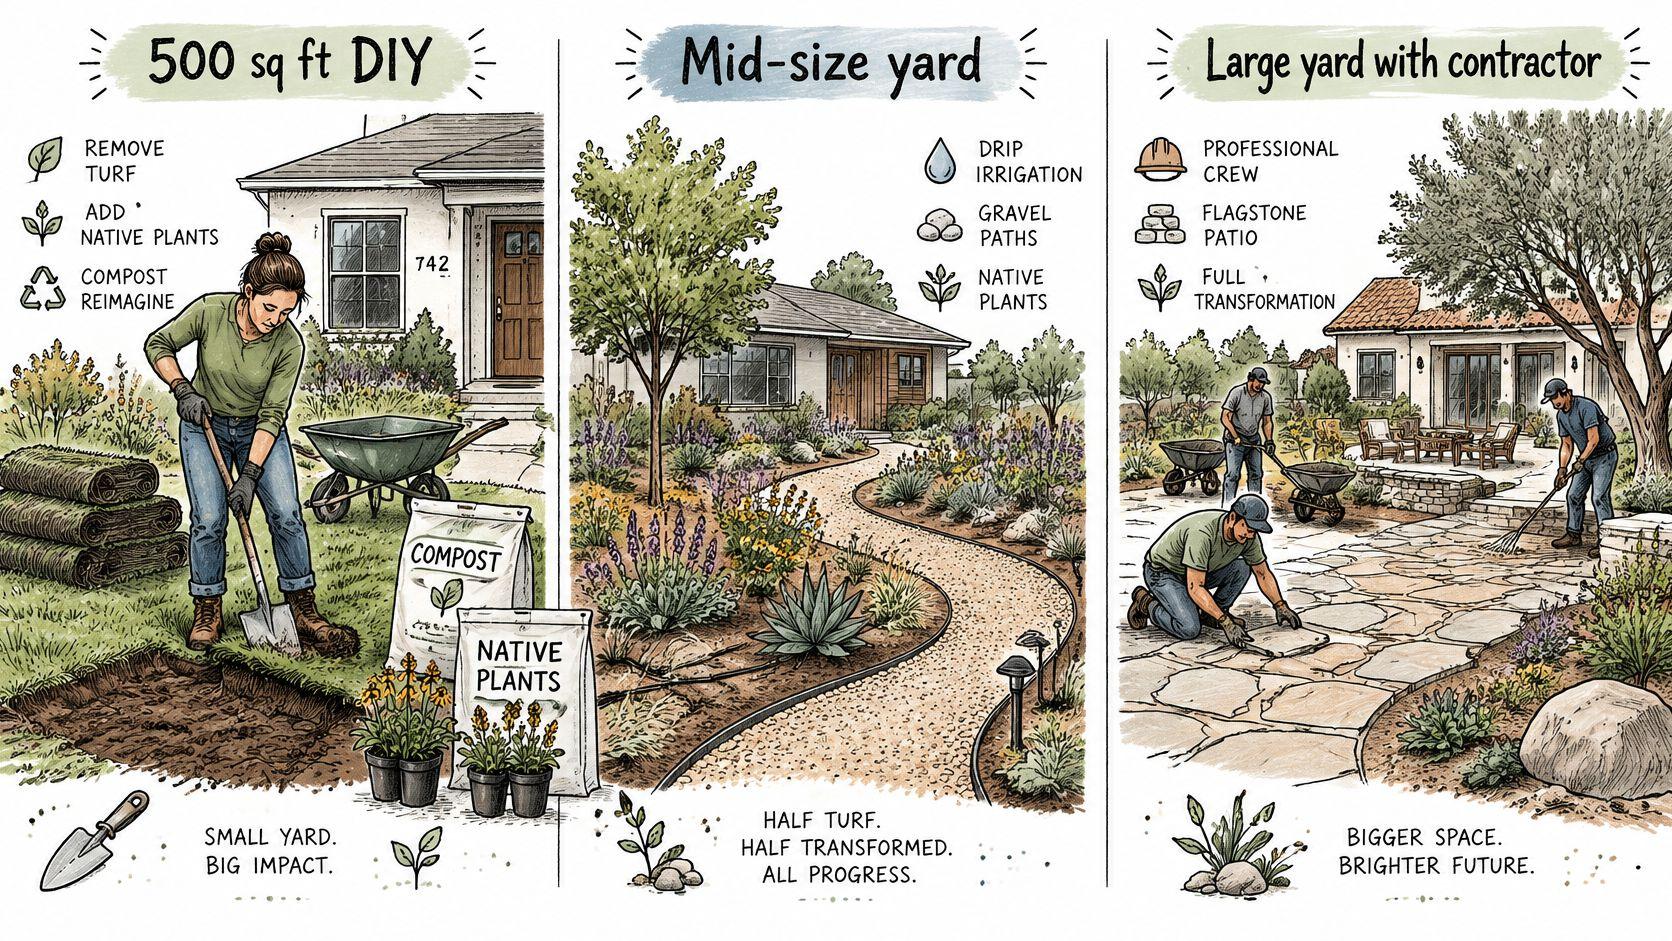
The owner-installed front garden
A homeowner converts a compact front lawn into locally appropriate plants and mulched beds. The cash budget contains turf-removal equipment, disposal, soil preparation where needed, plants, mulch, and irrigation components.
The owner avoids a turnkey labor bill but accepts responsibility for material quantities, scheduling, and installation. Water use must be estimated from the lawn irrigation being removed and the new plants' establishment needs, not from the finished garden's appearance.
The backyard with a patio
Another homeowner retains a functional lawn strip and commissions planting beds, drip irrigation, and a small stone patio. The expensive choices are the new built surfaces and infrastructure, not merely the drought-tolerant species.
This owner should separate the conservation investment from the outdoor-living upgrade. The patio may be worthwhile for everyday use, but charging its entire cost against anticipated water savings creates a misleading test of the planting conversion.
For design alternatives that don't require an elaborate build, consider water-wise yard tips from OutdoorBrite. Ask a contractor to price the simpler layout as an alternate, not as an informal promise to economize later.
A visual walkthrough can also help you identify which features belong in your written scope.
The mid-size turnkey conversion
A household wants one contractor responsible for removal, preparation, planting, irrigation, and cleanup. For context, HomeAdvisor reports a 2025 average project cost of $17,000, with most homeowners spending $5,000–$24,000.
That average isn't a specification. A proposal near it still needs quantities, plant sizes, irrigation details, and exclusions before you can judge value.
The analytical lesson is that scope and labor responsibility explain more than the project label. If the desired design exceeds the available cash, commission a complete, workable planting phase rather than scattering unfinished work across the property.
Water Savings and Payback Over Time
Xeriscaping can reduce water use without quickly recovering its installation cost. Gallons saved aren't dollars saved until you apply your utility's actual billing rules.
A Texas Water Development Board report found that buffalograss or no-grass yards consumed, on average, 31% less water than St. Augustine-grass yards, approximately 175 gallons per day per residential unit. The report's rebate analysis also produced negative returns under conservative assumptions and positive returns under optimistic assumptions, summarized below.
Payback outcomes under two savings assumptions
| Assumption set | Return per installed unit in the report | Payback pattern |
|---|---|---|
| Conservative water savings | Negative return of $82–$150 | Savings may not recover costs within the evaluated assumptions |
| Optimistic water savings | Positive return of $253–$475 | A more favorable outcome when the assumed savings materialize |
Those returns aren't annual household savings, and they aren't a universal homeowner payback schedule. Their value is in showing that the economic conclusion changes when the assumptions change.
The EPA's water-efficiency guide reports that native and drought-tolerant water-wise plantings can reduce supplemental irrigation by more than 50%, and cites a Colorado Springs comparison with 22%–63% less water use than traditional turfgrass. Establishment irrigation during the first one to two years also belongs in the budget rather than being ignored when forecasting savings from mature plantings.
Calculate savings from avoidable charges
Use the portion of your water bill that changes with consumption. A fixed service charge won't disappear because you irrigate less, and tiered rates mean the value of the saved water depends on which billed usage you eliminate.
Simple payback = net upfront cost ÷ expected annual net operating savings
Include eligible rebates in net upfront cost. In annual savings, include avoided water and documented maintenance spending, then subtract expected new irrigation upkeep, plant replacement, and maintenance expenses.
Payback check: Don't count the value of your own mowing time as a cash saving unless you clearly separate it from money you currently spend.
If annual net savings are negligible or negative, the project doesn't have a useful simple financial payback under those assumptions. It may still serve conservation, appearance, or usability goals, but those are separate reasons to proceed.
Before counting any return, use your local utility rate, verified rebate eligibility, and a realistic irrigation plan. A regional water-saving percentage alone can't tell you what your household will save.
Build Your Budget and Lock In Quotes
A useful answer to “How much does xeriscaping cost?” ends with a worksheet, not a national average. Your worksheet should distinguish cash you'll spend, labor you'll contribute, incentives you can receive, and operating savings you can reasonably expect.
Keep estimates provisional until the site and scope have been reviewed. A precise-looking total built from incomplete quantities is less useful than an honest allowance with clearly identified unknowns.
The process below turns the design into something contractors can price.
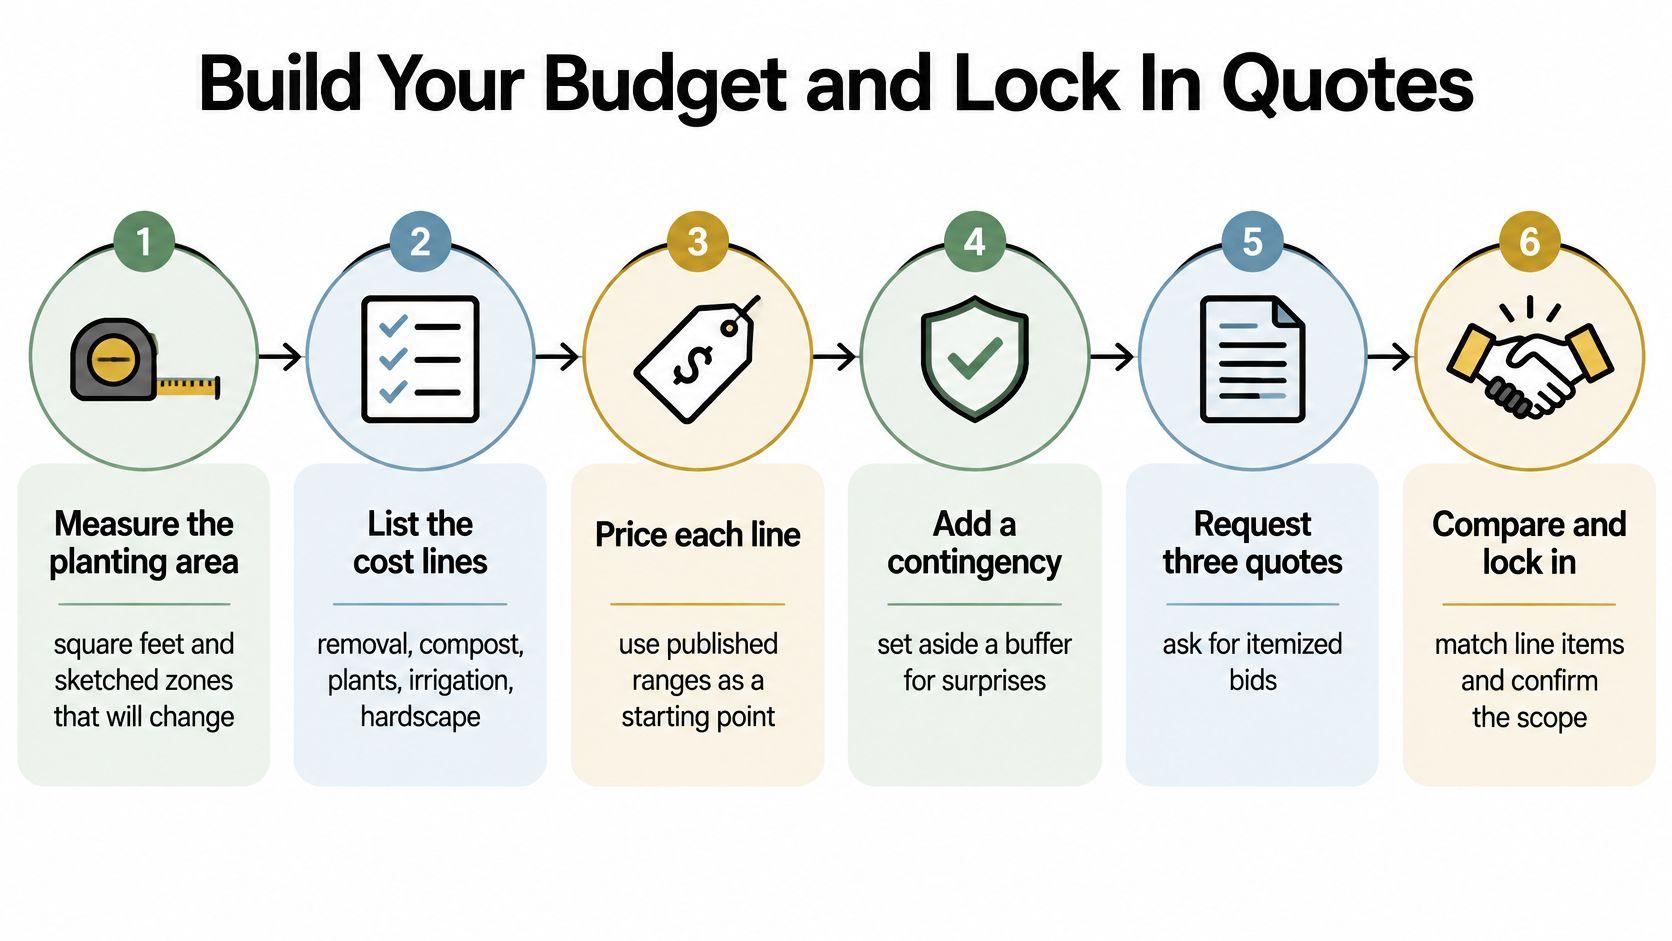
Turn the idea into a priced scope
-
Measure the area that will change. Use a tape measure or measuring wheel and sketch the conversion boundaries. Separate retained lawn, planting beds, paths, and patios so you don't price an unchanged area as new work. For an irregular bed, divide the outline into simple shapes and record how you calculated the area.
-
List every cost line. Include removal and disposal, grading, soil amendment, plants, mulch or rock, irrigation conversion, hardscape, permits where applicable, and labor. Add delivery and equipment access requirements. This prevents an attractive planting allowance from concealing necessary preparation work.
-
Price the components separately. Use published ranges only as an initial screen, then replace allowances with local supplier prices and written contractor estimates. Specify plant quantities and container sizes, mulch coverage, and the proposed irrigation scope. Give masonry its own subtotal so you can remove an optional path without guessing how much the planting budget changes.
-
Subtract only confirmed savings. Record a rebate after checking eligibility, application timing, inspections, and payment conditions with the program administrator. Deduct homeowner work only when the contractor's revised proposal excludes that work. Don't subtract a general labor percentage from a turnkey bid and assume the contractor will accept the result.
-
Add establishment and uncertainty allowances. Budget for the watering needed while plants establish, plus clearly identified unresolved conditions such as buried debris or uncertain access. Ask the contractor how concealed conditions will be documented and approved. An allowance should have a purpose, not function as an unexplained addition to the contract.
-
Test the ownership economics. Compare the net upfront expenditure with your expected annual operating savings and your intended ownership horizon. Keep a separate line for optional lifestyle improvements so you can see whether the water-saving conversion itself meets your financial objective.
Use a worksheet that exposes omissions
A compact worksheet makes revised designs easier to compare. Leave a line unresolved until someone has priced it rather than entering a token amount that makes the total look complete.
| Budget line | What to record |
|---|---|
| Removal | Area, materials removed, hauling, disposal |
| Site preparation | Grading limits, drainage work, soil preparation |
| Plants | Species, quantities, container sizes, substitutions |
| Ground coverage | Material, installed coverage, edging |
| Irrigation | Retained equipment, conversion work, controls, testing |
| Hardscape | Dimensions, materials, base preparation, installation |
| Professional services | Design, permits where applicable, specialist review |
| Homeowner work | Exact tasks excluded from the contractor's scope |
| Incentives | Eligibility, approval status, payment conditions |
| Operating costs | Establishment watering and expected ongoing upkeep |
Don't count DIY labor twice. If you're starting with a materials-only estimate, paid installation labor is already absent. Subtracting an additional labor allowance would understate your cash requirement.
Similarly, an approved rebate can reduce the eventual net cost without reducing the amount needed to pay the contractor upfront. Keep cash required to start separate from cost after reimbursement.
Request comparable written bids
Send the same sketch, plant schedule, and scope to competing contractors. Ask each to identify exclusions and proposed substitutions rather than pricing a different project.
- Match quantities. Confirm that each proposal covers the same conversion boundaries, plant counts, and hardscape dimensions.
- Define completion. Include hauling, irrigation testing, cleanup, and any agreed establishment instructions.
- Clarify responsibility. Identify who obtains permits, confirms utility locations, and handles required inspections.
- Control changes. Require written approval of extra work and its price before it proceeds.
- Check uncertain items. Ask whether excavation, disposal, access, or drainage allowances can change after work begins.
An outlying bid isn't automatically wrong. Ask whether it reflects missing work, different materials, difficult access, or a misunderstood design before accepting or rejecting it.
Our OutdoorBrite design tool works from your own yard photo, not a stock yard, helping you show contractors the intended appearance. You can save a redesigned patio, compare it with the original photo, and share it for a quote, but the image shows appearance rather than price.
We don't replace an architect, designer, contractor, arborist, or horticulturist. Before spending money or starting work, verify feasibility, plant suitability, materials, drainage, utilities, permits, and cost with a qualified professional.
Proceed when the written scope fits your budget and the financial assumptions fit your ownership plans. If they don't, remove optional construction or divide the work into complete, practical phases rather than relying on uncertain water savings to cover an oversized contract.
Use our xeriscape design tool to compare planting and layout ideas on a photo of your own yard before committing to materials. Visit OutdoorBrite, save a concept that fits your priorities, and bring it alongside your itemized worksheet when requesting contractor quotes.
See your yard reimagined
Start creating