
Landscape Design from Photos: Your AI Guide to a New
Transform your outdoor space with landscape design from photos. Our AI guide helps you visualize and plan a stunning backyard makeover.
Saturday morning, coffee in hand, you walk into the backyard and see the same tired lawn, aging fence, and unfinished patio you've been ignoring for years. You know the space could feel better, but moving from a vague idea to a design you can build has always seemed expensive and complicated.
Designing from photos changes the first step. Instead of starting with a blank page, you start with the yard itself. A photo-based design tool can help you test layouts, materials, planting styles, and outdoor features against the actual setting before you buy anything or schedule construction. The render is only the beginning, though. The useful question isn't just, “Does this look good?” It's, “What must be verified before this idea becomes a buildable plan?”
Table of Contents
- Why a Single Yard Photo Can Start a Whole Redesign
- How AI Reads Your Photo and Imagines a New Yard
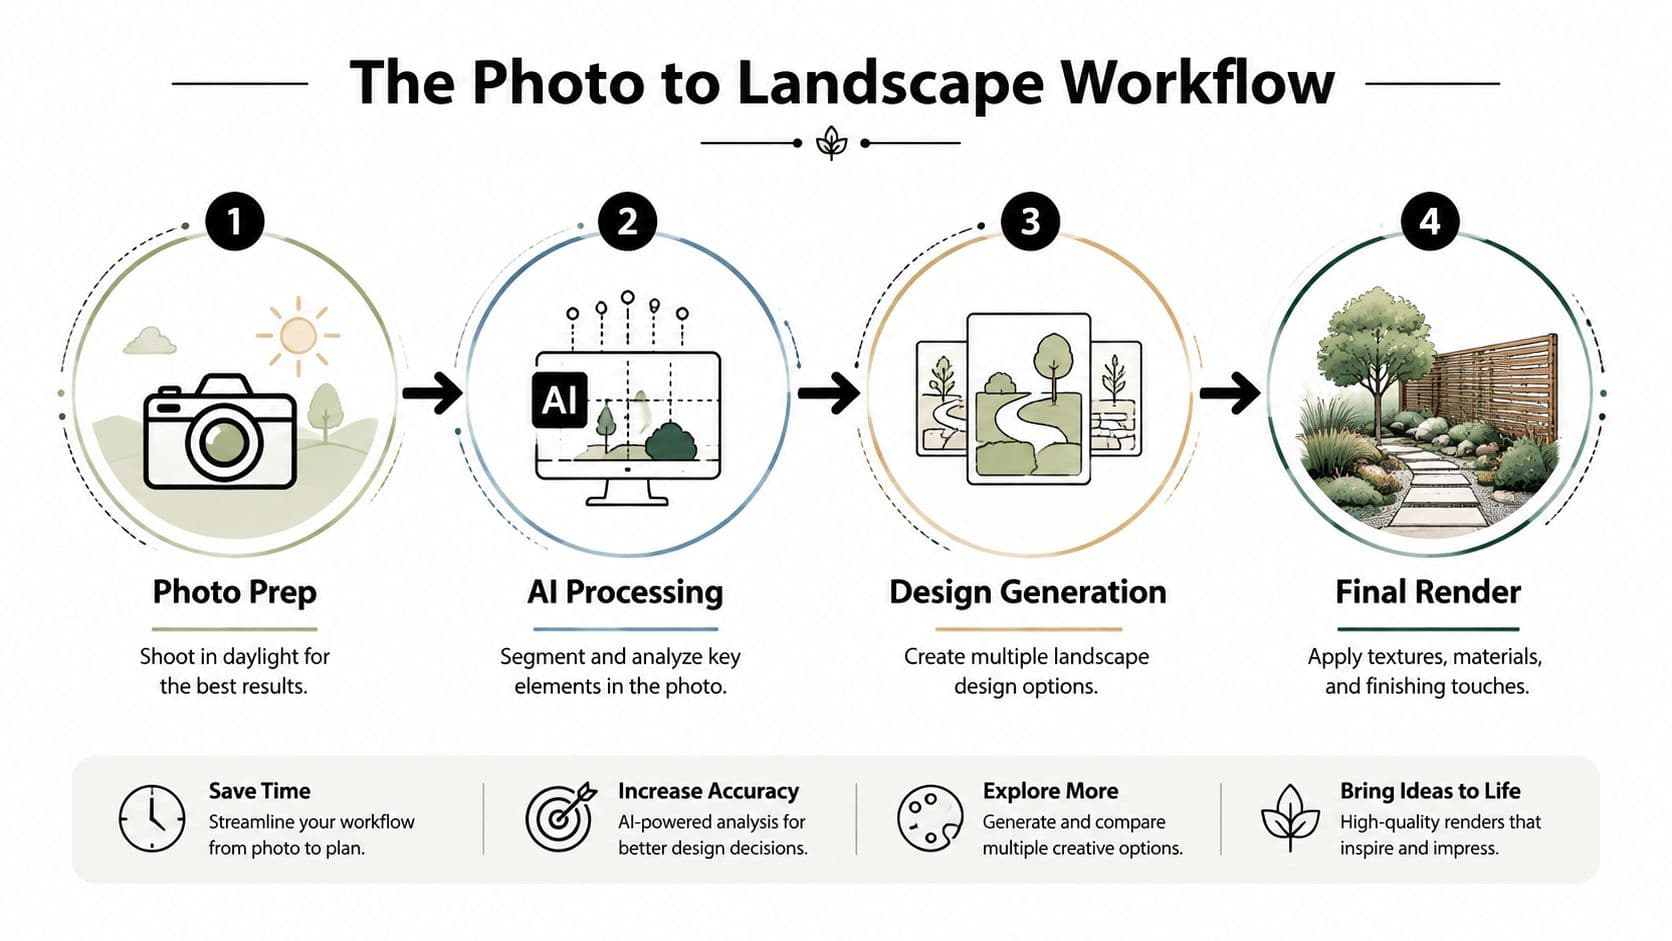
- The Photo to Landscape Workflow From Start to Finish
- Who Uses Landscape Design From Photos and Why It Works
- What Your Photo Cannot Tell You About the Site
- Best Practices for Getting Better AI Landscape Results
- Choosing a Design That Holds Up Long After the Render
- Your Next Step From Inspiration to Buildable Plan
Why a Single Yard Photo Can Start a Whole Redesign
A phone photo gives you something an inspiration board can't: a design conversation anchored to your actual property. The fence, patio edge, house wall, mature tree, and available planting areas all remain in view. That context helps you judge whether a contemporary terrace, cottage border, fire pit, or wider path belongs in the space you own, rather than in someone else's garden.
This visual approach has deep roots in horticultural practice. The Frederick Law Olmsted National Historic Site archive includes photo albums dating from 1867 to 1978, documenting existing conditions, grading, construction work, new plantings, and completed outdoor spaces in the same collection. Those images weren't only promotional pictures. They helped record change and compare conditions over time, which makes modern photo-based redesign part of a longer tradition of using images to plan and verify outdoor work. The Olmsted archives offer a useful historical example.
From vague frustration to visible options
Suppose your backyard has a rectangular patio that feels disconnected from the lawn. You could describe the problem to a designer, collect pictures of patios you like, and try to explain how those ideas might fit. Or you could upload a clear yard photo and ask for several directions, such as a larger entertaining area, a planted transition zone, or a more naturalistic garden edge.
That doesn't eliminate professional design. It makes the early conversation more concrete. You can compare a restrained planting bed with a more ambitious layout, notice which features repeatedly appeal to you, and identify ideas that clearly don't suit the house.
Practical rule: Use the first render to discover what you want to discuss, not to approve construction.
Visual communication has long shaped how people understand outdoor environments. Harvard's American landscape and architectural design study collection contains approximately 2,800 lantern slides covering landscape and architectural work from 1850 to 1920, including parks, estates, gardens, plans, maps, and models. The Library of Congress collection record shows that image-driven landscape communication predates current software by generations.
If your goal is to create a stunning patio, a photo-based concept can help you think through its relationship to seating, circulation, planting, and the rest of the yard before the project becomes a purchase list.
How AI Reads Your Photo and Imagines a New Yard
An AI design tool doesn't understand a yard in the same way a person does. It processes visual patterns in layers, and each layer supports a different part of the final composition.
The first layer separates the scene
The process usually begins with semantic segmentation. Think of it as digital color-by-numbers. The system labels parts of the image as sky, structures, hardscape, softscape, or existing vegetation. This separation helps it distinguish a fence from a hedge, a patio from a lawn, and a window from an area where a new planting bed could go.
That distinction matters because an unrestricted edit can place plants over windows, alter a roofline, or erase a bed you intended to keep. Zone separation gives the model a map of what's already present and where changes are more appropriate. ArchitGPT's explanation of AI landscape generation describes segmentation and depth estimation as important parts of photo-based design workflows.
Depth keeps additions tied to the property
The next layer estimates depth, or the approximate distance between the camera and objects in the yard. A simple analogy is your own eyesight. You know a nearby planter is smaller than a distant tree because your brain reads perspective and distance together.
AI uses similar visual cues to place paths, terraces, planting masses, and furniture more consistently. Depth estimation can help preserve the apparent slope and perspective of the original image, although it can't replace a survey or site measurement. A photo with strong context, clear lighting, and an eye-level viewpoint gives the system better clues. Heavy shadows, poor exposure, and clipped highlights make those clues harder to interpret.
Generation and blending create the proposal
Once the image has been divided into zones and interpreted spatially, a generative model can introduce new features. It may add a pergola where the patio meets the lawn, reshape a bed, or replace a large area of grass with layered planting. A style layer then adjusts colors, textures, materials, and lighting so the additions belong visually to the photograph.
The final image can look convincing because the system blends shadows, edges, and surface textures. That visual coherence is useful for comparing concepts, but it can also hide uncertainty. A rendered retaining wall may look perfectly natural while the actual slope, drainage, footing, or access conditions remain unknown.
For a visual overview of the process, this video introduces the broader idea of transforming an existing outdoor image into a design concept:
The Photo to Landscape Workflow From Start to Finish
A successful project usually follows a repeating rhythm: prepare the image, choose a direction, generate a concept, then refine it. The quality of the result depends on what you do before pressing the generate button.
Start with a photo that shows the yard's bones
Take the main photo from approximately eye level, with the camera held steady and the horizon reasonably straight. Use daylight that reveals the patio edge, fence line, planting beds, and relationship between the house and open space. Include enough of the surroundings for the tool to infer scale and placement.
A clear, slightly angled exterior image often works better than a dramatic close-up. Industry guidance recommends a sharp source photo with a known dimension, full-area framing, and useful site context. One guide identifies approximately 3000 pixels on the long side as an ideal source-photo size. ReimagineHome's photo guidance explains why resolution and measurable references support more believable proportions.
Remove temporary clutter where possible. A hose, vehicle, stack of pots, or oversized chair can confuse the visual reading of the space. Keep permanent features visible, because those are the constraints you want the concept to respect.
Choose a design language that fits more than your taste
Next, select a style such as modern minimal, cottage garden, Mediterranean, Japanese-inspired, or xeriscape. Style affects more than color. It influences plant density, path geometry, materials, furniture, and the amount of visual maintenance the design implies.
A desert-inspired concept might look appealing in a dry climate but feel out of place in a shaded, wet yard. A lush cottage composition may suit the architecture but require more pruning and irrigation than you want to provide. Treat style selection as a design hypothesis, not a final commitment.
OutdoorBrite is one option for ai garden design software, allowing users to begin with a garden or yard photo and explore visual concepts rather than designing from an empty canvas.
Generate, inspect, and refine
The first render should answer broad questions. Does the circulation make sense? Does the patio feel proportionate? Is the planting concentrated where you want it? Are the new elements attached convincingly to the existing structure?
Then refine one issue at a time. Ask for a narrower path, a smaller seating area, a lower hedge, a drought-tolerant border, or a different material palette. Tools that support masking or no-go zones can constrain changes to selected areas, which reduces the chance that an edit rewrites unrelated parts of the scene. Save the versions that remain believable after scrutiny.
The winning render isn't the one with the most features. It's the one that gives a builder, nursery professional, or designer something specific to react to.
This workflow also applies beyond private gardens. Teams planning commercial outdoor environment transformations can use visual concepts to communicate intended circulation, planting character, and outdoor-use areas before moving into detailed design and construction documents.
Who Uses Landscape Design From Photos and Why It Works
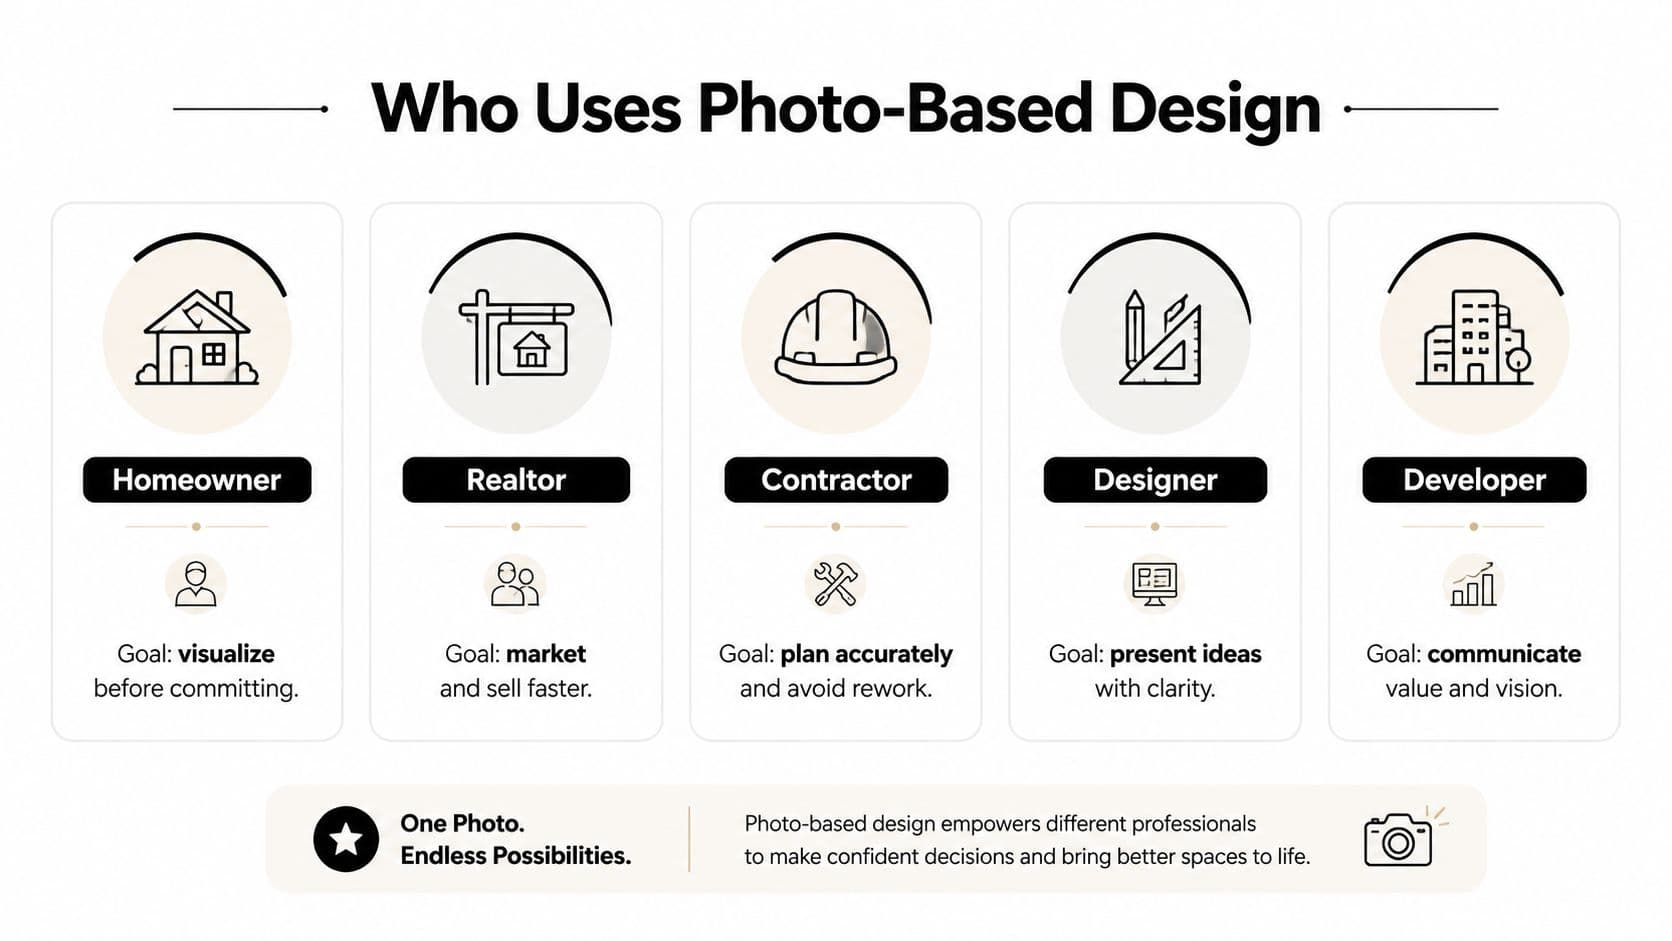
The same image-based tool serves different users because each person needs a different kind of certainty. A homeowner wants to avoid an expensive mistake. A contractor wants a clearer client conversation. A seller wants buyers to see potential without pretending the work has already been completed.
Homeowners and DIYers
A first-time homeowner might upload a tired backyard to compare patio arrangements, planting palettes, and screening ideas. The useful output isn't a construction drawing. It's a shared reference that helps the household agree on a direction before contacting a contractor.
A committed DIYer may take the process further by testing several versions of the same bed or seating area. The strongest render can become a rough build reference, provided the user checks dimensions, materials, drainage, and plant suitability separately.
Professionals and contractors
A professional can use an existing site photo to show a client how a proposal might change the property's character. That makes an early sales conversation easier to follow, especially for clients who struggle to interpret plan-view drawings.
Contractors can also use the image to identify questions before pricing. Where should the path connect? Does the client expect a retaining wall? Is the planting intended to screen a neighbor, frame a view, or soften a hard edge? A render helps expose those decisions.
Sellers and new-build owners
A seller or real estate agent may use a concept to communicate curb-appeal potential, but the image should be labeled clearly as a proposal. Buyers need to distinguish an imagined improvement from an installed feature.
New-build owners face the opposite condition. Instead of renovating an established yard, they're starting with raw soil, unfinished grades, or a blank perimeter. Photo-based design can help them test how the home might relate to a future lawn, courtyard, kitchen garden, or low-maintenance planting scheme.
Across all five groups, the strength is the same: the design stays attached to a real view of the property. That makes conversations more concrete, but it doesn't make the image a substitute for fieldwork.
What Your Photo Cannot Tell You About the Site
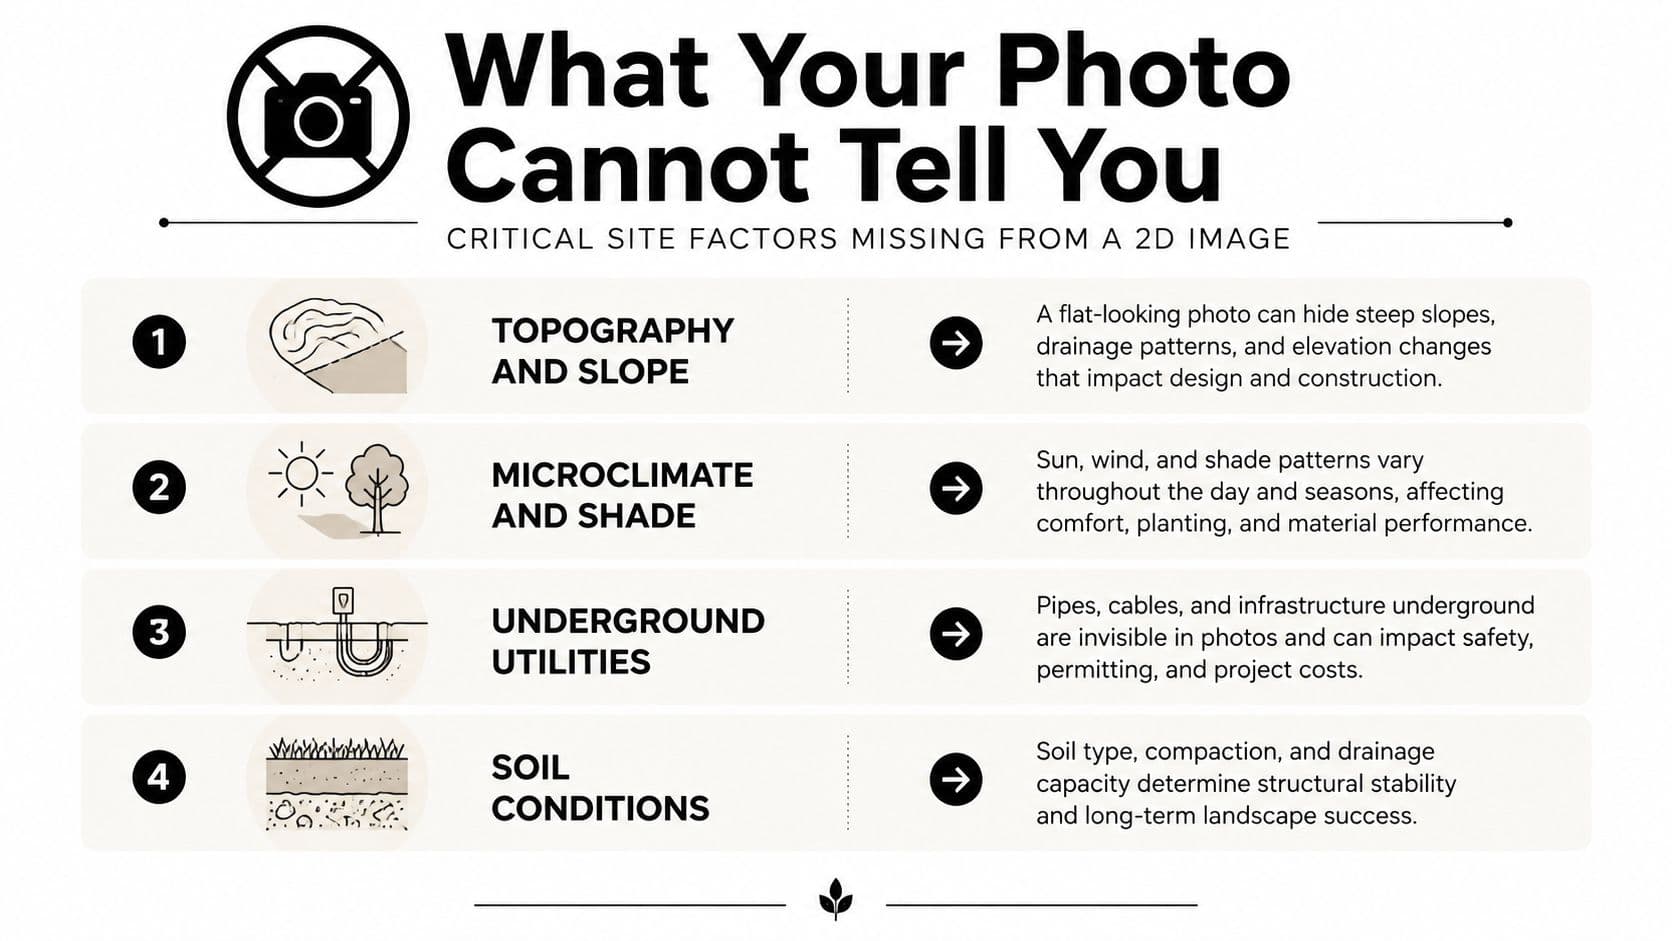
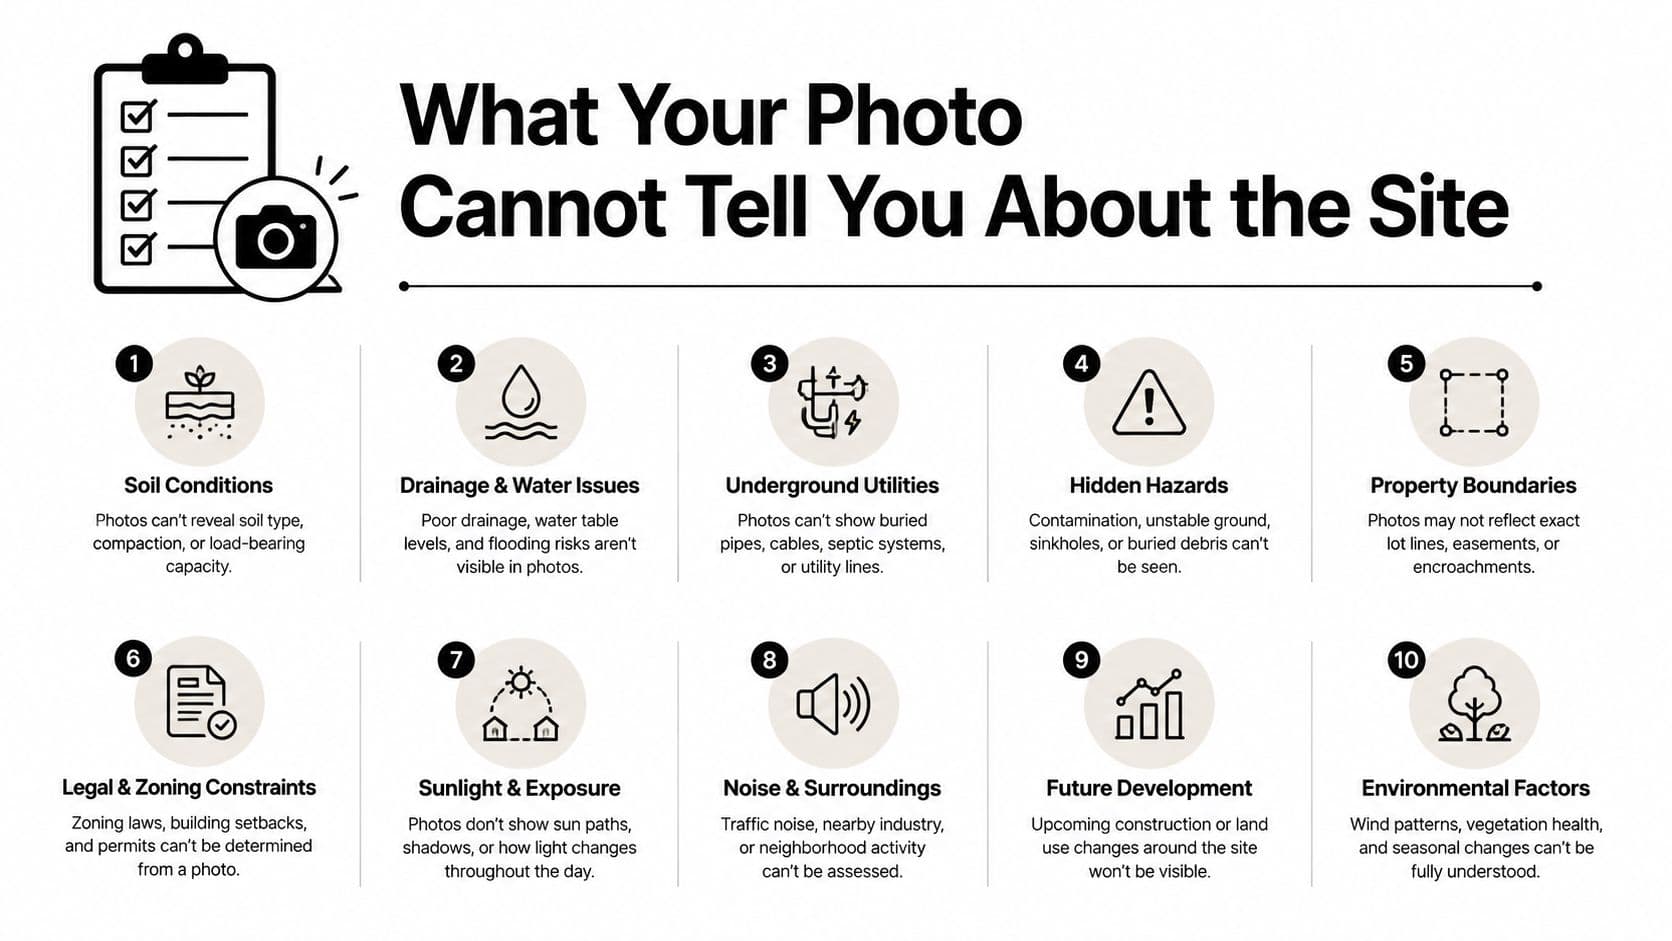
A photograph captures appearance, not performance. It can show a wet-looking patch, but it can't tell you whether that area receives runoff from an uphill neighbor, has compacted soil, or just reflects recent rain.
Grade and water movement
Slope is easy to underestimate in a single frame. A patio that looks level may drain toward the house, while a lawn that appears flat may carry water toward a planting bed. Before pricing excavation, paving, or retaining work, walk the site after rain if possible and look for pooling, erosion, damp foundation edges, and muddy transitions.
If the concept introduces terraces or a new lawn plane, review practical resources on swales and slopes for homes. The image can suggest where a grade change might look attractive, but a professional must determine how water will move and where structures can safely sit.
Sun, shade, and local growing conditions
A midday photo records one moment. It doesn't reveal how shade shifts across the yard, how a wall stores heat, or whether a proposed planting zone receives enough light for the plants shown. Note the sun at different times, especially in areas intended for vegetables, flowering plants, seating, or turf.
Climate also affects the design's durability. Plant hardiness, wind exposure, seasonal rainfall, drought risk, and irrigation access all influence whether the rendered palette will thrive. A plant that looks ideal in the image may be poorly suited to your region or maintenance preferences.
Invisible boundaries and buried infrastructure
Setbacks, easements, property lines, utility routes, existing irrigation, and mature tree roots won't appear reliably in a photo. Verify those conditions before placing a large tree, digging for a fence, installing footings, or widening a paved area.
Site check: Treat every rendered object as a suggestion until its location has been checked against grade, utilities, boundaries, and existing infrastructure.
Soil is another hidden variable. A simple probe can reveal compacted layers, shallow soil, or rock, while a soil test can inform amendments and plant selection. The render helps you decide what you'd like the space to do. On-site verification tells you what the property can support.
Best Practices for Getting Better AI Landscape Results
Output quality usually reflects three inputs: the photo, the prompt, and the refinement process. Improve those inputs and the design becomes easier to evaluate.
| Step | Do | Don't |
|---|---|---|
| Photo | Use clear daylight, standing-height framing, and enough context to show the full yard. | Don't rely on fisheye views, twilight images, glare, clutter, or clipped highlights. |
| Prompt | Name the yard zone, design style, intended use, materials, and planting character. | Don't write “make it nice” and expect the tool to infer your priorities. |
| Refinement | Request focused changes, such as a smaller patio or drought-tolerant border. | Don't chase a perfect result in one generation or change every element at once. |
Better photos produce better decisions
A sharp photo with the whole relevant area in frame gives the system more information about relationships and proportions. Include the house, fence, existing hardscape, major trees, and the edges of the space you want to redesign. If a feature must remain, make sure it's visible rather than hidden behind furniture or shadows.
Take additional views when one image can't show the site clearly. A front-facing photo might explain the patio, while an angled view reveals the side passage, fence relationship, or slope. Multiple views can support discussion even if the tool generates from one primary image.
Specific prompts reduce guesswork
A useful prompt describes where, what, and why. For example, ask for a low-maintenance planting border along the fence, a compact seating area near the existing patio, and a clear path from the back door to the lawn. Add the preferred material character and the amount of visual density you can maintain.
Avoid contradictory instructions. “Minimalist” and “lush, densely planted, highly layered” suggest different outcomes. Start with one clear direction, then test alternatives.
Refine in controlled edits
Treat the first image as a draft. Keep the features that work, then isolate the weak points. Change the patio size without changing the planting palette. Test a lower screen instead of replacing the entire boundary. Ask for native or drought-tolerant planting where regional suitability matters, then verify the specific plants independently.
Save prompts that produce useful results. Over time, you'll build a personal record of language that helps you communicate layout, maintenance, atmosphere, and materials more consistently.
Choosing a Design That Holds Up Long After the Render
The most striking render isn't automatically the best outdoor design. A photorealistic yard can look appealing while demanding more watering, pruning, fertilizing, cleaning, and replacement than you want to provide.
A better concept survives four questions:
- Will the plants suit the local climate and hardiness conditions?
- How much regular care will the design require to stay presentable?
- What will the yard look like after fast-growing plants fill the gaps?
- Does the style belong with the home's architecture and surrounding context?
These questions shift attention from novelty to performance. A restrained palette of well-suited plants may look less dramatic in the first image, yet remain healthier and easier to manage. A dense, manicured design may need frequent attention, especially in a region where water is limited or the homeowner has little time for maintenance.
Test the maintenance story
Ask the tool for alternatives that make tradeoffs visible. Compare a lush lawn with a planted or mulched area. Compare tightly clipped hedges with looser screening plants. Compare a high-detail border with a simpler massing scheme. The point isn't to make every yard sparse. It's to see how appearance changes when you give maintenance and water use equal weight.
Long-term cost also includes replacement. Plants that fail in the wrong conditions, paving that settles because drainage was ignored, and structures placed without checking utilities can turn an attractive concept into an expensive correction.
For quantities, surface areas, and material planning, OutdoorBrite's material calculator guide can help connect the visual idea to a rougher project estimate. It won't replace a contractor's takeoff or site measurements, but it encourages you to translate the image into actual materials.
The strongest concept is the one you'll still want to care for after the render stops feeling new.
Use AI to test restraint as readily as extravagance. Ask for fewer materials, wider planting spacing, lower irrigation demand, or a simpler path. The render becomes more useful when it helps you reject attractive ideas that don't fit your life or your site.
Your Next Step From Inspiration to Buildable Plan
Most photo-based guides stop after the first attractive transformation. The practical next move is simpler: turn the image into a short list of questions, measurements, and decisions.
Use one afternoon to create a workable starting package:
- Photograph the yard from several angles. Use clear daylight, include the full area, and keep permanent features visible.
- Measure the features that control the design. Record patio dimensions, fence lengths, door locations, steps, large trees, and any fixed structures.
- Generate an initial concept. Use OutdoorBrite or another photo-based tool to test a layout and style that match your intended use.
- Refine around site realities. Remove ideas that conflict with shade, drainage, boundaries, access, maintenance, or climate.
- Translate the chosen render. Create a preliminary plant list, material list, and rough budget, then ask a qualified professional to check feasibility.
The photo-to-design step is the easiest part. The value comes from pairing it with verification, clear measurements, realistic plant choices, and a construction sequence. Take the render to a nursery, designer, or contractor and use it to ask better questions rather than treating it as a final specification.
That same phone photo that started another weekend of staring at the yard can become the first practical step toward a plan you can explain, price, and build.
OutdoorBrite lets you upload a photo of your yard and explore realistic design concepts with different styles and outdoor features. Visit OutdoorBrite to test your space visually, refine the direction, and turn a promising idea into a clearer starting point for your project.
See your yard reimagined
Start creating