Landscaping Design Elements: Line, Form, Scale and More
Learn the core landscaping design elements: line, form, texture, color, scale and balance, and how to combine them in your outdoor space.
A friend texts you two photos of front yards from the same street. The plant list is nearly identical: boxwood, a pair of small trees, some perennials, a walk to the door. One yard looks settled. The other looks like a nursery delivery that never got unpacked. The difference is rarely the plants themselves. It's how the landscaping design elements are handled: where the bed edge runs, how many plant shapes compete for attention, whether the fence height belongs to the house, and whether the visual weight sits on one side.
You can fix most of that without buying a new shrub. The elements are the parts of a yard you control on purpose: line, form, texture, color, scale, and balance. They behave as a system, so changing one shifts the others. A curved path that slows your walk also changes the form of the bed beside it and the balance of the whole front yard.
Two more things belong in that system, and most guides leave them out. Water has to be designed as infrastructure, not decoration. And the yard has to work for a stroller, a walker, or a bad knee on a wet morning. Get the classic elements right, design the practical ones in, and a low-water yard still looks lush.
Table of Contents
- Six Landscaping Design Elements at a Glance
- Line Form Scale and Balance in the Structure
- Water Management as a Design Element
- Hydrozones That Keep Irrigation Honest
- Texture and Color in Low-Water Planting
- Access and Circulation for Every User
- Three Yards Where Elements Work Together
- Confirm Your Elements on Your Own Yard
Six Landscaping Design Elements at a Glance
Say two neighbors plant the same species in the same soil. In the first yard, the bed edge sweeps toward a bench, one columnar tree anchors the corner, the gravel path matches the flagstone porch, and the fence sits just under the roofline. The second yard has the identical plants but a bed edge that changes direction every three feet, five different shrub silhouettes, three paving materials, and a fence tall enough to hide the house. Same plants, chaotic result.
The six elements are the vocabulary that explains the gap.
| Element | What It Controls | How to Spot It | Example |
|---|---|---|---|
| Line | Direction and movement of the eye | Bed edges, paths, lawn borders | A curved bed leads the eye to a bench |
| Form | Shape and volume of plants and structures | Outline of trees, hedges, pergolas | A columnar cypress against a spreading oak |
| Texture | Coarseness of foliage and surfaces | Leaf size, gravel versus flagstone | Fine grass beside bold hosta leaves |
| Color | Mood and seasonal interest | Bloom timing, foliage tones | Silver foliage cools a hot patio |
| Scale | Size of elements relative to the house and people | Dimensions compared with house height | A 6-foot fence next to a two-storey house |
| Balance | Spread of visual weight across the yard | Matching or deliberate asymmetry | A heavy pergola offset by tall planters |
Copy that table into your phone notes and walk the yard with it. Stand at the street, then at the back door, and ask the same six questions from each spot. You'll usually find one element doing all the damage, and it's rarely color.
The order matters when you start changing things. Structure comes before planting, because no plant combination rescues a path that leads nowhere or a hedge that dwarfs the entry.
Line Form Scale and Balance in the Structure
A straight walk from the gate to the door gives a yard a formal feel. Line guides both movement and the eye: a single curve toward a bench slows the route and suits a cottage border, while several competing curves can make the layout feel uncertain. Choose one clear gesture for each path.
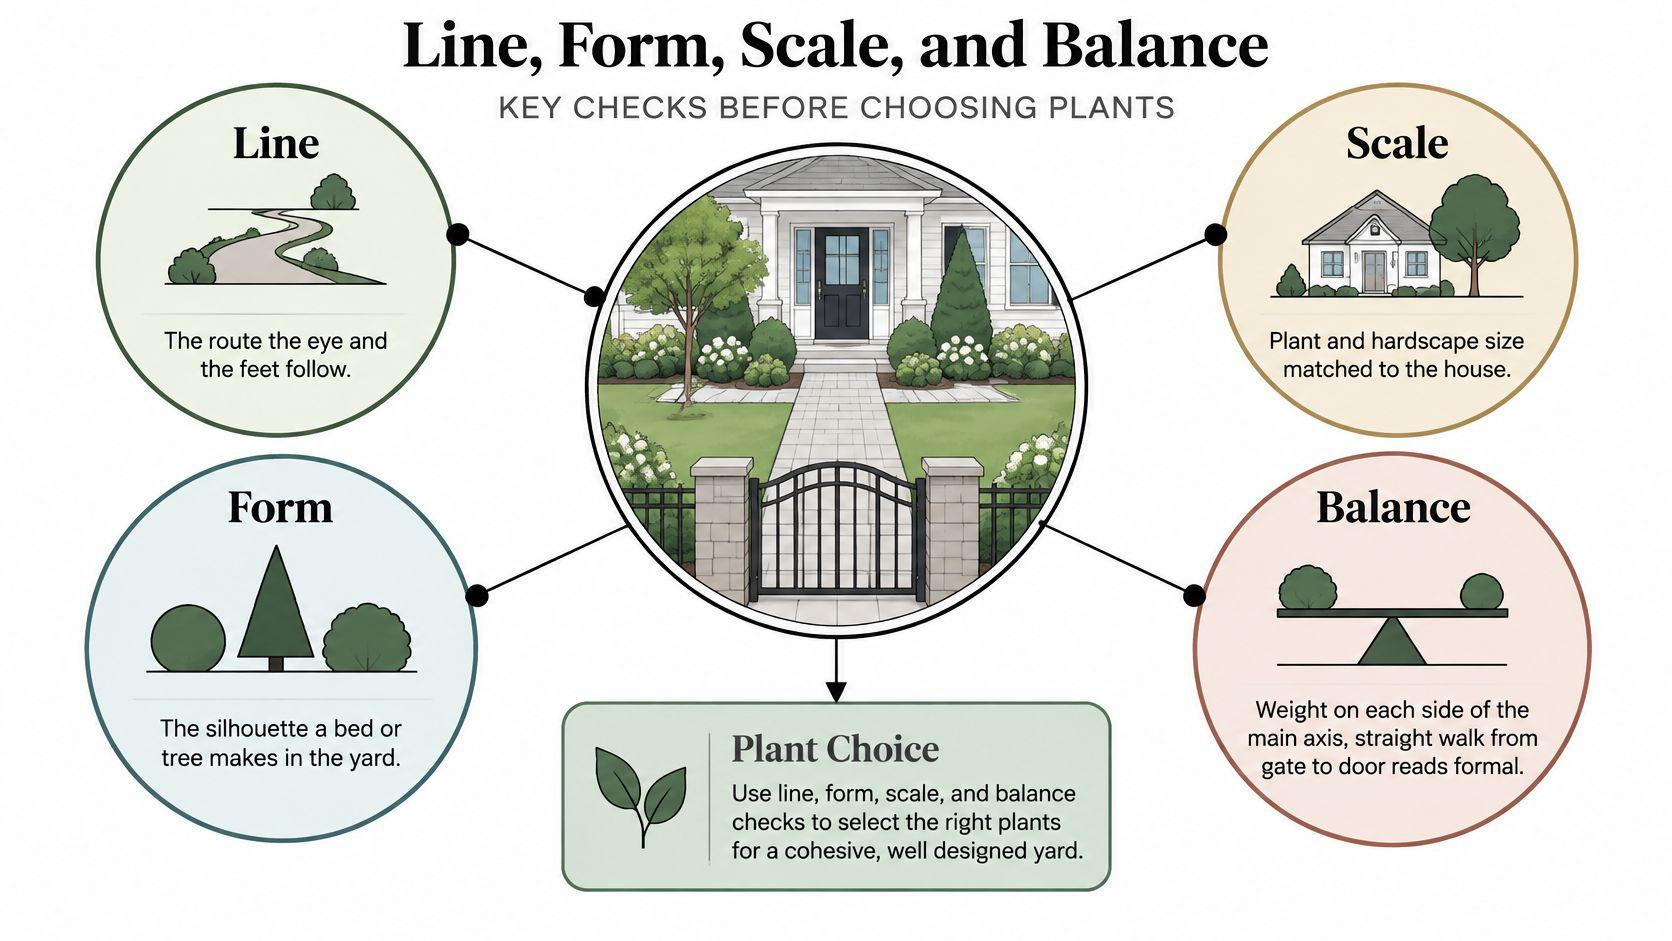
Form is the volume and outline of a tree, hedge, pergola, or urn. Choose two or three dominant shapes for the yard, such as a columnar tree, a clipped hedge, and a square pergola. Repeating those shapes in smaller plants ties the composition together; introducing a new silhouette every few feet can make a bed look like a collection rather than a design.
Scale compares each feature with the house and with a person. A fence that suits a single-storey entry may look undersized against a two-storey wall. A pergola with six feet of clearance feels comfortable to walk beneath; at five feet, it can feel like a doorway that makes you duck. Apply the same comparison to trees: a canopy planted close to a window can eventually dominate the view.
Balance describes how visual weight is distributed. Matching forms on both sides of a path create symmetry. In a small yard, one substantial pergola can balance a group of tall planters on the opposite side, creating an intentionally uneven composition that still feels settled.
Run the four checks on one photo
Garden design has long used geometry, perspective, and proportion to organize movement and views. Egyptian enclosed gardens used controlled water and geometric layouts; Renaissance gardens developed formal geometry, and André Le Nôtre advanced perspective and scale in seventeenth-century France. Later milestones include Olmsted and Vaux receiving the Central Park commission in 1858 and Harvard establishing an academic course in garden design in 1900, according to this survey of landscape architecture's development. The practical questions remain straightforward: where people move, what they see, and how the parts relate in size.
Print a daylight photo of your yard and mark it up in this order:
- Draw the main path as one continuous line from gate to door.
- Mark the two or three dominant forms and circle any shape that appears only once.
- Compare each form with the house and a standing person shown at a similar distance.
- Check the visual weight: mark areas that feel crowded and areas that feel empty.
Four marks on a photo can clarify the structure before you start browsing plants.
Water Management as a Design Element
After a hard rain, water may race off a roof, cross a patio, and collect beside the house. A well-planned yard slows that route and gives runoff somewhere suitable to go. The EPA's green infrastructure guidance describes approaches that use plants, soil, permeable surfaces, and stormwater collection to store, absorb, or return water to the air.
Treat the yard as one connected drainage system. A rain garden can receive roof runoff, permeable paving can let water pass through a patio, and a shallow channel can guide flow alongside a driveway. If you're fixing a yard that never dries, trace where water enters, travels, and settles before choosing a solution.
Sizing a rain garden that actually works
A planted low spot becomes a rain garden when its size, depth, and outlet suit the runoff it receives. The EPA's bioretention and rain garden guidance provides design considerations for planning one.
| Design Factor | Typical Value | Design Implication |
|---|---|---|
| Bed area | About 5–10% of the drainage area | Map roof, driveway, and patio runoff first |
| Filter bed area | More than 3% of contributing impervious area in some state guidance | Treat as a minimum check |
| Design ponding depth | 4–8 inches, kept below 12 inches | Limits plant stress and safety risk |
| Drain-down time | 24–48 hours | Slower draining points to poor soil or an undersized bed |
| Infiltration rate | Below 0.5 inches per hour | Add a perforated underdrain |
| Concentrated inflow | Needs energy dissipation | Add a flow-spreading detail to prevent erosion |
Work through the layout before digging:
- Map the runoff. Mark roof downspouts, driveway slope, patio fall, and the low point where water collects.
- Size the bed for the area draining into it, then check any local minimum filter-bed guidance.
- Set ponding depth and overflow. Plan for temporary storage and a clear route for excess water.
- Test infiltration with a simple holes-and-water check. Slow-draining soil may call for a perforated underdrain beneath the gravel layer.
- Spread the inflow with a stone apron or shallow grass channel to reduce erosion where water enters.
Water features also affect how a yard feels. A fountain can add movement near a patio, while a pool feature may combine water with fire; compare fire-and-water pool feature combos when considering how those elements will share the space.
The reframe: A rain garden is drainage infrastructure designed as a planted bed. Size it first, then choose plants that suit its conditions.
Hydrozones That Keep Irrigation Honest
Drought-tolerant plants fail all the time, and the usual cause is a controller running one schedule across a mixed bed. The fix is grouping, not shopping. Utah State University Extension recommends grouping plants with similar water requirements into separate hydrozones, such as zero-, low-, medium-, and high-water areas, so one schedule doesn't overwater some plants while stressing others. Established trees and shrubs should generally be watered enough to wet soil to approximately 18–20 inches.
| Hydrozone | Where It Sits | Typical Plants | Irrigation Rule |
|---|---|---|---|
| Zero-water | Areas with no supplemental water | Mulched beds and hardscape edges | Keep outside the irrigation zone |
| Low-water | Edges and areas far from taps | Established shrubs and groundcovers | Water deeply and less often |
| Medium-water | Near patios and entries | Perennials and mixed borders | Give it a separate controller zone |
| High-water | Closest to accessible irrigation | Lawns, annual beds, edible plants | Put it on its own valve |
The layout logic follows the hose. High-water planting, lawns, and vegetables sit where the spigot, drip line, and your own daily route already are. Low-water shrubs and hardscape take the far corners and the strips beside a hot driveway, where watering is expensive and often forgotten. Medium-water perennials cluster near the patio, where you'll see them and can hand-water during establishment.
Group first, then water
Trigger irrigation just before visible water stress, not on a fixed weekly clock. Push a probe or a trowel into the root zone to check moisture below the surface, because the top inch dries long before the roots do. A weather-based controller pulls local evapotranspiration figures and adjusts run times; a soil-moisture controller reads the root zone directly and shuts off when the ground is already wet. Both beat a dial set in June.
Practical rule: if two plants need different amounts of water, they need different valves. Same valve means one of them is being slowly killed.
Three habits keep the system honest. Group every plant by water need before planting, keep the high-water footprint small and close to the tap, and mulch every bed to slow evaporation between cycles.
Texture and Color in Low-Water Planting
Water efficiency does not have to look like gravel and cacti. Homeowners have been voting with their requests: 2025 trend reporting from Martha Stewart notes that requests for low-water and drought-tolerant yards rose 30%, while requests for gravel and permeable surfaces rose only 6% and concrete use fell 13%. People want the water savings without losing shade, bloom, privacy, or a garden that feels familiar.
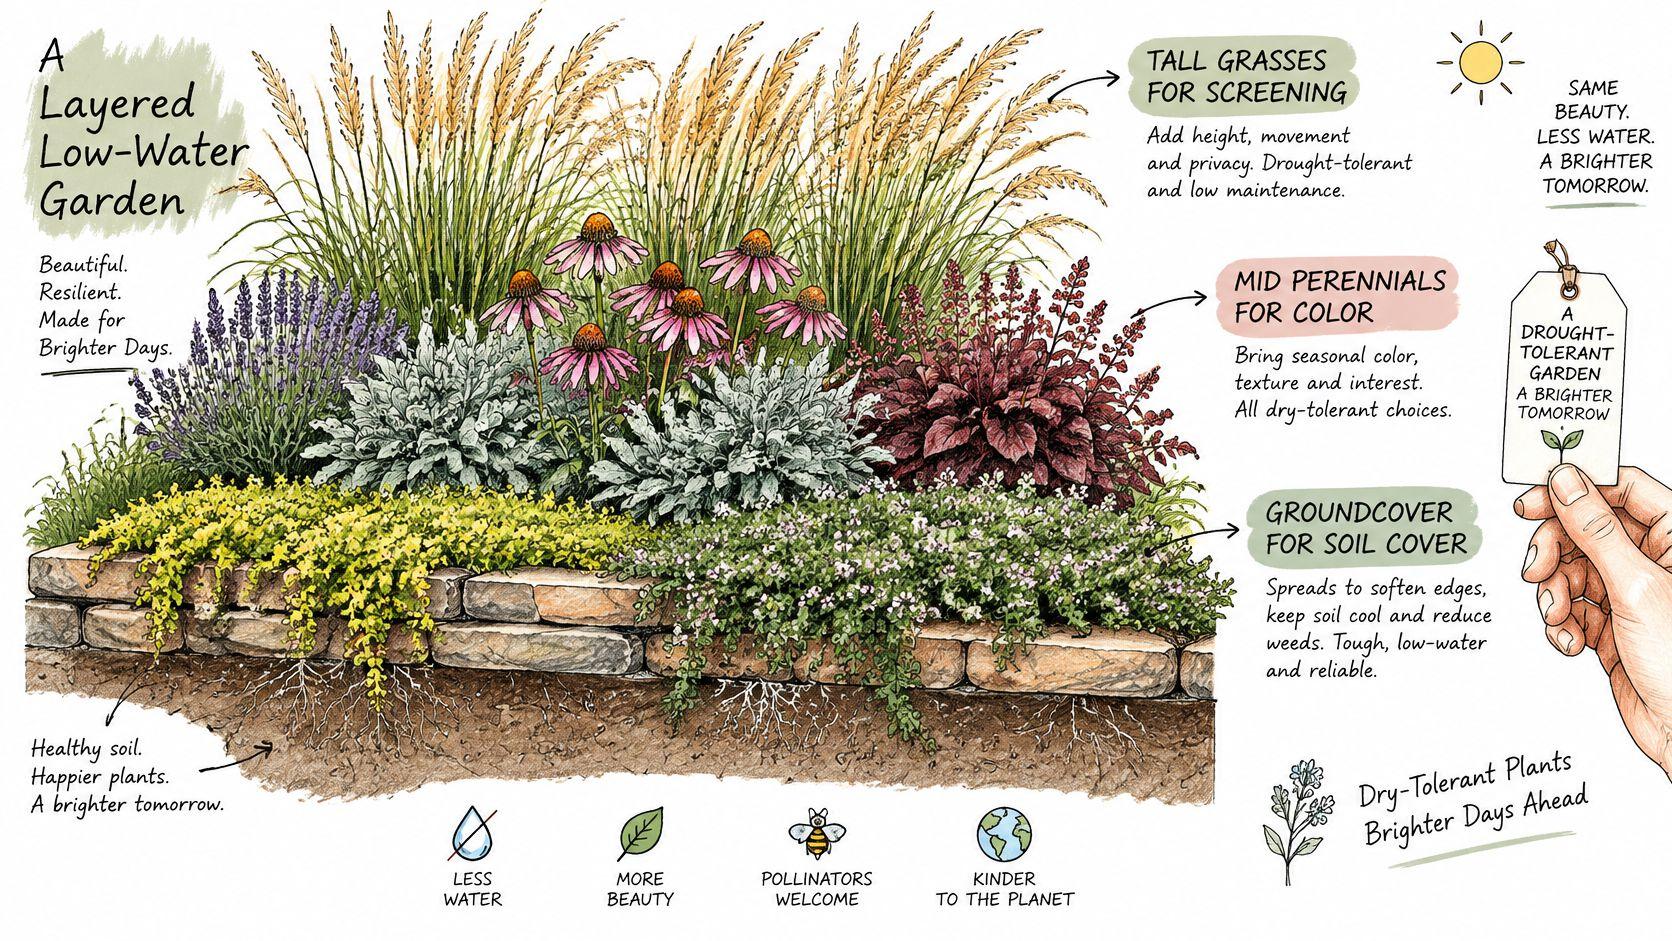
Texture and color are what carry that. Give each plant layer a job instead of filling space:
| Plant Layer | Design Role | Typical Water Need | Texture and Color Contribution |
|---|---|---|---|
| Canopy trees | Shade, height, privacy | Low to medium once established | Bark texture and seasonal leaf color |
| Shrubs | Structure and screening | Low to medium once established | Evergreen form and flowering color |
| Perennials | Seasonal color and layering | Medium, reduced after establishment | Bloom color and fine or bold leaf texture |
| Groundcovers | Covering bare soil | Low once established | Dense, fine texture |
| Edible plants | Productive planting and harvest | Medium to high, sited near irrigation | Leaf and fruit color |
Pick one color story per season
Pick a style and repeat it rather than mixing palettes. Silver-grey lavender and rosemary with warm stone paving reads Mediterranean. Repeating drifts of the same three perennials, in odd-numbered groups of three or five, reads cottage and hides the fact that the bed is water-thrifty. Moss, clipped evergreen, and a single sculptural shrub read Japanese-inspired and need almost nothing once established.
A "native" label proves nothing about maintenance or drought tolerance. Soil preparation, mulch depth, shade exposure, and establishment watering decide how the plant performs.
Hold each zone to one dominant texture plus one contrast. Fine fescue against bold hosta leaves, or strappy grass against rounded shrub foliage, creates the contrast the eye reads as richness. Squint at the bed: if it blurs into one soft mass, you need a bolder shape; if it looks heavy, you need finer foliage.
Then place thirsty color deliberately, in the small high-water zone by the patio where you'll enjoy it and can reach it with a hose.
Access and Circulation for Every User
Ask one blunt question about your own yard. On a wet morning, can someone using a wheelchair, a walker, a stroller, or a cane reach the seating area, the raised beds, the mailbox, and the waste bins without help? Many handsome yards fail that test at the first level change.
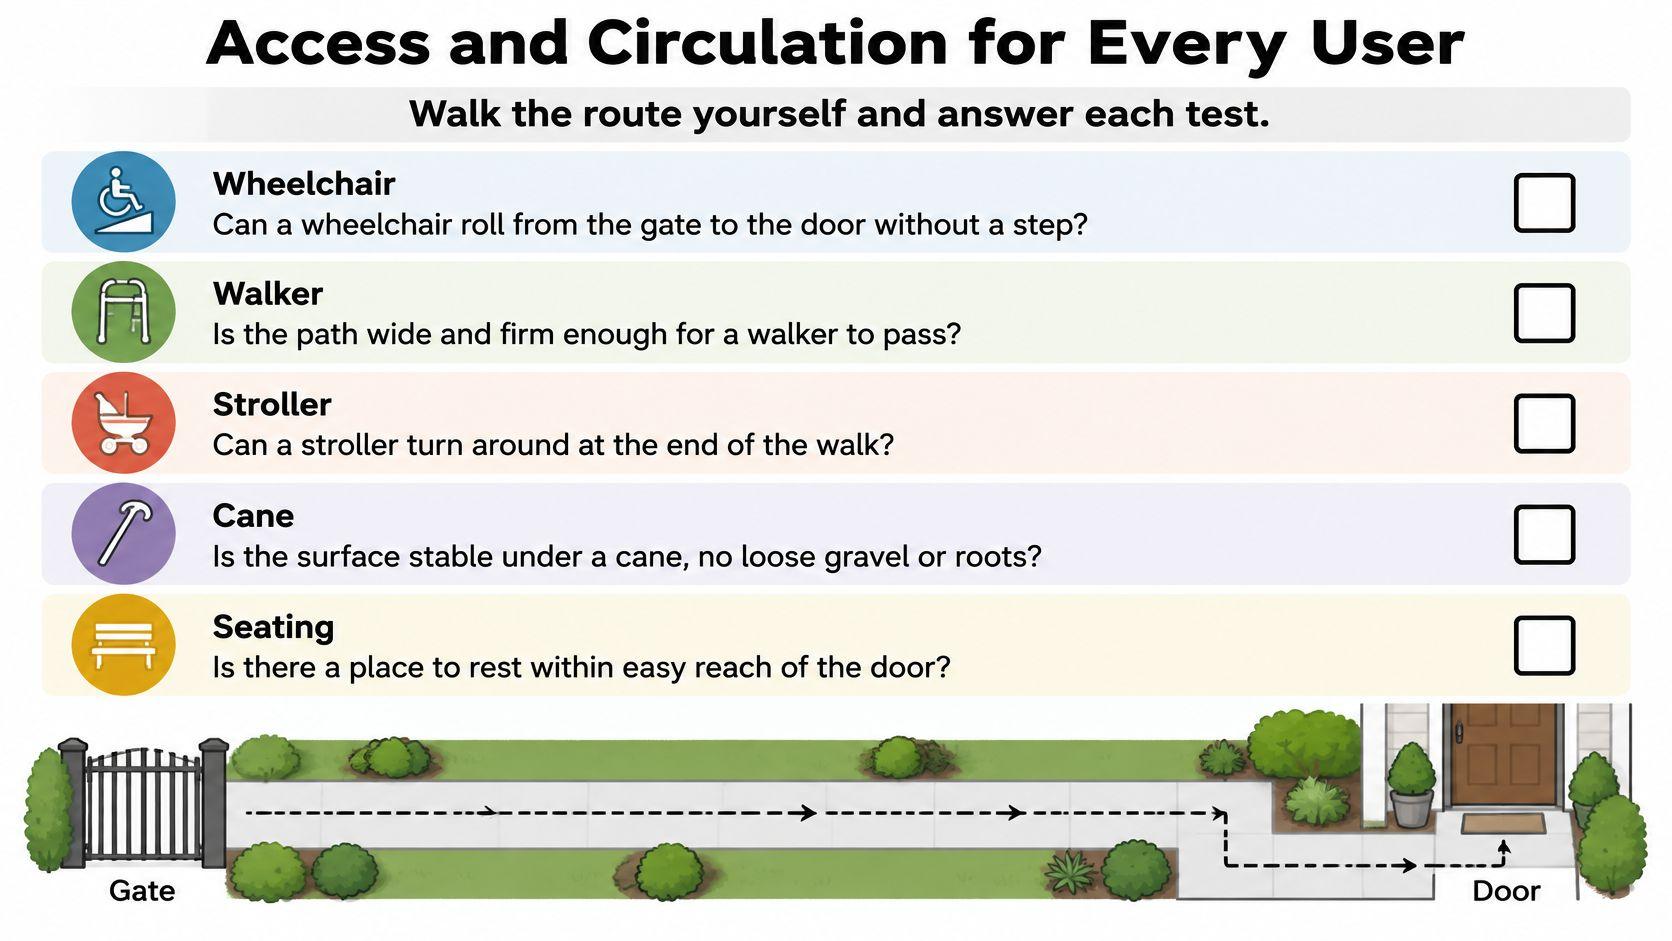
Accessibility isn't institutional. It's a set of dimensions and surfaces that happen to suit everyone: children on scooters, delivery drivers with a hand truck, a guest recovering from knee surgery. Research on user-centered outdoor planning identifies level changes, slopes, tactile features, communication cues, safety, comfort, and functionality as key design parameters, and reports an approximate universally acceptable level-change margin of 12–15 mm, as set out in this study of user-centered outdoor planning. In practice that means ramping a single step, or replacing it with a gentle slope, rather than accepting a two-inch lip at the patio edge.
What an accessible route looks like
Wide, firm, and predictable is the whole idea. A path around four feet wide lets two people pass, or one person turn a wheelchair. Firm and slip-resistant surfaces matter more than pattern: smooth concrete, tight-set pavers, and compacted decomposed granite all work, while loose gravel and bare tree roots don't. Add lighting along the route rather than only at the door, handrails wherever the ground pitches, and a bench with arms partway along it.
Here's the walkthrough most design guides skip.
Where the route is concrete, the finish decides whether it stays usable in wet weather. Concrete sidewalks for homes are worth checking for broom finishes and joint spacing, since a smooth troweled surface turns slick in the rain.
A concept image cannot verify slopes, drainage, surface firmness, or local code, so bring a short list to a contractor:
- Route width and the narrowest pinch point on the path.
- Every level change over the threshold, with a ramp or slope detail.
- Surface specification for the wet-season route.
- Lighting positions and handrail locations.
- Turning space at the seating area and the bin store.
Keep these decisions on the same drawing as the planting. It's far cheaper than planning your yard's zones and grading twice, once for looks and once for access.
Three Yards Where Elements Work Together
Elements don't get judged one at a time. They get judged as a scene, which is why three short examples are more useful than another list of rules.
The narrow front yard. A gently curved walk is the line, and it's the only curve on the property. Two columnar evergreens repeated at the gate and the door are the form. Planters stay below the door height so the scale doesn't crowd the entry, and the fence matches the porch rather than the roofline. The mistake avoided: adding more plants and calling it balance. Repetition did the balancing.
The backyard patio. The fire pit is the focal point, but it isn't the biggest object. A pergola on one side carries the visual weight, offset by two tall planters on the opposite corner, which is deliberate asymmetry rather than symmetry. The lawn edge runs straight to the pit, so the line points at the thing you want people to walk toward. The mistake avoided: assuming a focal point must be the largest element in the frame.
The dry-climate side yard. A small canopy tree supplies shade, evergreen shrubs give privacy along the fence, groundcover closes the soil under the tree, and one flower color sits in the sunny bed. A hydrozone boundary separates the shadier, thirstier groundcover from the sunny low-water shrubs. Texture comes from leaf size and bark, not from a sheet of gravel. The mistake avoided: mixing so many textures that a small yard fragments into unrelated patches.
Use the closest yard as a template. Name its line, its dominant form, and its color limit before you sketch anything of your own.
Small finishing decisions belong in the same pass. A short yard decor guide from Farmhouse World is useful at this stage for settling material and container choices that support the structure you've already set, rather than introducing a new shape into it.
Confirm Your Elements on Your Own Yard
The next step is one photo, not a new shopping list. Stand at your main viewing point in daylight and photograph the whole yard, then mark six tests on that image.
- Line: draw the main path or bed edge as a single stroke.
- Form: circle the dominant silhouette. If you circle five, that's the finding.
- Scale: compare its height with the house wall and with a person standing beside it.
- Color and texture: note one color story per season and one deliberate texture change.
- Balance: check whether the visual weight has all drifted to one side.
- Access: trace a wheelchair, walker, stroller, or cane from the gate to seating, beds, mailbox, and bins on a firm surface.

From that one photo, OutdoorBrite gives you realistic redesign concepts back in seconds, which is useful for comparing two versions of the same yard before money moves. Use ai for garden design to test a curved walk against a straight one, or a light low-water palette against a richer mixed border, on your actual house and lot rather than someone else's show garden.
Treat the result as a visual concept for planning. Designs are not construction documents, engineering or architectural plans, surveys, or professional planting, horticultural, legal, or financial advice. Before you buy a plant or break ground, verify feasibility, plant suitability, materials, drainage, utilities, permits, and cost with a licensed architect, contractor, or horticulturist.
Finish by sketching the three most important elements on the photo in your own hand. Those three are your project.
OutdoorBrite turns one photo of your backyard, garden, patio, or front yard into realistic redesign concepts in seconds, so you can test a straighter path, a lower fence, or a low-water bed in your own setting before spending on plants or pavers. Upload the same photo you used for the six tests, pick a style such as Mediterranean or xeriscape, and compare the concepts side by side. Visit OutdoorBrite to see your yard's design elements working together as a plan you can judge.
See your yard reimagined
Start creating